

Making decorated cookies for Easter doesn't have to be hard! Using a few basic cookie cutters (ahem...some plain ol' circles!) and my signature sugar cookie recipe, I've got you covered with some simple and adorable ideas for Easter sugar cookies.
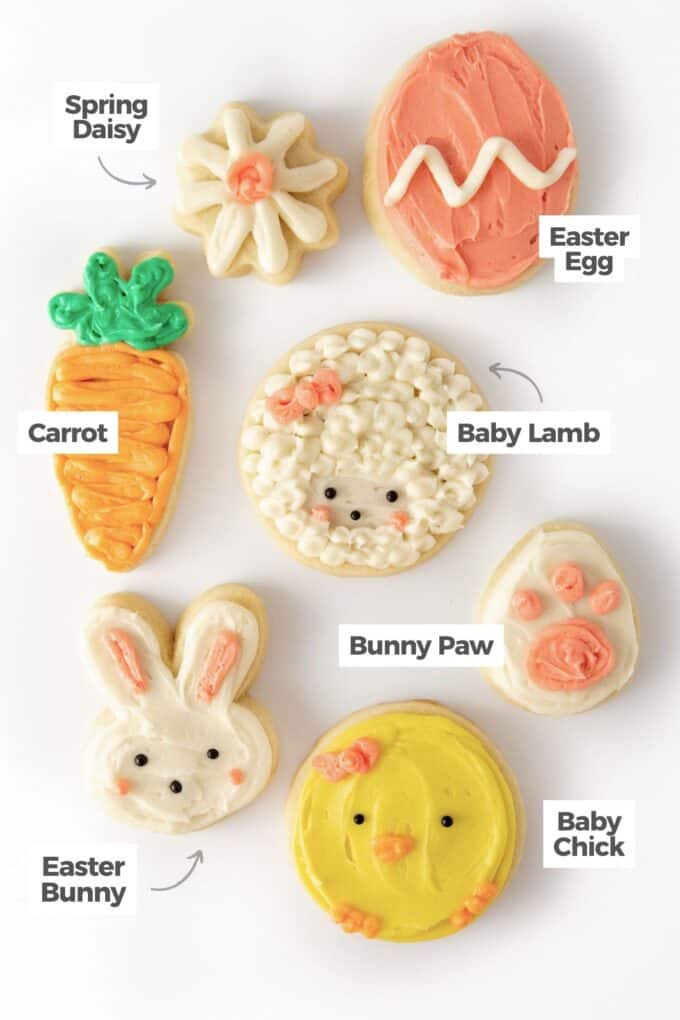
Jump to specific cookies: Flower | Egg | Bunny | Lamb | Carrot | Bunny Paw | Baby Chick
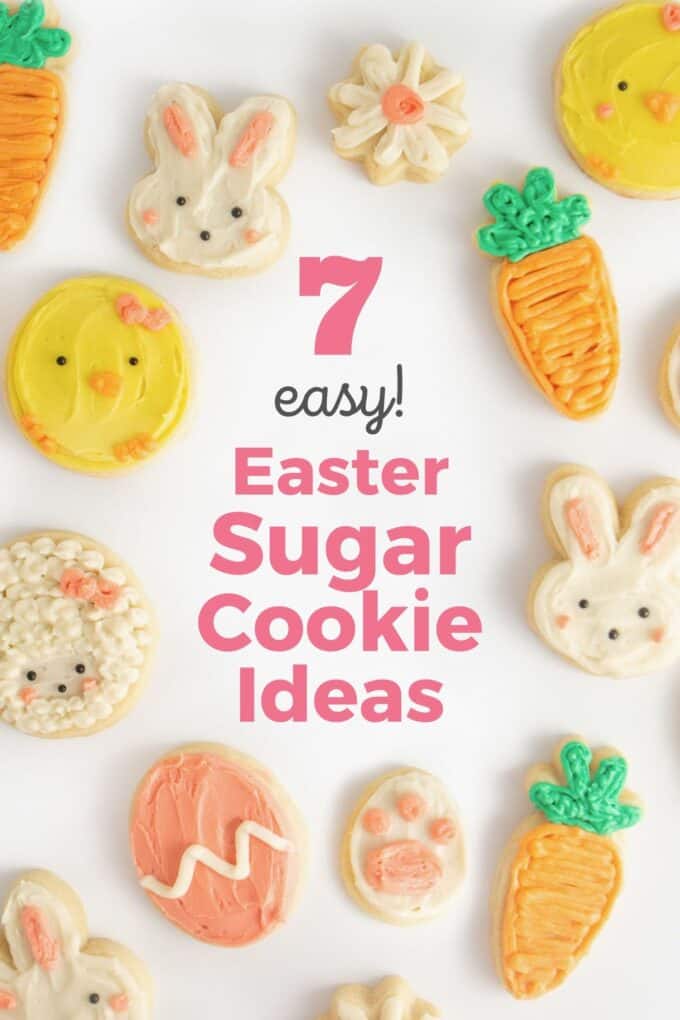
Decorated Easter Cookies MADE EASY
- Perfect for beginners: If you are a first-time baker or cookie decorator, then this is the perfect place to start since these Easter designs are rather simple to decorate! My sugar cookie recipe is easy to follow and the buttercream frosting is simple enough to make in just a few minutes.
- Use premade dough: Don't worry if you don't have time to bake the sugar cookies homemade. Just pick up some Pillsbury sugar cookie dough, bake them, and decorate them instead!
- Great for Easter baskets: Wrap up these decorated cookies for Easter and add them as gifts in baskets for kids, teachers, or friends.
Ingredients Needed For Sugar Cookies:
- My Signature Cut-Out Sugar Cookie Dough (or try my Fluffy Sugar Cookies!)
- Buttercream Frosting
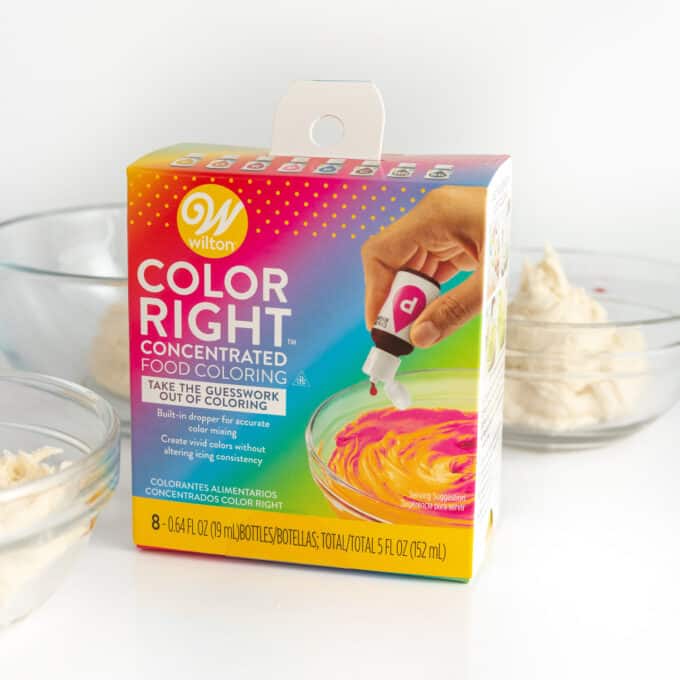
- Food Coloring (I'm using the Wilton Color Right Set)
- Black pearl sprinkles, mini chocolate chips, or mini M&M's (these are for the eyes!)
- Tools: You'll also need a rolling pin (read more about my favorite rolling pin here), parchment paper, Easter cookie cutters, piping bags, and butter knife or offset spatula
Tip: Don't have a rolling pin? Make my frosted sugar cookie bars instead and cut out the shapes after they're baked!
How To Make Decorated Easter Cookies
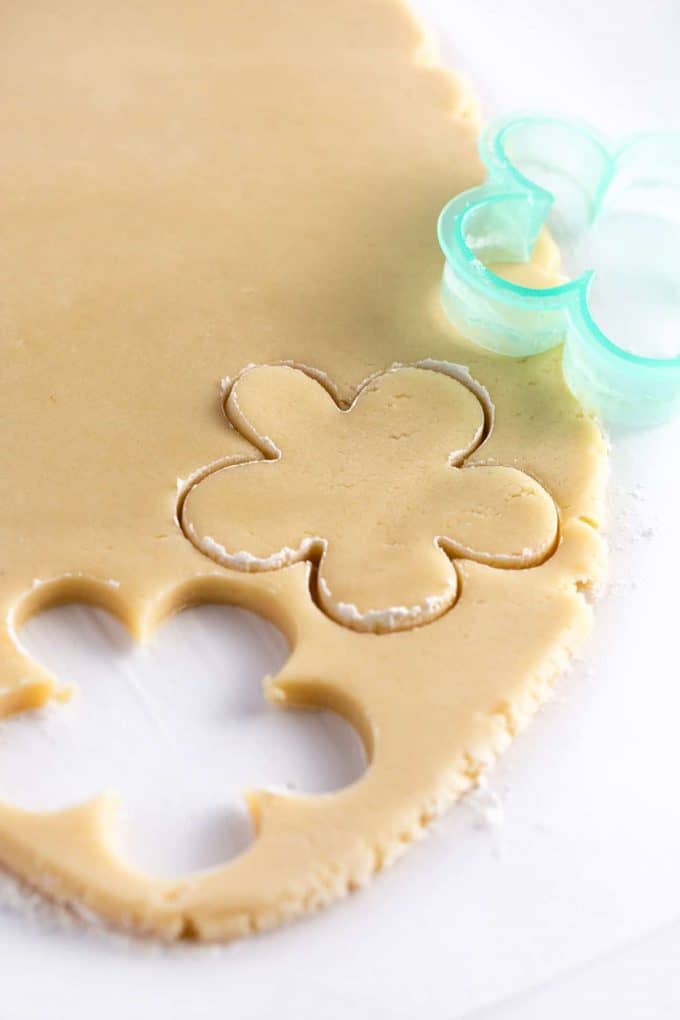
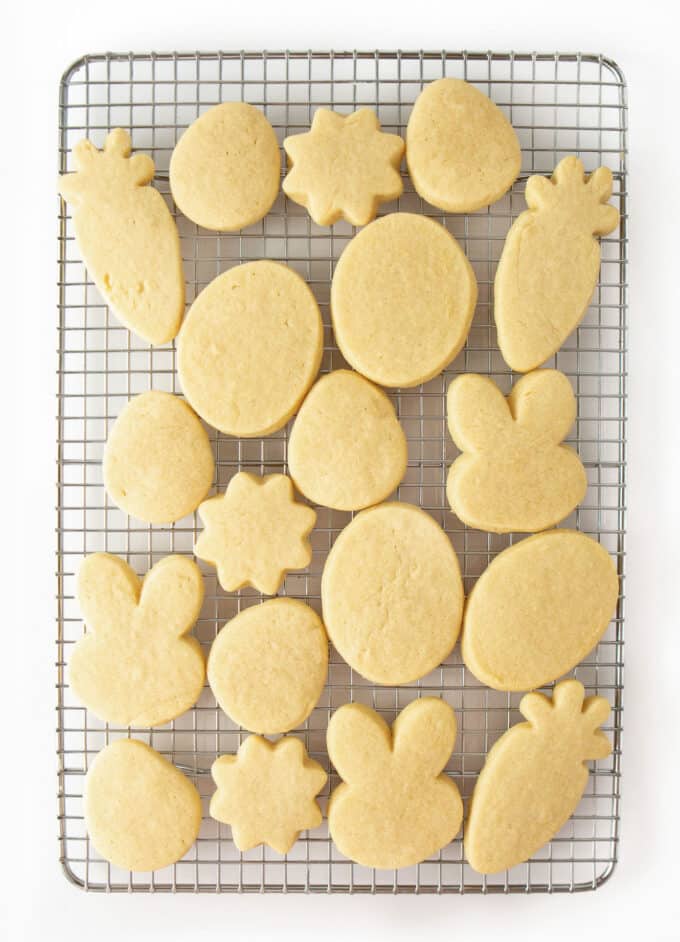
Step 1: Make Dough, Cut Shapes, and Bake
The first step is to follow the instructions in the recipe card below and make some classic sugar cookie dough. Once you do, your cookie dough will be ready to be rolled out. In each idea below, I've listed the cookie cutters (or hacks!) you can use to create each shape.
If you're new to sugar cookies, I highly recommend checking out my guide on how to perfectly roll out sugar cookie dough!
Tip: Want to make the dough ahead of time and roll it out later? Learn all about how to freeze sugar cookie dough!
Step 2: Make Buttercream Frosting
Using my easy buttercream frosting recipe as the base for all 5 colors, add in food coloring to get the perfect shades to use for these Easter cookie designs. I've included my simple formulas using the Wilton Color Right Set to achieve these pastel shades.
- Coral Frosting: For every 1 cup of frosting, use 1 swipe Wilton Red + 1 swipe of Wilton Yellow.
- Orange Frosting: For every 1 cup of frosting, use 4 drops of Wilton Orange and + 2 drops of Wilton Yellow.
- Green Frosting: For every 1 cup of frosting, use 4 drop Wilton Blue + 4 drops Wilton Yellow.
- Yellow Frosting: For every 1 cup of frosting, use 4 drops of Wilton Yellow & 1-2 swipes Wilton Orange.
- Mint Frosting: For every 1 cup of frosting, use 2 swipes Wilton Blue + 2 swipes of Wilton Yellow.
Tip: If you want your frosting to be pure white, make sure to use clear extracts because using regular vanilla extract will make the frosting slightly off-white. You can also add a TINY amount of purple food coloring to make a dingy off-white color more white (use my toothpick trick to do that).
Step 3: Decorate!
To make it as easy as possible, I am going to share how I decorated each cookie design and any tips I may have.
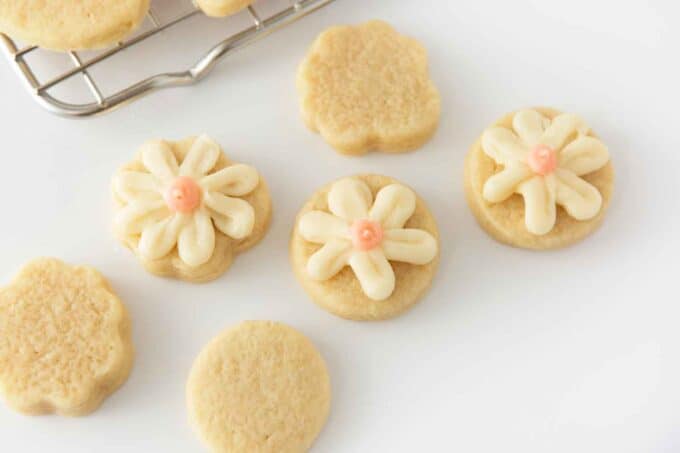
Idea 1: Flower Cookie
These flower cookies are the easiest to decorate out of all the Easter cookie decorating ideas I am sharing today! You can make this cookie with or without a flower cookie cutter, as it works great with a simple circle!
- Cut with Flower Cookie Cutter: Use a flower-shaped cookie cutter or just a small circle (a champagne glass works great!)
- Pipe White Lines: Using a piping bag and a small round tip, pipe white stripes for the petals. It's easiest to star in the middle and then "loop" out and back in.
- Add Pink Dot: Then, pipe one small pink round dot in the middle of the flower.
Tip: You can leave the cookie as is, or you can decorate it with some white sanding sugar or pink sugar sprinkles.
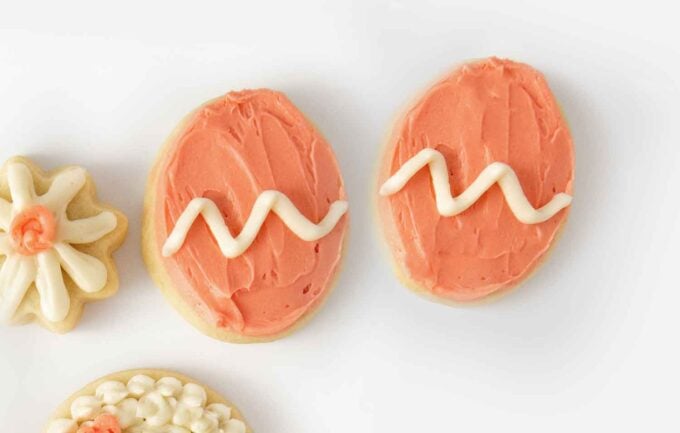
Idea 2: Easter Egg Cookie
You can make easter eggs with a simple circle, egg shape, or oval cookie cutter! You can use any of the colored buttercream frostings for this one but I went ahead and used pink and white.
- Cut Cookies: use a egg cookie cutter or a plain circle and the "squish" in the top sides after cutting with a butterknife.
- Spread Frosting: Pipe or spread the buttercream evenly onto the cookie (if piping, create an outline, fill in, then smooth).
- Add Zig Zag or Dots: Use another color frosting to add zig-zags, polka dots, or any other design that you want.
Tip: Finish it off with sprinkles or some edible cookie glitter!
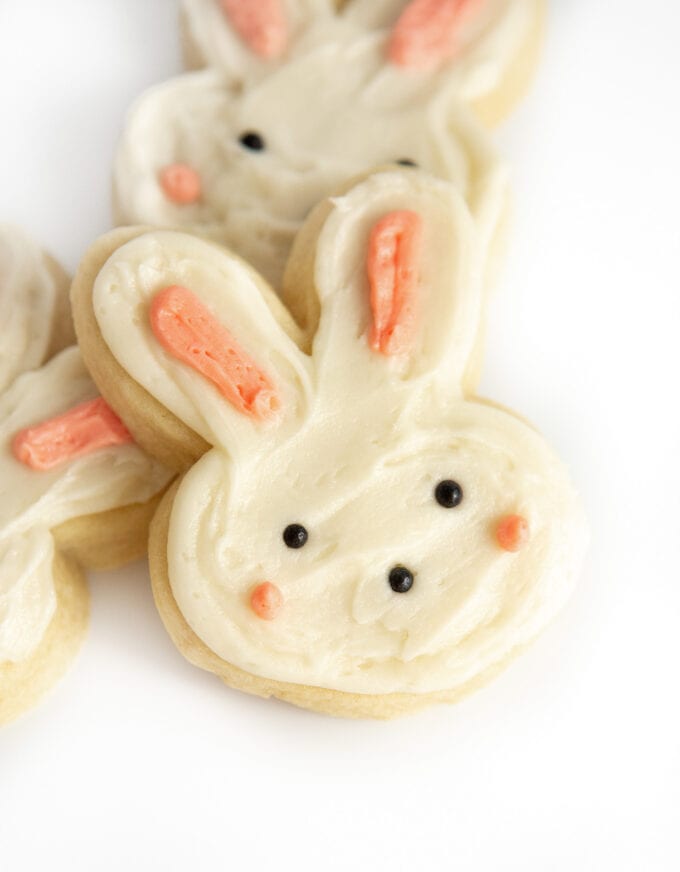
Ideas 3: Easter Bunny Sugar Cookie
What is a collection of Easter cookies without the bunny? These are so easy and super adorable too! You can make these Easter bunny shaped cookies using any bunny cutter you can find, simply adapt to the exact shape you have!
- Cut Cookies: Use a bunny-shaped cookie cutter.
- Spread Frosting: Using a piping bag or knife, spread white frosting on your cookie.
- Add Pink Accents: Use a piping bag to add pink or coral icing for the ears and cheeks.
- Press on Eyes: Press on two black sprinkles or mini chocolate chips for the eyes and nose.
Tip: You can also use brown M&M's (I like using the mini ones!) or mini chocolate chips for the eyes, similar to how I made my 5 EASY Christmas Cookies for Kids!
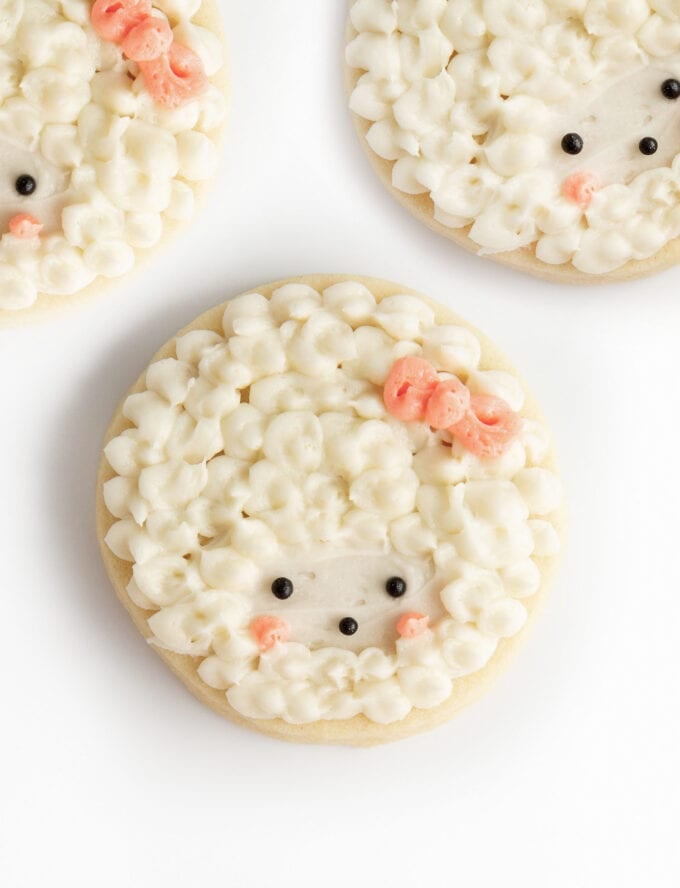
Idea 4: Lamb Cookie
This fluffy little lamb is the cutest cookie on the list. I love him so much I could cry and he would make the cutest cookie for baby shower cookies!
- Cut Circle Cookies: Use a circle cookie cutter or glass cup to cut out shapes.
- Spread frosting for face: Use a small amount of frosting to spread a small circle on the bottom ⅓ of the face. This will be the flat part for the face.
- Pipe fluff: Using a piping bag, add small dots of white frosting all over the cookie (avoiding the smooth circle you just added for the face). This is the lamb's wool.
- Press on Eyes: Add three black sprinkles, mini brown M&M's, or mini chocolate chips for the eyes and nose.
- Add bow: Use a small round piping tip to pipe on a small pink bow (optional).
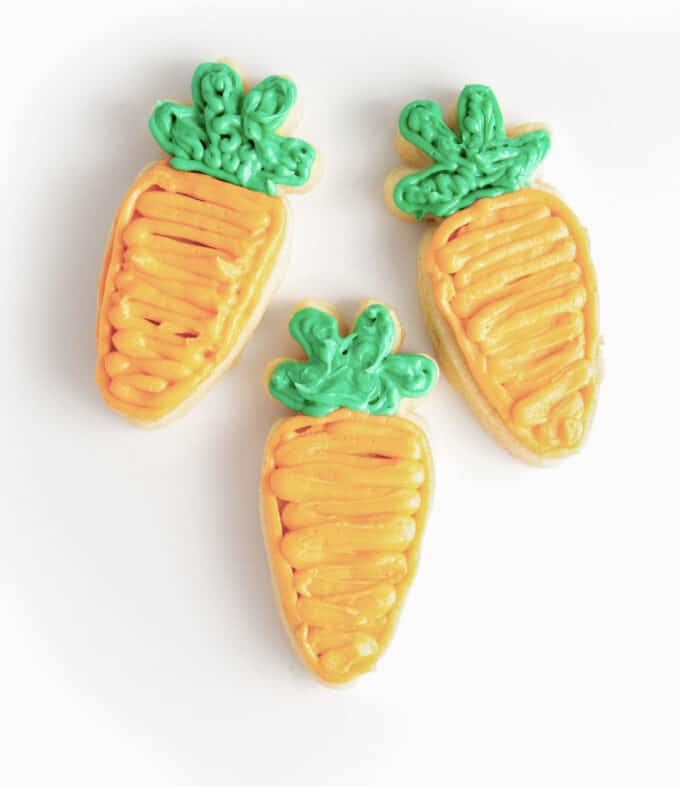
Idea 5: Carrot Cookie
If you have bunny cookies, you of course need to also have carrots for the bunny!
- Cut Cookies: Use a carrot shaped cookie cutter
- Add orange frosting: Spread or pipe on the orange frosting for the bottom of the carrot. I like to first outline the edges then fill in the center.
- Pipe on green frosting: Pipe on the green frosting on the top where the leaves are; I like to use a round piping tip and do "squiggles" to give it texture.
- Smooth, if desired: If you want, use a small knife to smooth out the frosting.
Tip: Don't have a carrot-shaped cookie cutter? You can simply freehand the carrot shape with a sharp knife.
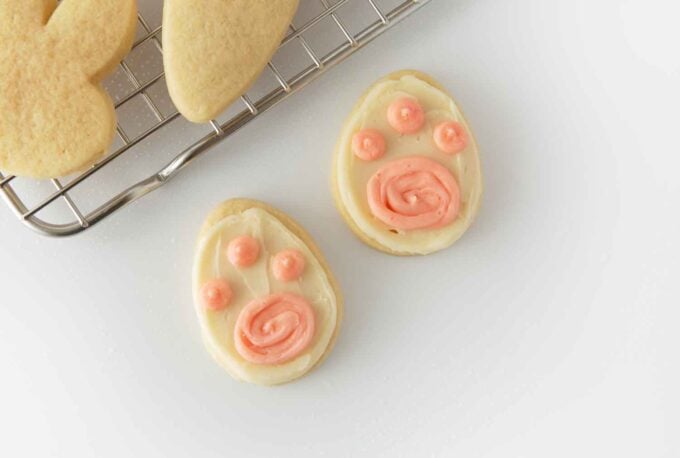
Idea 6: Easter Bunny Paw Print Cookie
These little paw prints are so easy to decorate that kids will have fun making them. Pair them with the easter bunny shaped cookies above for a fun pairing!
- Cut cookies: use an egg-shaped cookie cutter or round circle to cut out. If using a circle, simply use a butterknife after cutting the dough to "squeeze" in the top edges to create a egg shape.
- Spread Frosting: Spread or pipe on the white icing.
- Add Pink Dots: Use a piping bag or ziploc bag with the corner snipped off to pipe one large pink dot in the middle and three smaller pink dots above it - this is the shape of the bunny paw print.
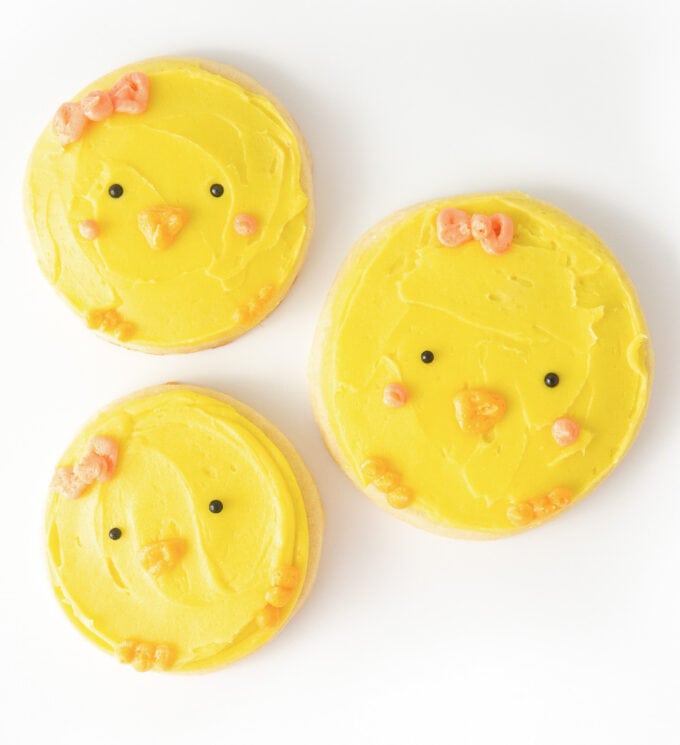
Idea 7: Yellow Easter Chick Cookie
Now, for the last Easter cookie! This is my favorite circle Easter cookie, as you can make it with a simple circle cup!
- Cut cookies: Use a round cookie cutter or glass cup to cut out shapes.
- Spread frosting: Spread or pipe on the yellow icing.
- Add face details: Using a fine tip, gently pipe orange icing for the small beak and three little dots at the bottom for the chickie's feet. If desired, pipe on a cute little bow with pink frosting.
- Add eyes: Add two black sprinkles, mini brown M&M's, or mini chocolate chips for the eyes.
Tip: You can also use M&M's to create a similar face (turn the orange one sideways for the beak). See my Easy Decorated Snowman Cookies for inspiration!
Frequently Asked Questions:
What are other kinds of frostings or icings?
Besides buttercream, there are several other types of frosting you can make to add to your sugar cookies:
- Easy Sugar Cookie Icing = This is my favorite choice anytime you are making designs with just one color.
- Cream Cheese Frosting for Cookies = This is delicious, but it doesn't harden very well. It's best for simple spreading but not great for decorating details.
- Easy Sugar Cookie Glaze = The glaze is runnier, definitely not as thick as the buttercream. If you use the glaze, I suggest dipping the cookies and using just one color.
- Royal Icing = This is a perfect option for those sugar cookies if you using detailed designs. The icing fully hardens and holds onto the design.
How long do sugar cookies last?
After you decorate them, these cute Easter sugar cookies will last for up to 3-4 days. In order for them to last this long, you should store them in an airtight container.
These cookies are also freezer-friendly! They will stay fresh in the freezer for up to 2 months. The best way to thaw them is to let them sit out at room temperature for 1-2 hours before enjoying them.
How do you decorate Easter cookies with royal icing?
This royal icing recipe tells you everything you need to know. Start by using a piping bag to outline the cookie. Then, fill it in with your first layer. Smooth out the icing with a toothpick and let it harden before adding more colors on top.
FREE Easter sugar cookie decorating class & eBook!
Watch the class replay here and download the eBook by entering your email below! Includes the sugar cookie & frosting recipes, as well as pastel color formulas. Check your email for the link to download!

Decorated Easter Sugar Cookies
Ingredients
⭐️ Before you begin! If you make this, will you do me a huge favor afterwards and leave a review and rating letting me know how you liked this recipe? This helps my small business thrive so I can continue providing free recipes and high-quality content for you.
Instructions
- Preheat oven to 350°F degrees.
- In a large bowl, cream together the unsalted butter (¾ cup, i.e. 1 ½ sticks) and granulated sugar (¾ cup) on medium speed for 20-30 seconds. Mix in egg (1 large), vanilla extract (2 teaspoons), and almond extract (1 teaspoon). Add in baking powder (1 teaspoon), salt (½ teaspoon), and all-purpose flour (2 cups) and mix until combined.
- Transfer to a flour-covered surface and use a rolling pin to roll the dough ⅜" to ½" thick. Use cookie cutters to cut out dough.
- Bake at 350℉ for 8-10 minutes. Depending on size of your cookie cutter and thickness of dough, you may need to bake for a few extra minutes (small cookies less than 2" will bake for less time, closer to the 8 minutes). Allow to cool before decorating.
- Spread or pipe frosting on top of cooled sugar cookies and decorate as desired, using the tips and tricks in the blog post above!
- Store in airtight container for 2-3 days or freeze for later.