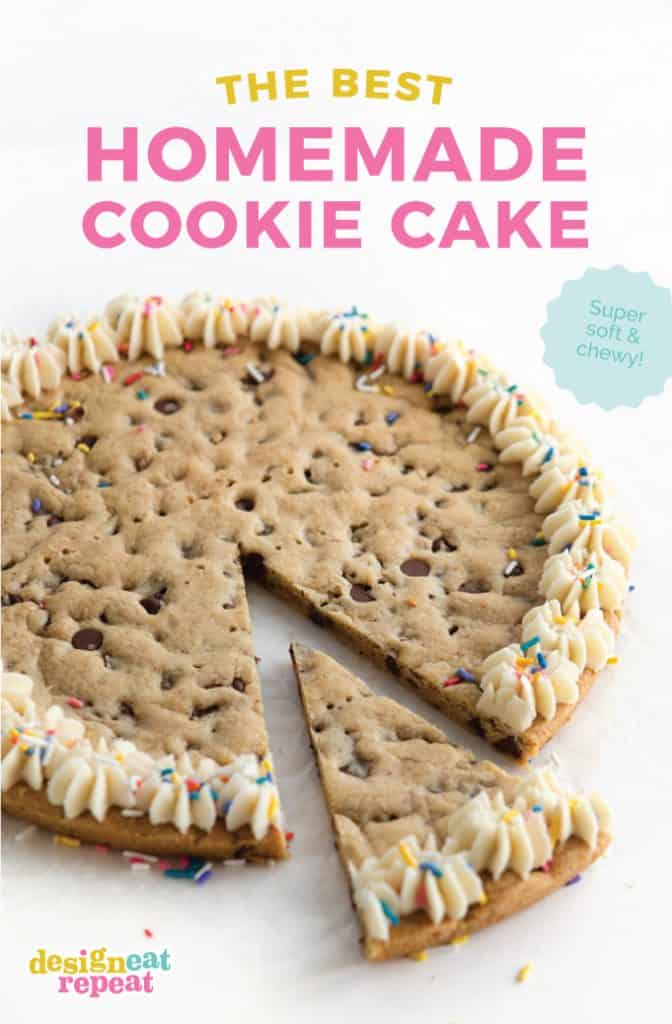
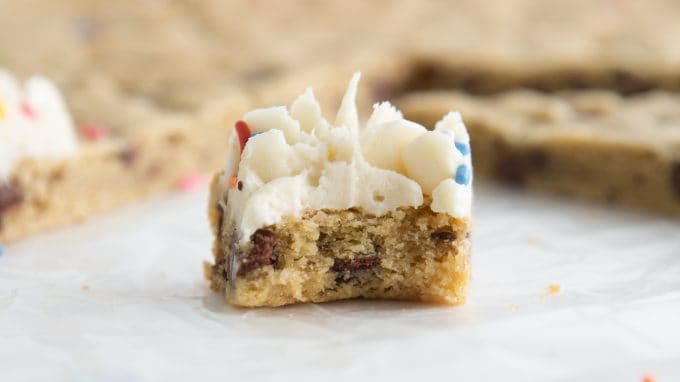
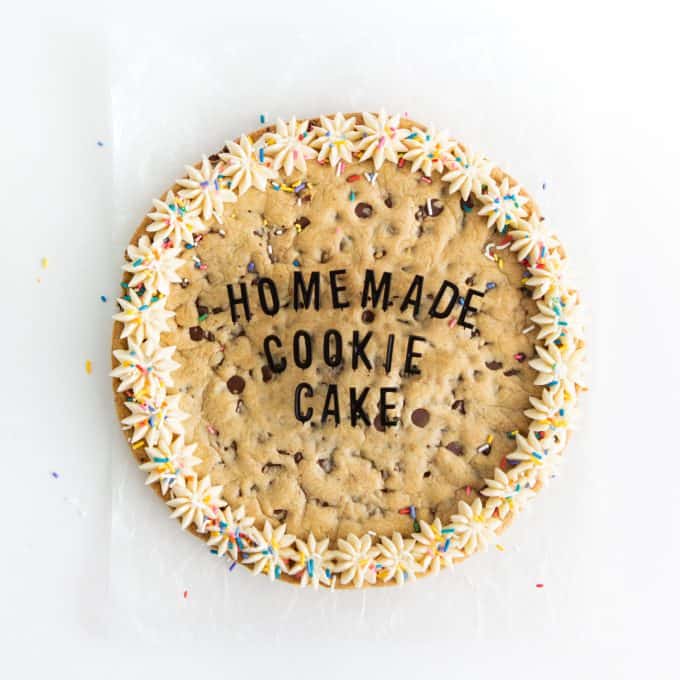
This easy and Chewy Cookie Cake Recipe is the perfect way to celebrate birthdays or other special occasions! It tastes so much better than store-bought and only costs about $8 to make! Leave unfrosted or top with my favorite vanilla buttercream and sprinkles for a simple homemade cake!
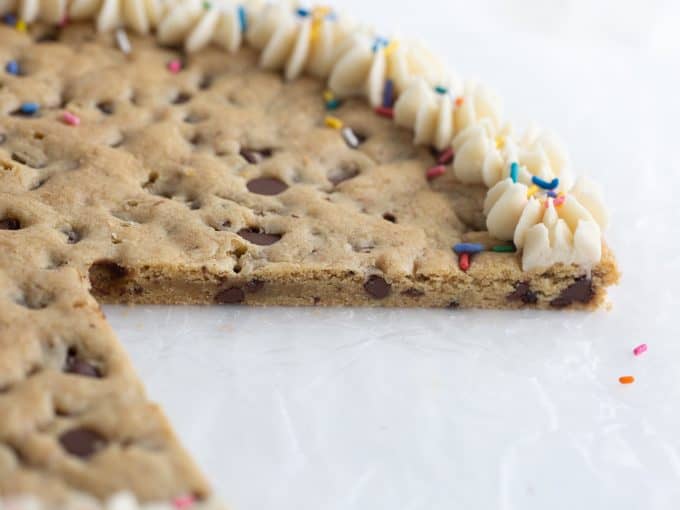
Use melted butter and mix by hand: The melted butter in this chocolate chip cookie dough makes it super smooth and helps it bake up into the perfect chewy, yet sturdy cookie. Rather than whipping air into it and making the dough light and fluffy, mixing by hand allows it to have a denser texture (and also makes it easier to press into the pan as it's not sticky!).
Spread into a 11" Metal Round Pan (or a 9x13 metal pan or DIY foil cookie cake pan): The key to the perfect cookie cake is only spreading the dough to be about ½" thick. If you use a smaller pan, the dough will be thicker and require a longer baking time. If you use a larger pan, the dough will be spread too thin and result in a crispy cookie.
Do Not Overbake: This is the trick to the perfect, SOFT, chewy cookie cake. Take it out when the top is slightly brown and the center looks like it is baked through. My oven bakes the perfect cookie cake in 12 minutes in my 11" pan, but you just want to keep a close eye on it to prevent it from baking too long (no one likes crunchy cookie cakes!).
Allow to FULLY cool before removing from pan: To remove from pan, use a knife to go around the edges, place a flat platter or baking sheet on top (must be larger than the cake and not be indented in the middle), then flip over the pan to remove. If you used parchment paper, this should come out rather smoothly. After flipping over the cookie cake, flip it over again on the final decorate plate or platter.
What You Need to Make This Cookie Cake Recipe:
For the Cookie Cake: butter, white sugar, light brown sugar, 1 egg, vanilla extract, baking soda, baking powder, flour, and semi-sweet chocolate chips.
For the Homemade Frosting (optional): butter, powdered sugar, vanilla extract, salt, and a little milk.
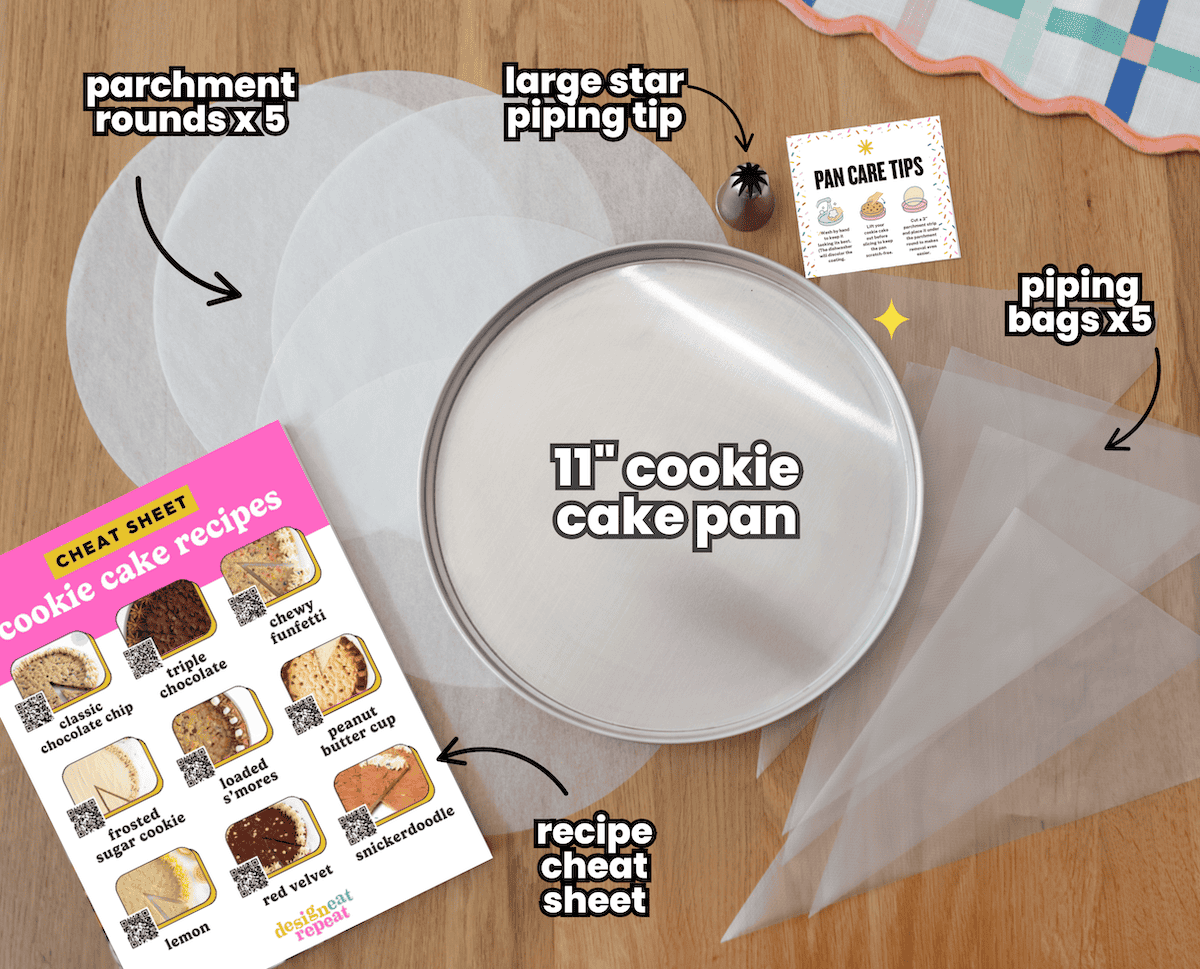
11" Round Cookie Cake Pan(don't have one? scroll for alternatives & instructions!)
With Wilton discontinuing their cookie cake pan, I've created a bundle with everything you need to bake the perfect cookie cake at home. Investing in your own pan means you can skip the cost of store-bought cookie cakes and enjoy fresh, homemade ones anytime.
Use it for this Homemade Cookie Cake Recipe or any of my cookie cake flavors!
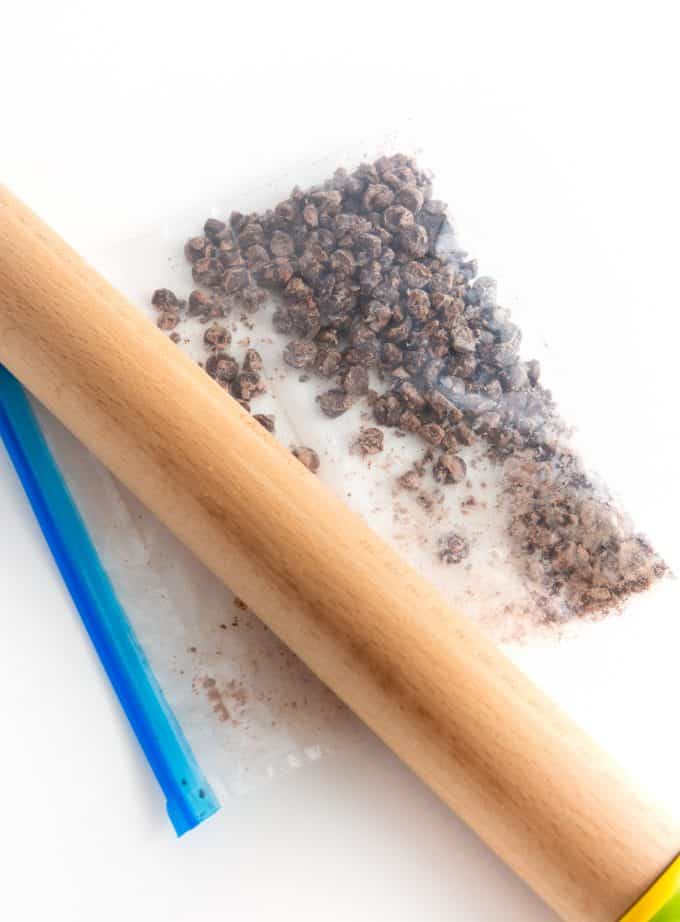
Place ½ cup of the chocolate chips on a cutting board and use a large knife to chop into small pieces (set the other ½ cup of unchopped chocolate chips aside).
The goal here is to have a mixture of tiny chocolate flakes throughout the dough, while still have the whole chunks in there for texture. Once chopped, set aside.
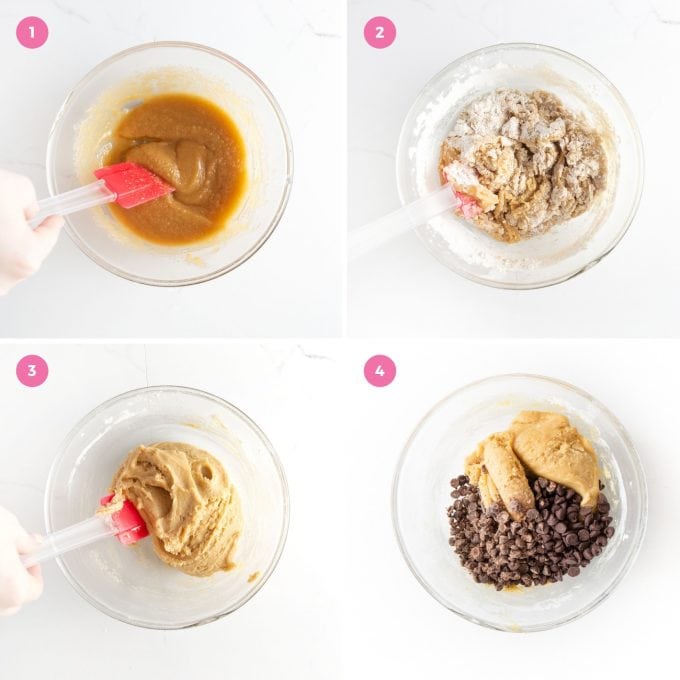
Step 2: Melt Butter & Add Ingredients
In a small microwave-safe bowl, melt the butter for 20-30 seconds until JUST melted (you don't want it piping hot).
Transfer butter to a larger mixing bowl and add in white sugar and brown sugar. Use a spatula (don't use a mixer!) to stir by hand until combined. Mix in egg. Next, add in baking soda, baking powder, and salt and mix again.
Add flour and mix until all the flour disappears into the dough. Lastly, add the ½ cup of chopped chocolate chips and ½ cup of whole chocolate into the dough and mix.
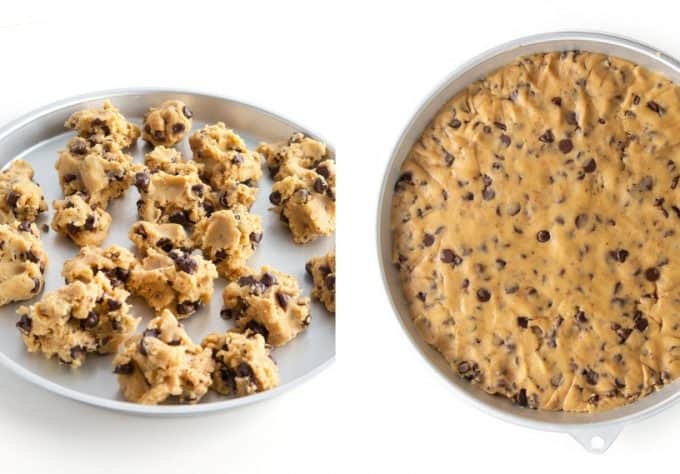
Step 3: Press Dough Into Pan
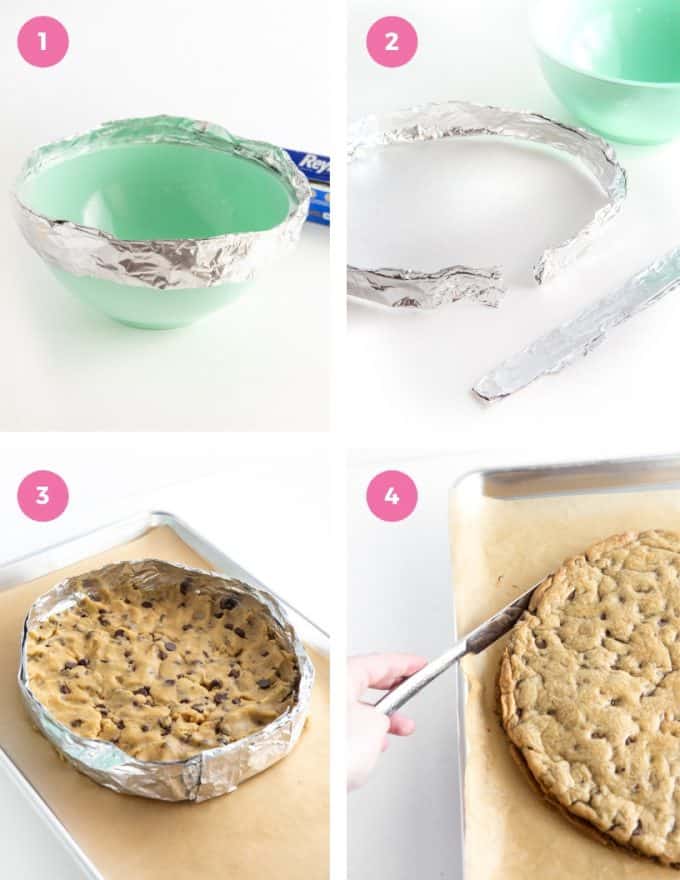
Grease a 11" metal cookie cake pan (don't have one? See tip below). Although this cookie removes cleanly, if you are worried about it sticking, line the bottom and sides of the pan with parchment paper first.
Using a spoon or your clean hands, drop the dough into small chunks in the pan. This will help disperse everything so that you can easily smooth it out.
Once all dough as been added, use a spatula or your hands to press down the dough into a smooth layer (being sure to get all the corners). This method is my best tip to make a cookie cake evenly.
Tip: If you notice 2-3 chocolate chips are stuck together, separate them before baking. This will allow the chocolate to be evenly dispersed and prevent the cookie from having a giant clump of chocolate in one spot (which could cause it to more easily break while cutting).
Don't have a round 11" pan?
You can bake in a 9x13 metal pan (they'll be a little thinner so watch the oven around the 12 minute mark). You can use the baking time in my Chewy M&M Cookie Bars as a guide.
Create a DIY cookie cake pan using a large mixing bowl (that is about 11" in diameter) with aluminum foil (scroll to FAQ section for instructions). Because you don't have as much heat from a real metal pan, these typically take an extra 4-6 minutes to bake.
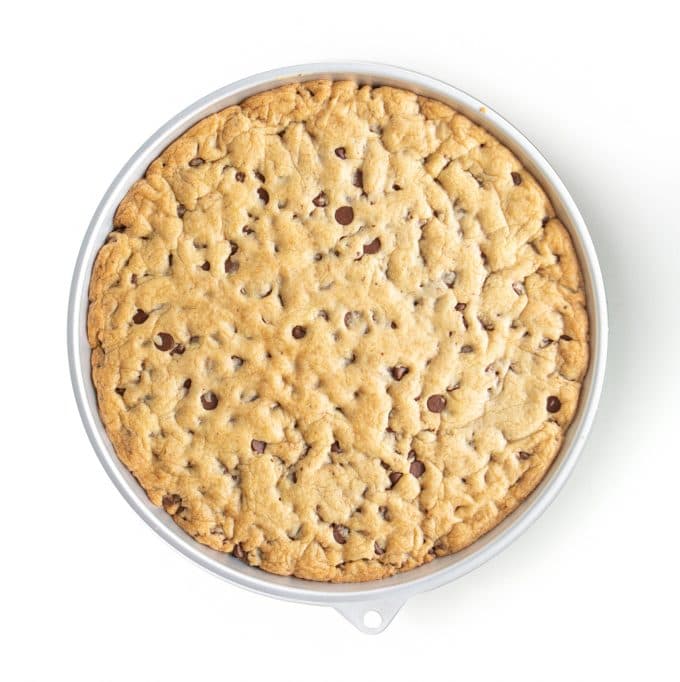
Step 4: Bake
Bake at 350 degrees for 12-14 minutes - do NOT overbake or your chocolate chip cookie cake will not be soft.
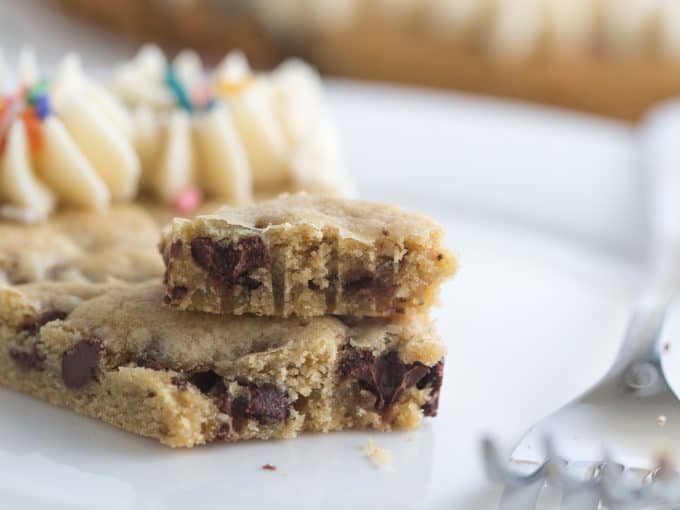
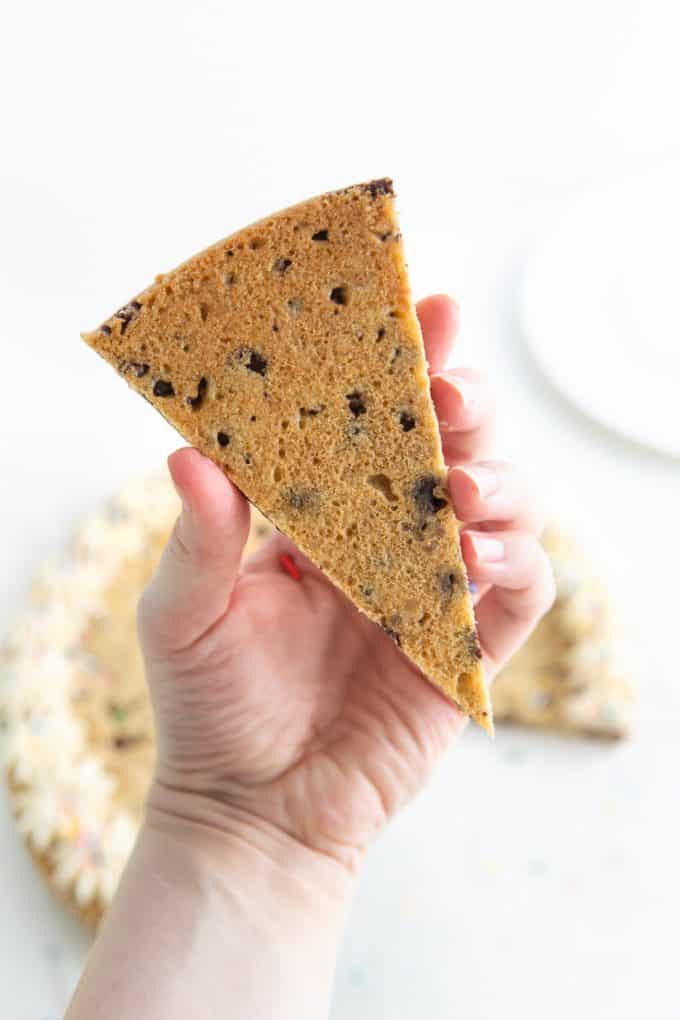
How do you know when cookie cake is done? The top should be slightly brown (see below) and the center baked through. The cookie may still look slightly underbaked but this is the trick to a soft, chewy cookie. If you overbake it and it gets too brown, you will have a crunchy cookie cake. Allow the cookie cake to cool completely before removing.
To remove from pan: use a knife to go around the edges, place a flat platter on top, then flip over the pan to remove. If you used parchment paper, this should come out rather smoothly. After flipping over the cookie cake, flip it over again on the final decorate plate or platter.
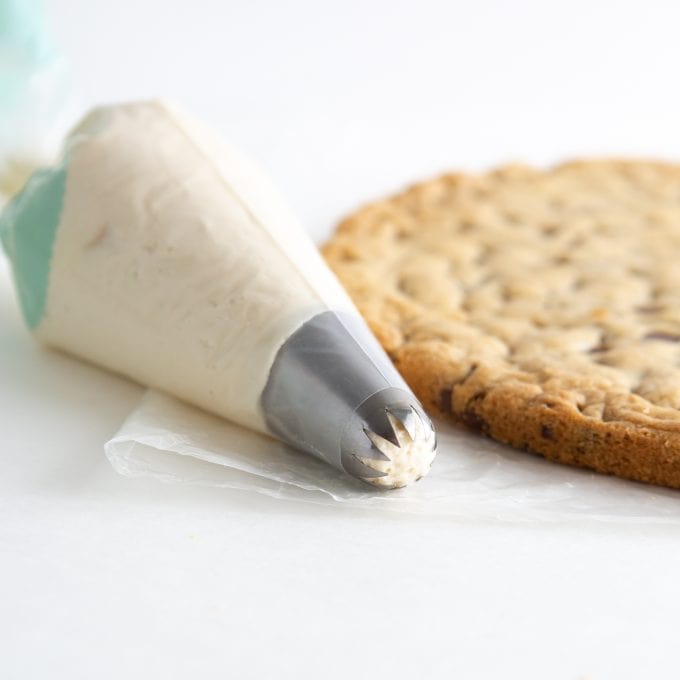
Step 5: Pipe or Spread Frosting
Use the instructions in the recipe card below to make my homemade vanilla buttercream (it tastes like ice cream!) or you could also use canned frosting.
Using a large star piping tip, pipe around the edges then immediately add sprinkles (the frosting will start hardening quick, so add sprinkles right away!).
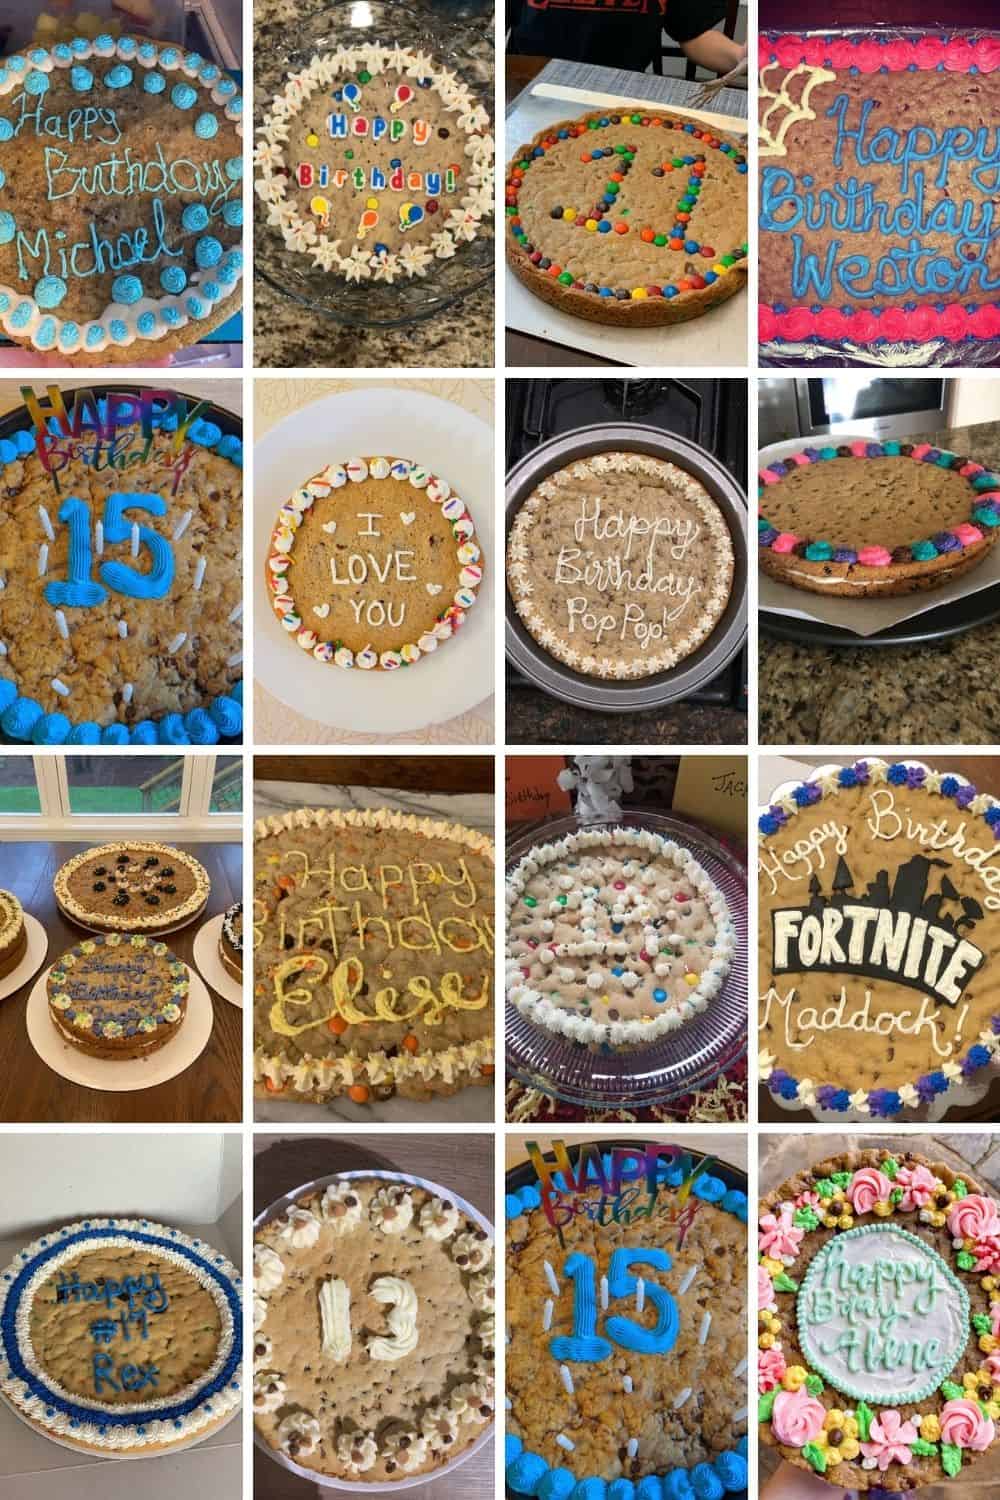
If you're feeling fancy, pipe phrases like "Happy Birthday" on the top with frosting (although this can be risky unless you're a skilled frosting writer!), pipe a large number using my number stencils in my Giant Birthday Cookie Cake post.
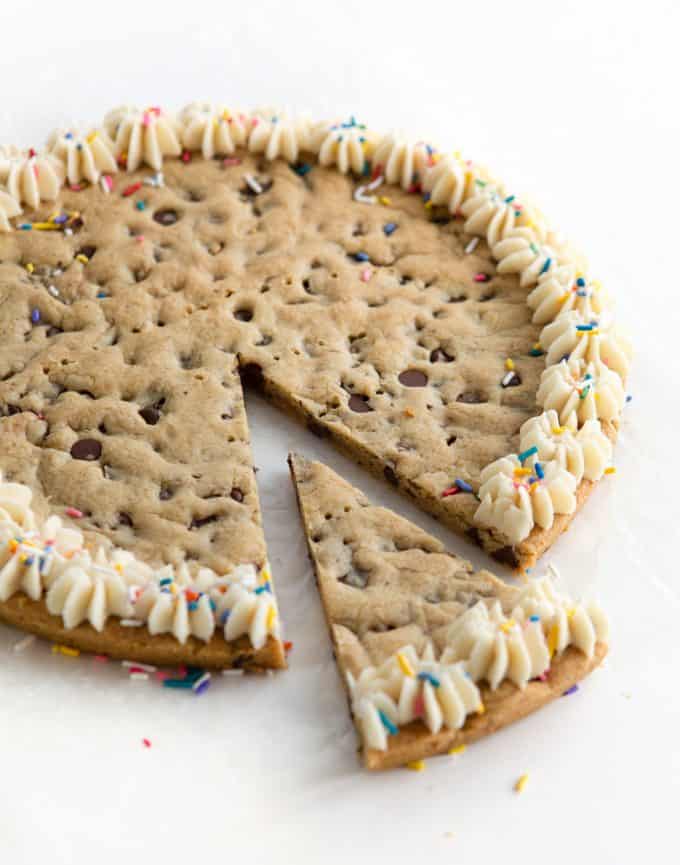
Step 6: Slice & Enjoy!
Use a sharp, large knife to cut. Depending on how many you're needing to feed, cut the cookie cake in normal triangles or in smaller squares.
Frosting/Freezing Notes :
Frosting Note: This homemade buttercream will start developing a crust, which makes it a great frosting to make a day ahead. Because of the sugar content, you don't need to refrigerate the frosted cookie cake if you plan to enjoy it within 1 day. If you are making ahead earlier, I'd suggest waiting to frost until day of OR gently wrap the frosted cookie after the frosting sets and place in the fridge.
Storing/Freezing/Make Ahead Tip: I don't typically like refrigerating freezing chocolate chip cookies because I feel like they get dry and not as chewy in the freezer. If you do need to make this in advance, you could wrap the baked, unfrosted cookie in plastic wrap and when you're ready to eat it, let it thaw to room temperature then frost.
Frequently Asked Questions:
What if I don't have a cookie cake pan?
Don't have a round 11" cookie cake pan? You can bake in a 9x13 metal pan (they will just be a little thinner, so you may need to bake a couple minutes less) OR create a DIY cookie cake pan using the instructions below. Super easy to do!
Take about 2.5 feet of aluminum foil and fold it a few times to create a long skinny strip. Wrap that strip around the top of a large mixing bowl (that is about 11" in diameter) to use as your guide.
Remove it from the bowl then take a smaller strip to secure the two ends closed, completing the circle.
Place the foil ring on a parchment-lined baking sheet then press dough into the middle, trying not to let any slip below the bottom ridge of the foil (it should all be contained within).
Bake. Because you don't have as much heat from a real metal pan, these typically take an extra 4-6 minutes to bake through. Immediately after baking, carefully remove foil ring then use a butter knife to push in any rough edges. You're not going have as clean of edges as you would with a real pan, but the foil ring definitely helps create a wall rather than having the cookie spread onto the pan.
Do you keep cookie cake in the fridge?
You can but you don't have to. If unfrosted, this cookie cake will be good covered/wrapped at room temperature for 2-3 days. If you use homemade frosting, I would refrigerate it if not eaten within a day (the sugar content in the frosting will help it not go bad as fast).
That said, I find that chilling cookie cakes will typically dry them out a bit so for the freshest flavor and texture, I wouldn't make this more than a day or two ahead of when you plan to eat.
Can I make this into a layered cookie cake?
You sure can! To do this, make two 11" cookie cakes, double the icing recipe, then spread half of the frosting between the two cookies and the remaining to pipe on top.
With a layered cookie cake being a little richer in flavor with the additional frosting, you can cut it into smaller squares or wedges.
Crushing half the chocolate chips will give you a more evenly dispersion of chocolate AND help so that it cuts more cleanly. Sometimes the reason cookie cakes break while cutting is because there are two many clumps of chocolate chips. So I definitely recommend taking an extra minute to do this - it really helps the overall texture!
How to write on a cookie cake?
If you want to write on a message, you will likely need to thin down the frosting a bit with more milk (not much though, only a teaspoon or two!). But you want to know my life hack to this these days? Order one of these adorable letterboard cake topper kits (the letters are plastic!) that you can reuse for YEARS to come to write ANY message!
Can I double this cookie cake recipe?
You can, but you still want to make sure the dough is only ½" thick once spread in the pan (so you would need a larger pan than 11"). Note that thicker dough will require longer baking times and won't be as much like the traditional, chewy cookie cake recipe you may be used to.
How much does this cookie cake recipe cost to make?
A store-bought cookie cake will likely run you around $20 and if you're getting one from somewhere like Mrs. Fields or Great American Cookies, those can go upwards to $40. If you've already got the staples on hand (like sugar and eggs), then this homemade cake cake costs less than $6-8 to make!
Does this taste like the Great American cookie cake recipe or the cookie cakes you get at Walmart or Publix?
For years, I tried recreating the chewy texture of store-bought cookie cakes and while I wouldn't say this is an EXACT match, I would say that it's pretty dang close! I actually like this homemade cookie cake more than those (the frosting is so much better and doesn't have that fake taste), which are words that I didn't think I'd ever say.
What occasions can I make this homemade cookie cake recipe?
Birthday Cookie Cake: Top with frosting, sprinkles, and add a Happy Birthday message on top!
Valentine's Day Cookie Cake: Line a baking sheet with parchment then shape the dough into a large heart (or use a heart shaped pan!). Then pipe red or pink frosting along the edges and top with sprinkles.
Easter Cookie Cake: Line a baking sheet with parchment then shape the dough into a large egg shape (or use a egg shaped pan!). Then spread frosting on the top and pipe on the squiggly lines and polka dots to make it look like an easter egg.
Here's what readers have to say about on Pinterest about this homemade cookie cake:
"Omg this was the easiest and best tasting cookie cake! My husband said I will never have to buy him great American cookie again, this tasted so much better!" - Jade
"This recipe is perfect! My family and friends all beg for me to make this!" - Allie
"This was a HUGE hit! Perfect mixture of crunchy edges/top, and soft chewy middle. Will never use another recipe for cookie cakes! Delicious!" - Kristen
The perfect way to celebrate birthdays or other special occasions! It tastes so much better than store-bought and only costs about $8 to make! Leave unfrosted or top with my favorite vanilla buttercream and sprinkles for a simple homemade cake!
½cupunsalted butter (1 stick), You will be melting this
½cuplight brown sugar, packed
¼cupgranulated sugar
1large egg
1 ½teaspoonvanilla extract
½teaspoonbaking soda
¼teaspoonbaking powder
¼teaspoonsalt
1 ½cupsall-purpose flour
1cupsemi-sweet chocolate chips, You'll be chopping (½ cup) and adding the remaining (½ cup) whole
Frosting
¼cupunsalted butter (½ stick), softened to room temperature
1 ¼cupspowdered sugar
¾teaspoonvanilla extract
pinch of salt
1-2tablespoonsmilk
⭐️ Before you begin! If you make this, will you do me a huge favor afterwards and leave a review and rating letting me know how you liked this recipe? This helps my small business thrive so I can continue providing free recipes and high-quality content for you.
Instructions
Preheat oven to 350℉.
Place ½ cup of the chocolate chips on a cutting board and use a large knife to chop into small pieces (set the other ½ cup of unchopped chocolate chips aside). The goal here is to have a mixture of tiny chocolate flakes throughout the dough, while still have the whole chunks in there for texture. Once chopped, set aside.
In a small microwave-safe bowl, melt the ½ cup unsalted butter (1 stick) for 20-30 seconds until JUST melted.
Transfer butter to a larger mixing bowl and add ¼ cup granulated sugar and ½ cup light brown sugar and use a spatula to stir until combined (* do not use a mixer!). Add in 1 large egg and 1 ½ teaspoon vanilla extract, then mix. Next, add in ½ teaspoon baking soda, ¼ teaspoon baking powder, and ¼ teaspoon salt and mix again. Add in 1 ½ cups all-purpose flour and mix until all the flour disappears into the dough.
Add the ½ cup of chopped chocolate chips and ½ cup of whole chocolate chips into the dough and mix. Immediately proceed to pressing into pan (you don't want the dough sitting out or it will set too much with the melted butter).
Grease a 11.5" metalcookie cake pan (don't have one? See notes below.) Although this cookie removes cleanly, if you are worried about it sticking, line the bottom and sides of the pan with parchment paper first. Using a spoon or your clean hands, drop the dough into small chunks in the pan. This will help disperse everything so that you can easily smooth it out. Once all dough as been added, use a spatula or your hands to press down the dough into a smooth layer (being sure to get all the corners).Tip: If you notice 2-3 chocolate chips are stuck together, separate them before baking. This will allow the chocolate to be evenly dispersed and prevent the cookie from having a giant clump of chocolate in one spot (which could cause it to more easily break while cutting).
Bake at 350℉ degrees for 12-14 minutes - do NOT overbake or your chocolate chip cookie cake will not be soft. You want the cookie cake to be slightly brown on the top and look slightly underbaked (my oven was perfect at 12 minutes). Remove from oven and place entire pan on a cooling rack. Allow the cookie cake to cool completely before removing.
Tip: To remove from pan, use a knife to go around the edges, place a flat platter on top, then flip over the pan to remove. If you used parchment paper, this should come out rather smoothly. After flipping over the cookie cake, flip it over again on the final decorate plate or platter (I LOVE these cute paper trays and the largest one in the pack is perfect for a 10" cookie cake).
Using a large star piping tip, pipe around the edges then immediately add sprinkles (the frosting will start hardening quick, so add sprinkles right away!).
If you're feeling fancy, you can double the frosting recipe to have enough to pipe phrases like "Happy Birthday" on the top.
To Make Frosting:
Beat the softened ¼ cup unsalted butter (½ stick) on medium-high speed for 2-minutes until smooth. Turn the mixer to low speed then add the powdered sugar ¼ cup at a time (1 ¼ cups powdered sugar total). You may need to stop and scrape down sides. Add ¾ teaspoon vanilla extract and a pinch of salt and turn mixer to medium speed. One tablespoon at a time, add 1-2 tablespoons milk. Beat on high for 2-3 minutes until creamy and the frosting is at a good consistency to pipe. If it looks too runny, add more powdered sugar. If it looks too stiff, add a tiny bit of milk until you get to the desired consistency.
This will make just enough frosting to pipe a border along the edges. If you would like more frosting to cover the top or to write words on top, simply double the frosting recipe!
Notes from Melissa
I'm confused on the size of the Wilton cookie cake pan you linked to - is it 10" or 12"? The Wilton website technically calls it a 11.5″ since that's the bottom diameter but the packaging says it's a 11.5. So it is often referred to as a 10" or 12" pan.Don't have a round 11.5" pan?
You can bake in a 9x13 pan (they'll be a little thinner) OR
Create a DIY cookie cake pan using a large mixing bowl (that is about 11.5" in diameter) with aluminum foil (see instructions in FAQ section in post). Because you don't have as much heat from a real metal pan, these typically take an extra 4-6 minutes to bake.
Frosting Tip: This homemade buttercream will start developing a crust, which makes it a great frosting to make a day ahead. Because of the sugar content, you don't need to refrigerate the frosted cookie cake if you plan to enjoy it within 1 day. If you are making ahead earlier, I'd suggest waiting to frost until day of OR gently wrap the frosted cookie after the frosting sets and place in the fridge.Freezing/Make Ahead Tip: I don't typically like freezing chocolate chip cookies because I feel like they get dry and not as chewy in the freezer. If you do need to make this in advance, you could wrap the baked, unfrosted cookie in plastic wrap and when you're ready to eat it, let it thaw to room temperature then frost.Can I double this recipe? You can, but you still want to make sure the dough is only ½" thick once spread in the pan (so you would need a larger pan than 10"). Note that thicker dough will require longer baking times and won't be as much like the traditional, chewy cookie cake recipe you may be used to.Gluten-Free: For those asking, I turned this popular recipe into the best Chey Gluten-Free Cookie Cake!Nutrition information is just an estimate but based on 12 servings.


The reviews did not lie, this recipe is INCREDIBLE and so fast and easy!
Turned out great but I’d omit the salt in the icing. Ended up tasting that and it was a bit weird. Next time I’d just leave it out.
Great recipe and was easy to make.
Thanks for sharing this recipe ☺️
So happy it was easy and delicious. Thanks for trying it!
Just as good, if not better, than a store bought cookie cake! I have made this three times for my family now and every time they rave about it!
That's the best kind of review!
So happy to have found this recipe. My family are big fans of cookie cakes for Birthday celebrations. Absolutely wonderful.
So glad your family loves it!