
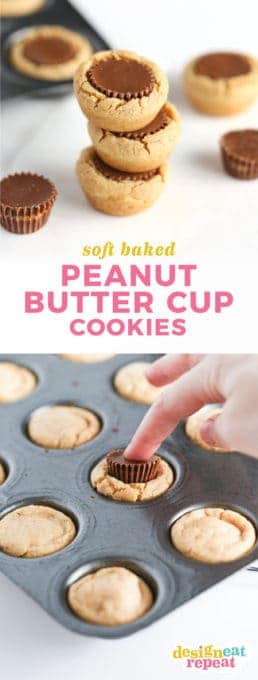
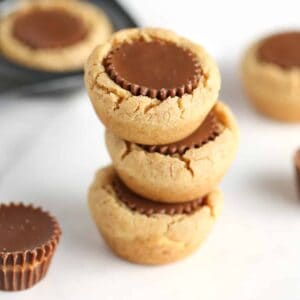
The BEST recipe for soft Reeses Peanut Butter Cup Cookies! Simply bake the cookies in a mini muffin tin then press a miniature Reeses cup into the center of each one. Whip up in under 30 minutes - no dough chilling required!
⭐⭐⭐⭐⭐
"My absolute fave. SO happy to have finally found a staple recipe that I can keep for all the holidays to come- these little guys are the best!" - Karly
The trick to making these Reeses Peanut Butter Cookies so soft!
- Do not overbake! The trick to making these super soft is to only bake them for 8 minutes. A minute or two longer and you'll have a crunchy, brown cookie (which isn't bad if you like crunchy cookies, but I like mine soft!).
- Use homemade dough: While you can make these Reeses cookies with premade dough, I will say that the extra work to make these homemade is SO worth it. They are melt-in-your-mouth delicious and are one of those recipes that friends ask me to make time and time again.
Ingredients for Reeses Peanut Butter Cup Cookies
Jump down to the full recipe card for the recipe amounts and condensed recipe instructions. You only need a handful of ingredients to make peanut butter cup cookies from scratch!
- Unsalted Butter
- Creamy Peanut Butter
- Brown Sugar & Granulated Sugar
- Vanilla Extract
- 2 Eggs
- Baking Soda
- All-Purpose Flour
- Miniature Reeses Peanut Cups (60 total) ** see note below
- Tools: Mini Muffin Tin or Cookie Sheet (either work!)
Note: You need to buy the miniature Reeses that are individually wrapped. Not the newer "Minis" that come in a resealable bag, as those are too small. You can also make these with mini dark chocolate or white Reeses peanut butter cups!
How to Make Peanut Butter Cup Cookies
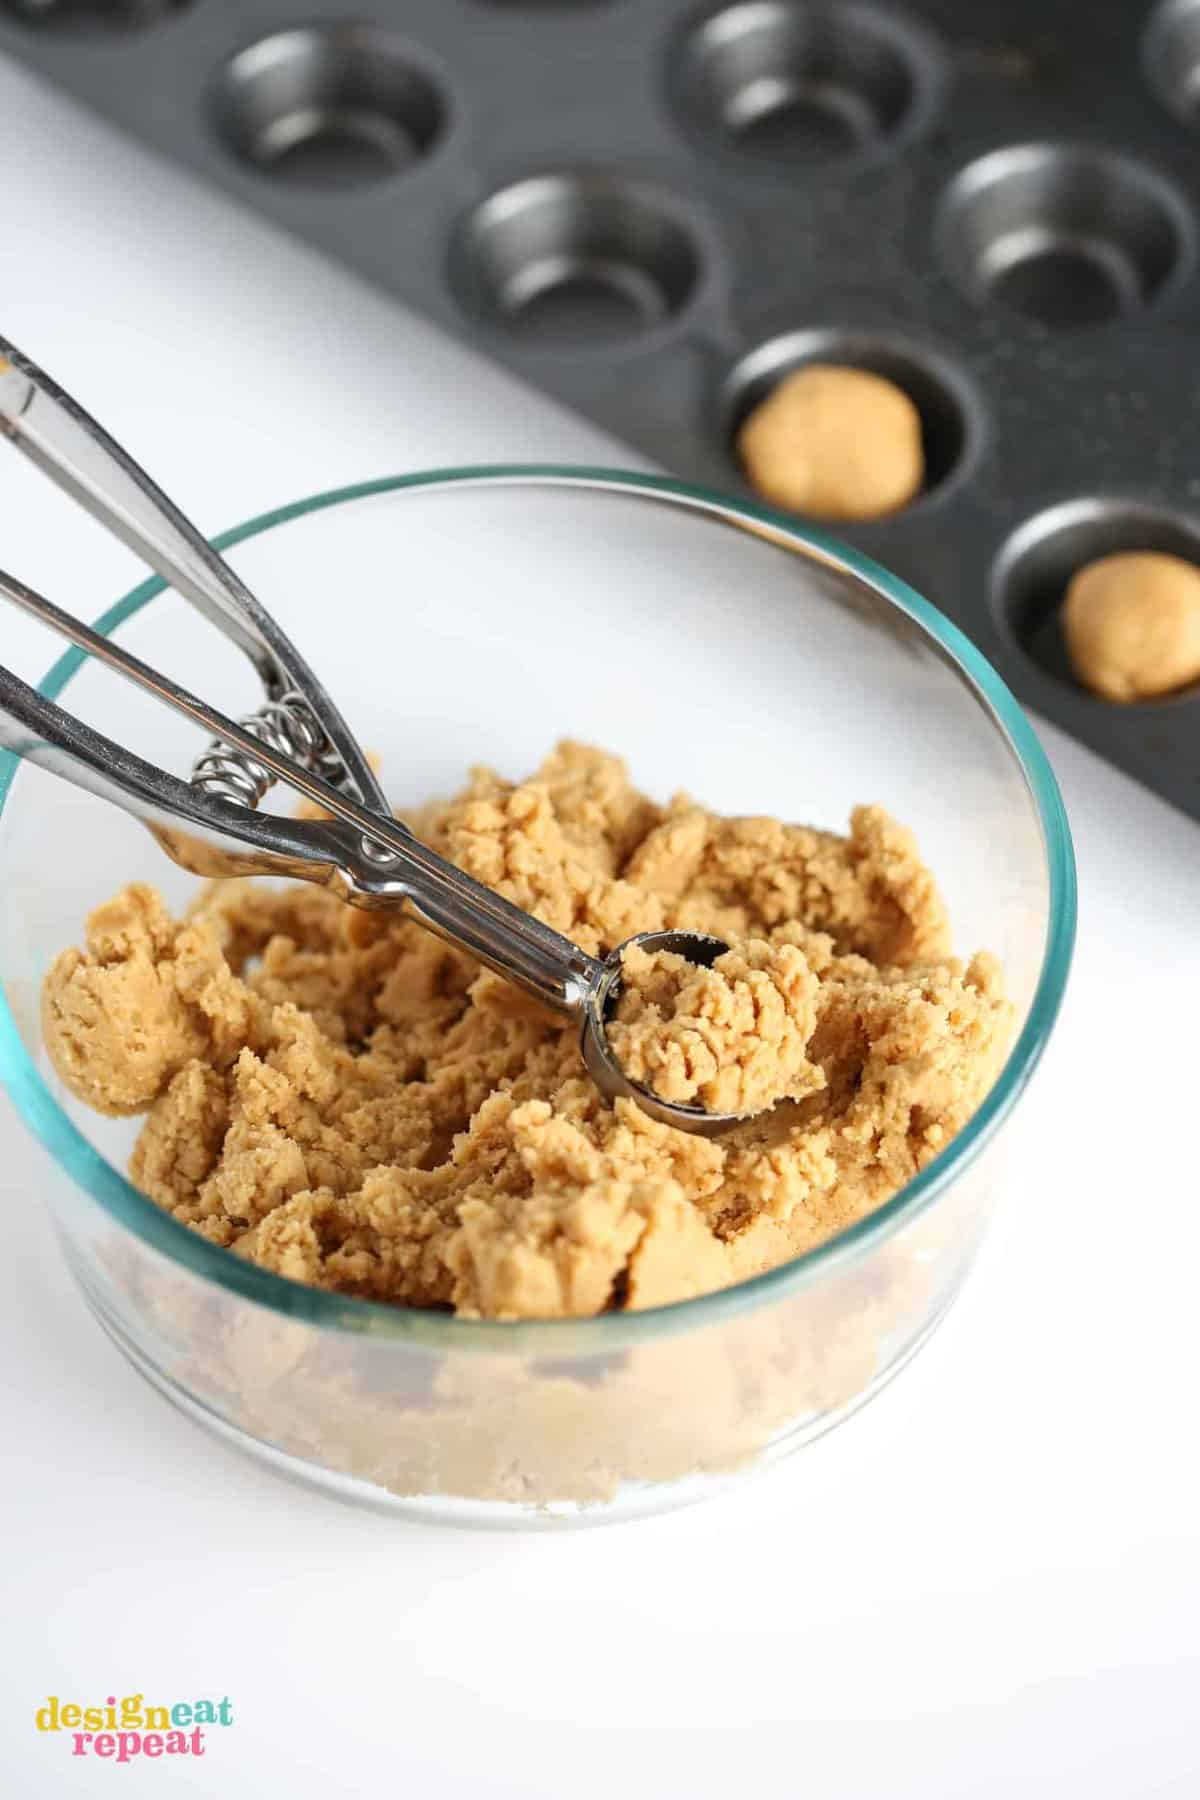
Step 1: Mix & Scoop Dough
The key to making these cookies the perfect size is to scoop the dough into equal-sized balls. To do this, I use a one-tablespoon sized cookie scoop and level off the top of each one. After scooping, use your hands to roll each scoop into a ball.
Tip: If your dough is too sticky, first try spraying your hands with nonstick cooking spray. If still too sticky, chill dough in the refrigerator for 20 minutes.
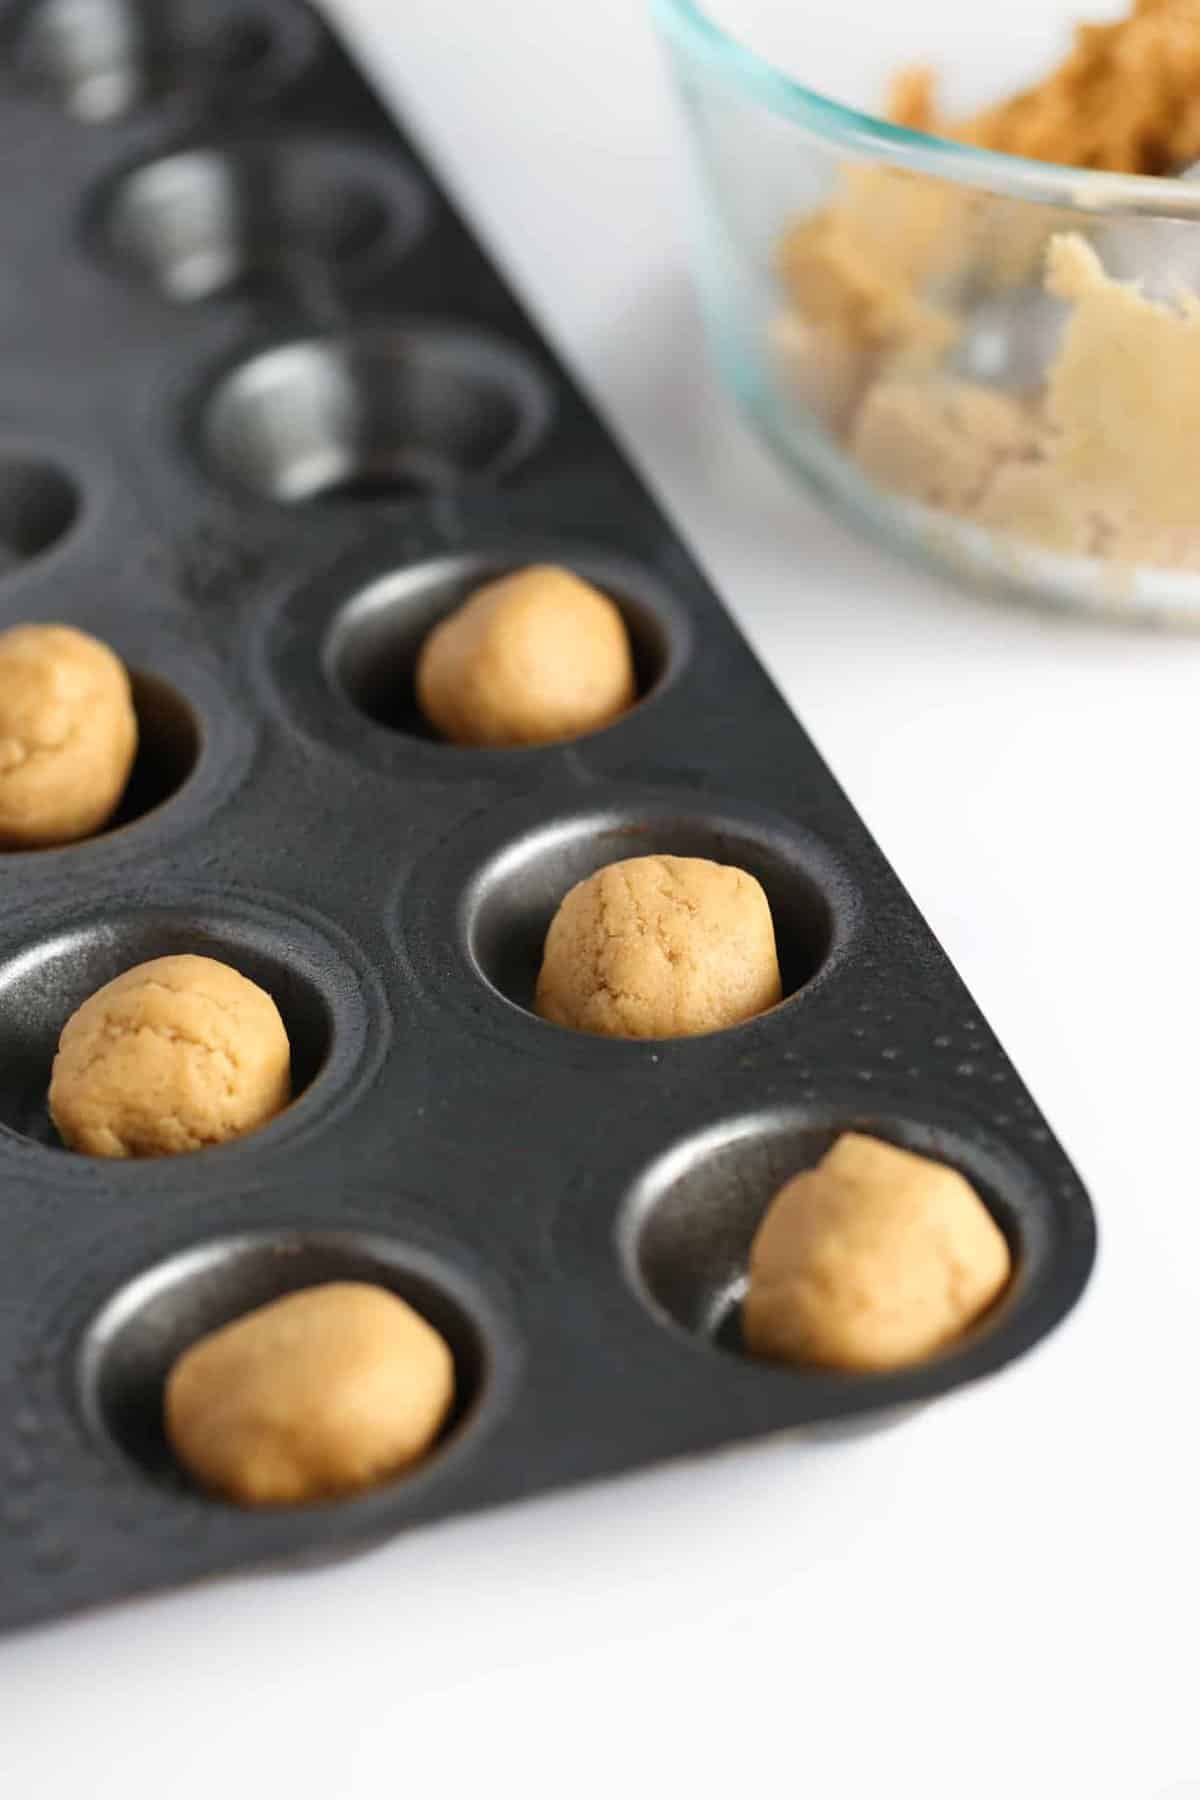
Step 2: Place in Mini Muffin Tin or Cookie Sheet
Place each cookie dough ball in a greased mini muffin tin or a parchment-lined cookie sheet.
Tip: If you don't have a mini muffin tin, simply bake them on a cookie tray (they just won't be the traditional cup shape).
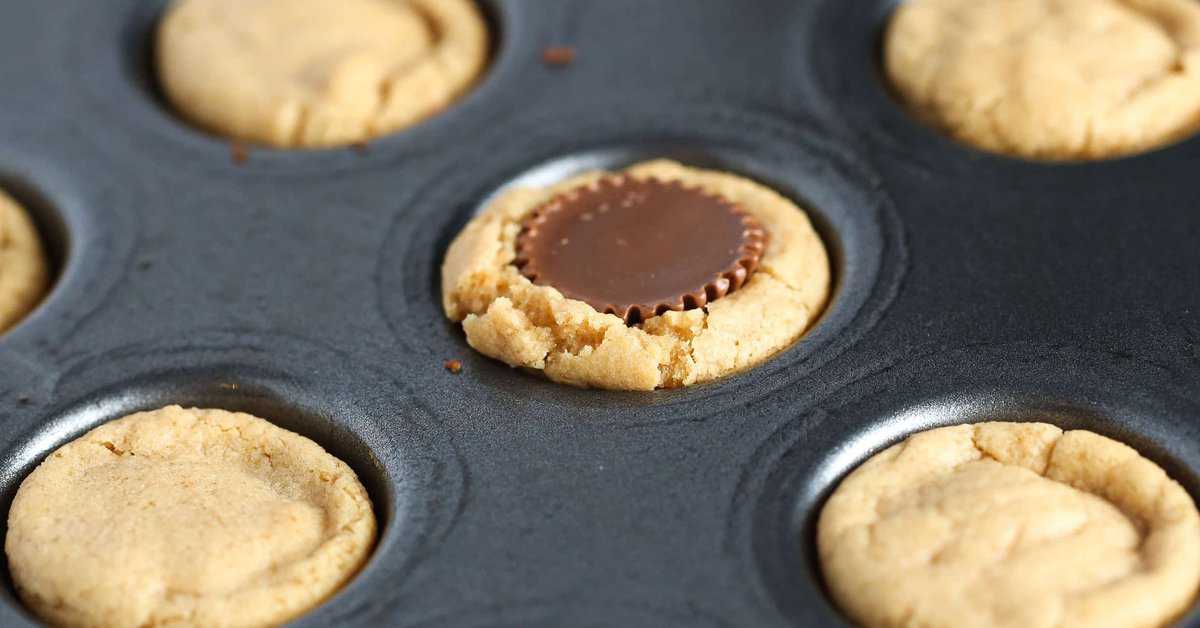
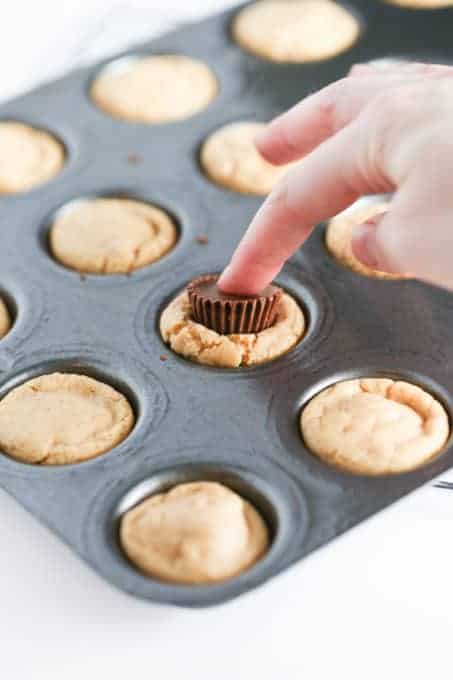
Step 3: Bake & Press In Candy
Bake at 350 degrees for 8 minutes or until edges are very lightly brown. After 8 minutes, you will likely look at the cookies and think they look too doughy and be tempted to put them back in the oven. But trust me on this, take them out at 8 minutes and they will finish baking on the cooling rack.
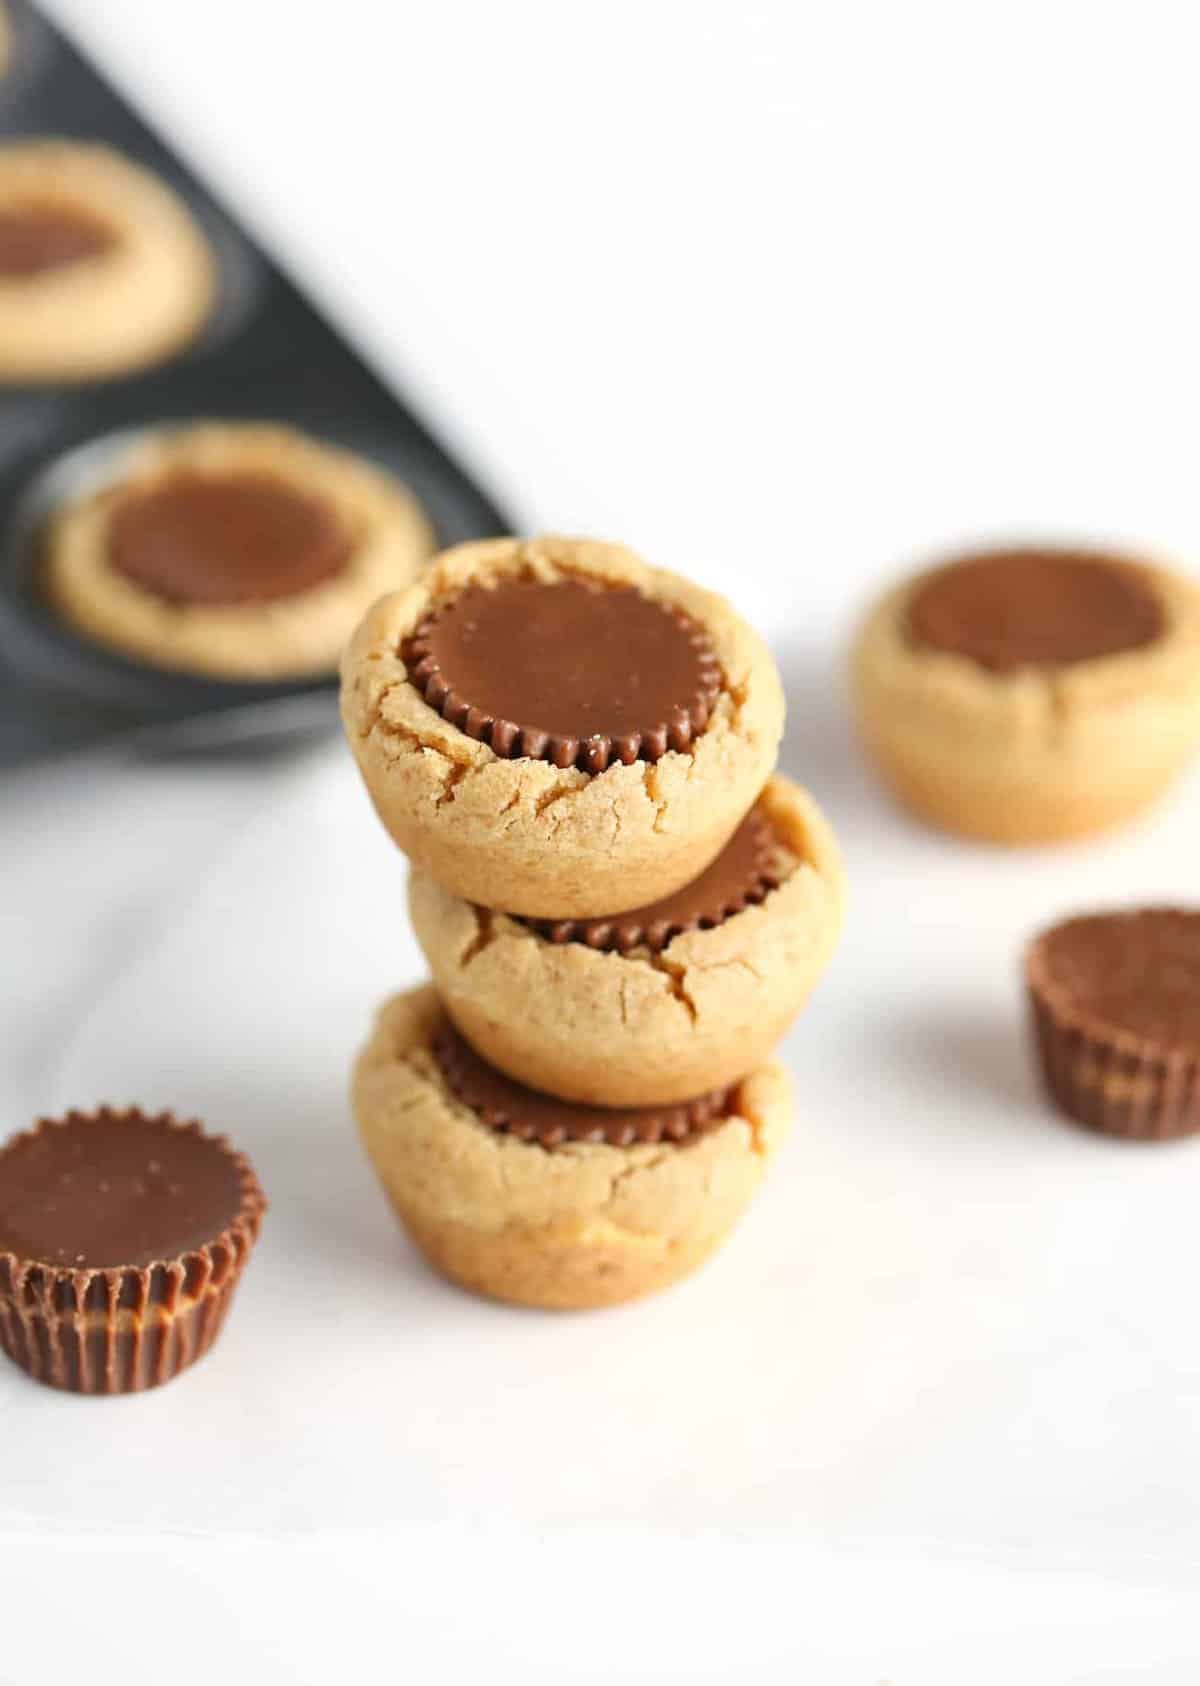
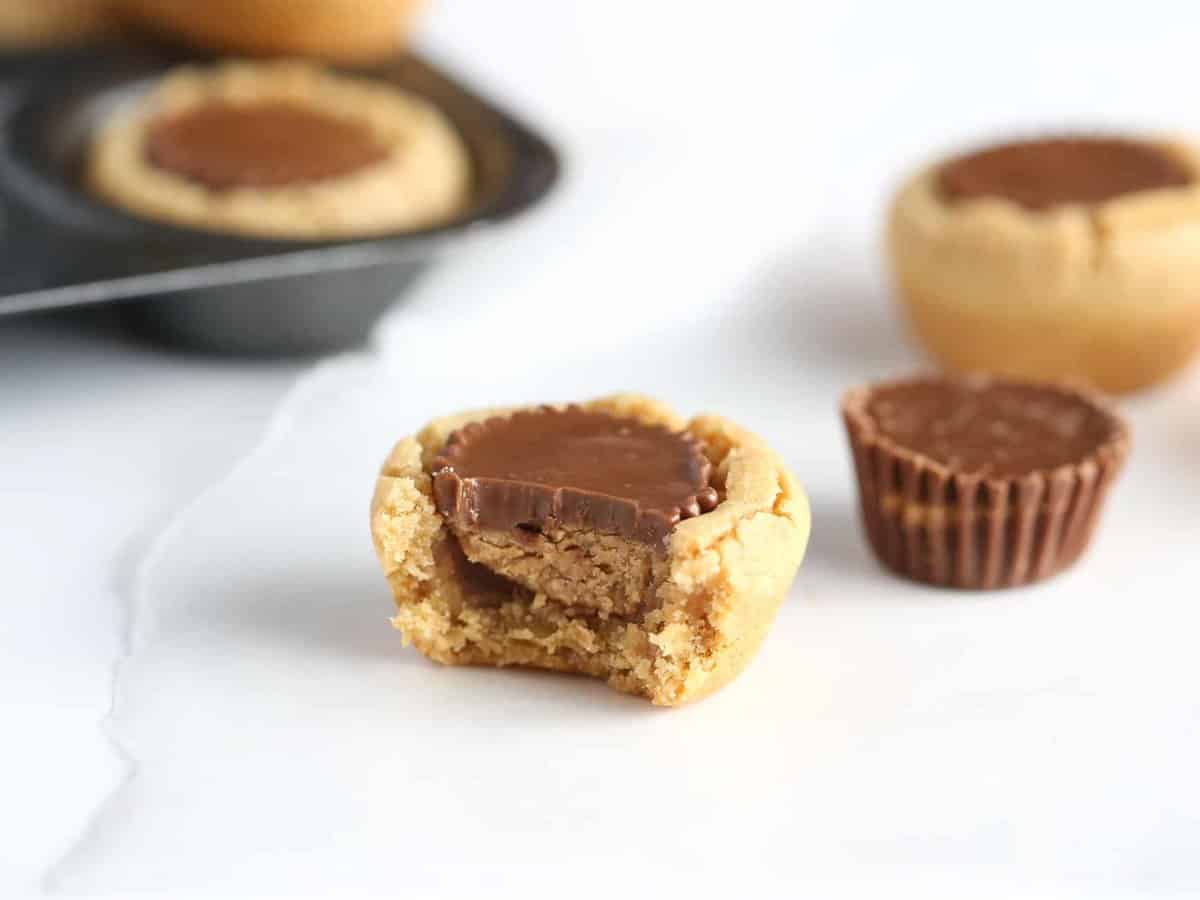
After removing from the oven, immediately press one mini Reeses peanut butter cup into the center of each cookie. Allow the pan to cool on a cooling rack. Do not try removing the cookies from the pan while they're still warm or they will break!
Important Tip: While cookies are baking, unwrap your mini Reeses peanut butter cups so that they're ready as soon as they're done baking!
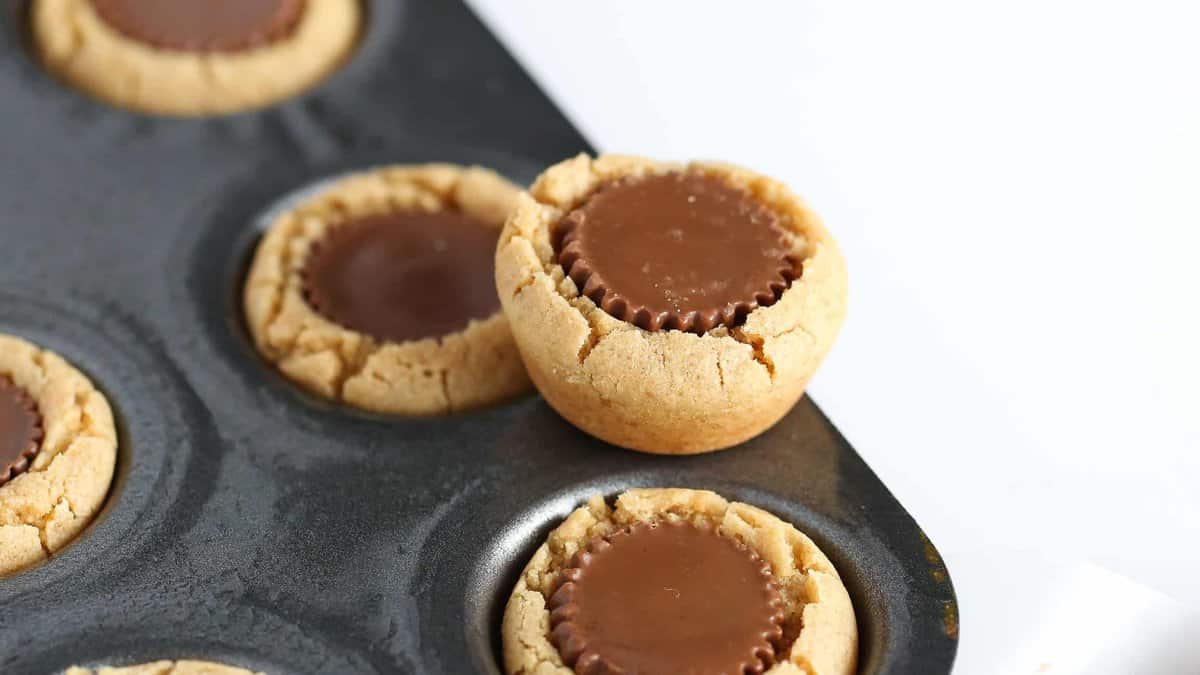
Step 4: Let Cool & Remove from Pan
After inserting the Reeses, allow the cookies to cool on a cooling rack for about 20 minutes. At this point, your chocolate will likely still be melted so you will then place the entire pan in the fridge for about 15 minutes or until the chocolate sets. (If you're a midwesterner like me, you can also put them outside during the winter to harden quickly!)
How to Remove the Cookies Without Breaking Them: Once the chocolate is hardened, use a spoon to gently "scoop" out the cookies. This is where spraying the muffin tin before baking is crucial, otherwise, your cookies will stick to the pan!
Frequently Asked Questions
If you don't have a mini muffin tin, you can bake these on a normal pan but just keep in mind that they will spread a bit (leaving you without a nice, little cup shape to fit the Reeses cup into). As an alternative, you can make larger cookies by using regular-sized Reeses (since they're flatter). To do this, scoop dough into 3 tablespoon-sized balls, roll, then gently flatten with your palm. Bake the larger cookies for 9-11 minutes.
For these bite-sized mini peanut butter cup cookies, you'll need a mini muffin pan. I recommend a non-stick, teflon-coated pan for the most ease in removing the cookies. Whatever type of mini muffin pan you use, you'll want to be sure to spray it with non-stick cooking spray beforehand.
While you can make these Reese's peanut butter cup cookies with premade dough, I will say that the extra work to make these homemade is SO worth it. They are melt-in-your-mouth delicious and are one of those recipes that friends and family ask me to make time and time again.
Yes, they freeze beautifully so that you can make them ahead of time! After cooling and allowing the chocolate to reharden, place the cookies in an airtight container and freeze (best up to 2 months). I actually prefer these half-frozen, so definitely try that (if you happen to have any left, that is!).
Since they freeze well, they are great for making ahead. And after the chocolate hardens, they are a great cookie to travel with since they don't require messy frosting and won't break apart on the road. I actually like them better when they're slightly frozen since it's basically like a soft ball of cookie dough with a frozen Reeses inside.
Christmas Decorating Ideas
These easy peanut butter cup cookies are a great last-minute cookie to bring to your family gathering!
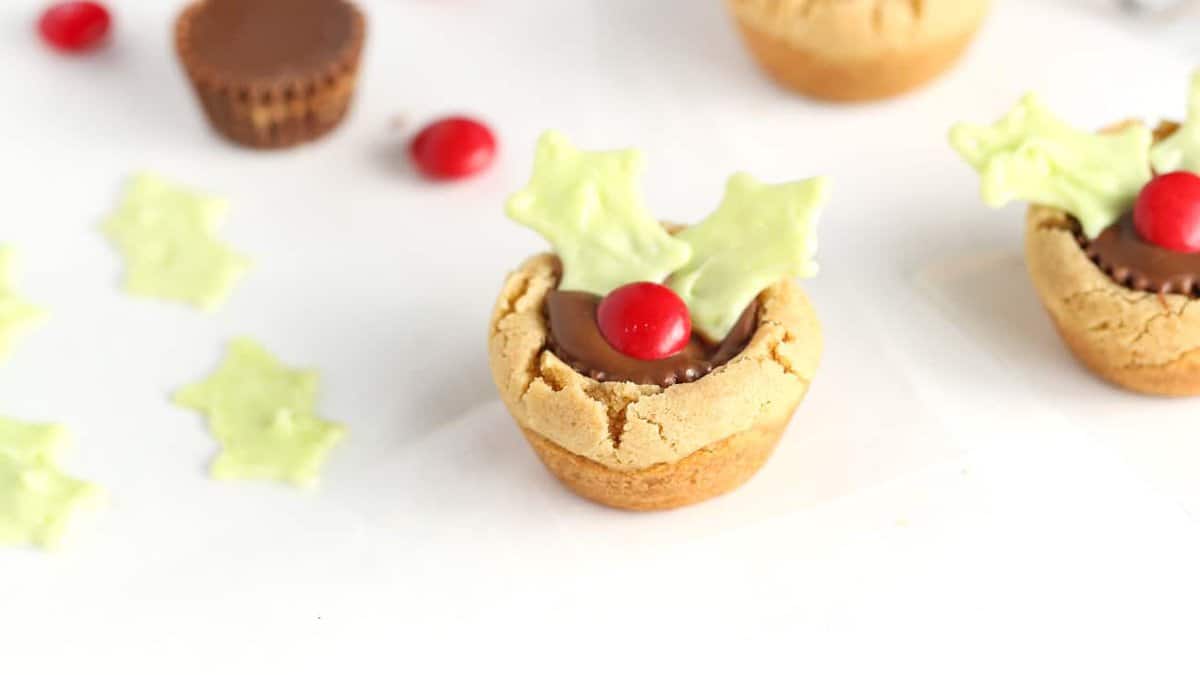
- Turn them into reindeer: Top with pretzels & a m&m for adorable little Rudolph cookies!
- Add sprinkles: For a easy & cute way to jazz these up, top with your favorite holiday sprinkle mix!
- Add white chocolate toppers: turn them into adorable Christmas Holly Cookie Cups to make them a little fancy! A true must-have for Christmas cookie platters or as a year-round treat for chocolate and peanut butter lovers - what's not to love about a cookie stuffed with candy!
I've also turned these into Easy Valentines Cookie Cups & Watermelon Cookie Cups for other holidays!
This is a tried & true family recipe that we make year after year (going on over 20 years!). Our family makes this very recipe every year and it is the first to go on holiday cookie trays. If you make them, be sure to leave a comment below and tag me @designeatrepeat on Instagram!
Use the recipe card below to learn how to make peanut butter cup cookies from scratch!
The BEST Reeses Peanut Butter Cup Cookies
Ingredients
⭐️ Before you begin! If you make this, will you do me a huge favor afterwards and leave a review and rating letting me know how you liked this recipe? This helps my small business thrive so I can continue providing free recipes and high-quality content for you.
Instructions
- Preheat oven to 350°F.
- In a large bowl, cream together softened ¾ cup unsalted butter (i.e. 1 ½ sticks), 1 cup creamy peanut butter, 1 cup light brown sugar, and 1 cup granulated sugar with an electric mixer on medium speed for 30 seconds. Add in 1 teaspoon vanilla extract and 2 eggs and continue to mix for 10 seconds.
- Add 1 ½ teaspoons baking soda and mix on low speed for 10 seconds. Add 2 ½ cups all-purpose flour and continue to mix until all flour is incorporated.
- Scoop & roll dough into 1 tablespoon sized balls and place each in a greased, mini muffin tin.
- Bake at 350℉ for 8 minutes. The trick to making these super soft is to only bake them for 8 minutes. A minute or two longer and you'll have a crunchy, brown cookie (which isn't bad if you like crunchy cookies, but I like mine soft!). If baking the large version of these cookies (3-tablespoon flattened balls, bake for 9-11 minutes).
- Remove from oven, and immediately press one mini Reeses peanut butter cup into the center of each cookie.
- After inserting the Reeses, allow the cookies to cool on a cooling rack (while still in the muffin pan) for about 20 minutes. At this point, your chocolate will likely still be melted so you should then place the entire pan in the fridge for about 15 minutes or until the chocolate sets. Once the chocolate is hardened, use a spoon to gently "scoop" out the cookies. This is where spraying the muffin tin before baking is crucial, otherwise your cookies will stick to the pan!
- If not serving immediately, store in an airtight container for up to 5 days or freeze for long-term storing.
I have been using your recipe since dec 2023. I found it because I was making the Reese cup cookies for my family for christmas. I make them without the Reese cup too. They are wonderful. I cook them 4 minutes on one side rotate it and do 3 more minutes. They are perfect. Thank you for sharing your recipe. My cousin also switched to your recipe. She helped me that christmas when I found it.
So glad it's become a family staple!
I love how you write out your recipes with amounts in the directions. game changer.
Delicious! Always a hit! Super easy to make with the clear instructions you've provided! Thank you!
Thank you so much for leaving a review, Rebecca!
Doubled the recipe to give out with other cookies I baked for friends and coworkers for Christmas. These were one of two favorites that everyone loved. Making another batch of dough to bake tomorrow to give to everyone that has been asking for more.
So glad to hear everyone enjoyed this recipe so much! Thank you so much for taking the time to leave a review, Melanie!
These cookies are amazing! I have made them 3 times in 3 weeks! My husband said they were the best cookies I have ever made. I have Celiac so made them GF with GF cup for cup flour and followed the rest of the recipe as written and they came out perfect!
That makes me so happy to hear, Marisa! I'm so glad to hear you enjoyed the recipe so much! Thank you so much for taking the time to leave a review, I really appreciate it!
Update, I have now made them two more times and the last time I did half the batch with PB cups and the other half I rolled into balls and added a Hershey kiss when out of the oven. I brought the entire huge batch to my families party and every cookie was gone!!
These are amazing. I made them for a cookie exchange and they were a big hit
So glad to hear that! Thank you so much for leaving a review, Pam!
I haven't made these yet. But they sound delicious. I'm making them for Christmas this year. Along with fudge for a nice home made gift for friends. I give you 5 stars Mam. Thanks for the recipe.
Clear, complete instructions, including tips, and helpful pictures. My sister made these for a wedding reception and they were a big hit!
Thank you so much for leaving a review, Pauline! So glad to hear everyone enjoyed this recipe!