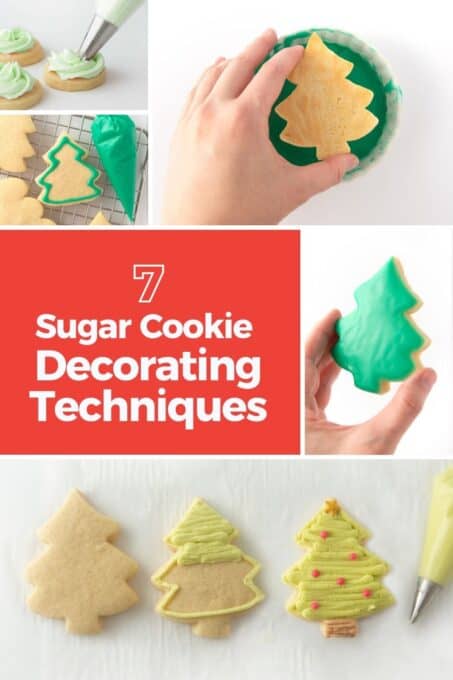
You don't have to be a pro to decorate adorable and bakery-quality sugar cookies! Today I'm breaking it down into easy tips, tricks, designs, and techniques to make it EASY and FUN! With 7 different sugar cookie decorating techniques, you can choose the method and difficulty level based on your skill level!
Save this Recipe!
Enter your email below and I'll send this recipe to you.
Before we go through the exact sugar cookie decorating techniques, let's go over a few foundational tools, tips, and recipe tips before you dive into decorating!
Tools & Supplies:
A lot of cookie decorators will tell you that you need a long list of cookie decorating supplies, but you really don't need a lot to decorate sugar cookies. At a minimum, grab these cookie decorating essentials:
- Tipless Piping Bags: These allow you to quickly decorate cookies without needing couplers. They are also seamless, so unlike a ziploc bag, the frosting will come out in a circle vs. a flat rectangle. If you don't want to use tipless, grab a reusuable piping bag with a few different sizes of couplers.
- Metal Tips: If you're looking for a bit more control and detail, my 3 favorites tips are: Wilton Round #5, Wilton Round #10, Wilton #22 Star Tip. For larger swirls, grab a Ateco 809 Large Round Tip and Ateco Closed Star 8.
- Adjustable Rolling Pin: While not necessary, if you're looking to make uniform, bakery-quality sugar cookies then having an adjustable rolling pin is a game changer!
- Gel Food Coloring Set: The Wilton Color Right System is my favorite verstatile set. It includes 8 gel food colorings that you can mix and match to create hundreds of shades. For help acheiving the perfect shade of Christmas green, check out How To Make Dark Green Icing (5 Shades!).
Cut Out Sugar Cookie Dough:
When you're going to the effort of decorating your cookies all pretty, the last thing you want them to do is to break! I roll my cut out sugar cookie recipe ⅜" thick using my favorite adjustable rolling pin. If you're a beginner, I recommend reading my guide to How To Roll Out Sugar Cookies for some super helpful tips!
7 Sugar Cookie Decorating Techniques
There are a handful of ways you can decorate sugar cookies, depending on the look you're going for! Below are my top 7 favorite decorating techniques using buttercream, icing glaze, and traditional royal icing! Each technique includes my favorite frosting recipes & instructional photos!
Important: Before decorating, make sure your sugar cookies are fully cooled! Decorating a warm cookie will cause your frosting to melt and spread.
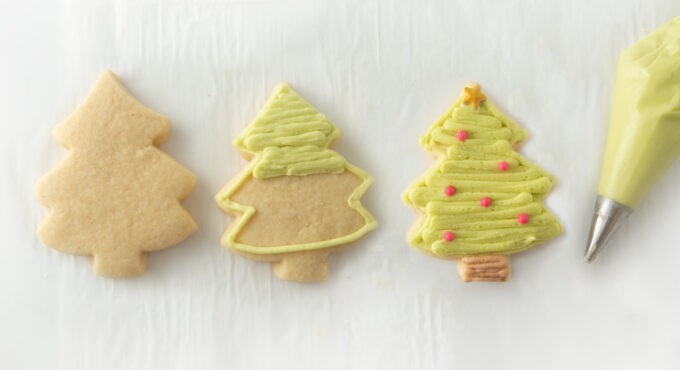
Technique #1: Buttercream + Pipe Border & Fill with Lines
This is my favorite technique because it gives it a refined finish without needing to get the frosting perfectly smooth. You can then layer other details on top to achieve a bakery look.
Tools needed:
- Tipless Piping Bag or traditional piping bag with coupler & Wilton Round #5
- Sugar Cookie Buttercream Frosting
- Pipe an outline around the cookie to create your border; this will help you achieve smoother edges and a more refined cookie.
- Next, "zig zag" back and forth horizontally across the cookie to fill it in.
- Note: When piping frosting, you never want to drag the tip along the cookie. Rather, "touch down" once at the beginning and at any sharp corners, then drag the frosting above the cookie.
Technique #2: Buttercream + Pipe & Smooth
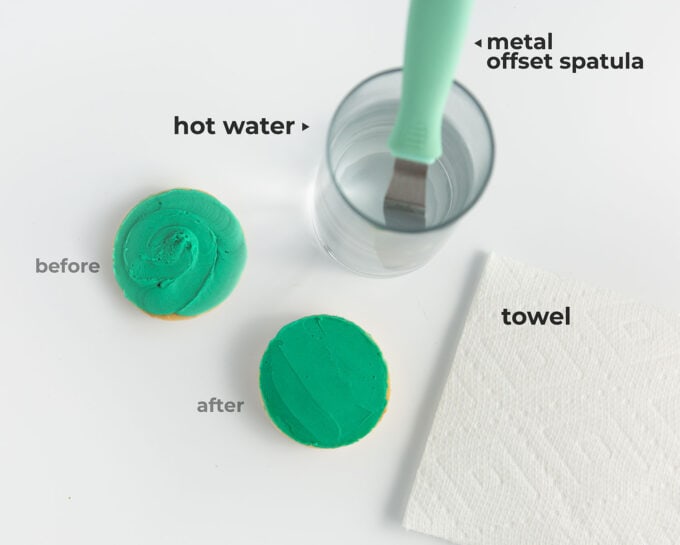
If you're wanting the frosting to have a smooth, flat finish then you can pipe or spread frosting on the cookie, followed by smoothing it with a hot offset spatula. I love this technique for achieving a smooth base layer, then I'll do more a more decorative border using a star tip.
Tools needed:
- Tipless Piping Bag or traditional piping bag with coupler & Wilton Round #5
- Offset spatula
- Sugar Cookie Buttercream Frosting
- Spread your frosting on the cookie. (You can also pipe an outline around the cookie to create your border before filling in; this will help you achieve smoother edges and a more refined cookie.)
- Let the frosted cookie sit for 5-10 minutes to develop a slight crust.
- Submerge the metal part of an offset spatula in a cup of hot water for 5-10 seconds, dry it off, then immediately smooth out the frosting on the cookie.
- Repeat until desired smoothness.
Technique #3: Buttercream + Decorative Star Tip
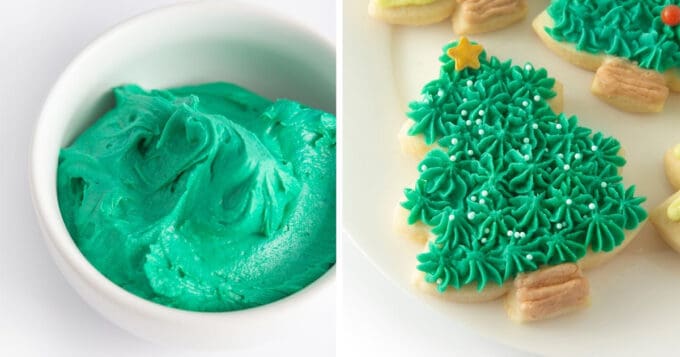
This next sugar cookie decorating technique is probably the most forgiving one and is beautiful if you have a cookie that justifies texture but doesn't need much detail. Examples would be a Christmas tree, wreath, or snowflake cookie. Buttercream is very forgiving when using a star tip, so if you mess up you can just go right over it again!
Tools needed:
- Tipless Piping Bag or traditional piping bag with coupler
- Wilton #22 Star Tip
- Christmas Cookie Frosting
- Starting at the edge of your cookie, gently touch down the tip of your metal star tip to your cookie (creating a border first will create a well defined edge).
- While applying light pressure to the bag, gently squeeze and lift.
- Repeat until the surface of the cookie is filled with frosting. If you see any gaps, simply fill them in.
Technique #4: Buttercream + Giant Swirl
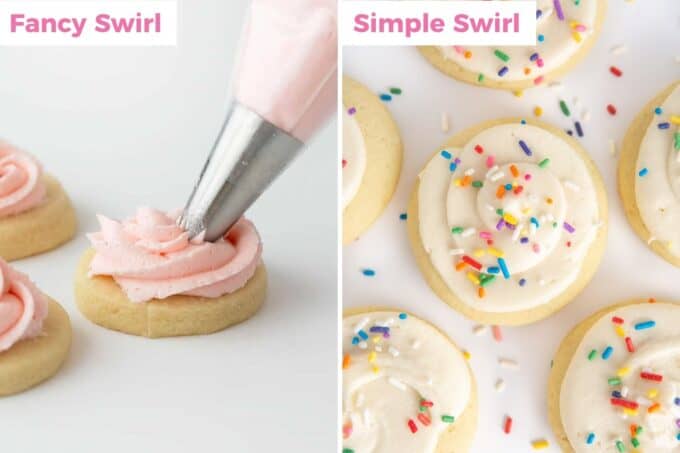
If you're not in the mood for intricate decorating but still want a refined, bakery-quality look, use my two favorite tips to create giant swirls and top with festive sprinkles! This technique works best for circle or heart cookies where there aren't many edges.
Tools needed:
- Tipless Piping Bag or traditional piping bag with large coupler
- Large Star Tip (for fancy swirl) or Large Round Tip (for simple swirl)
- Sugar Cookie Buttercream Frosting
- Starting on the outside edge, apply light pressure to your piping bag.
- After going around the edge, create a swirling motion to fill in the inside.
Technique #5: Dip In Glaze
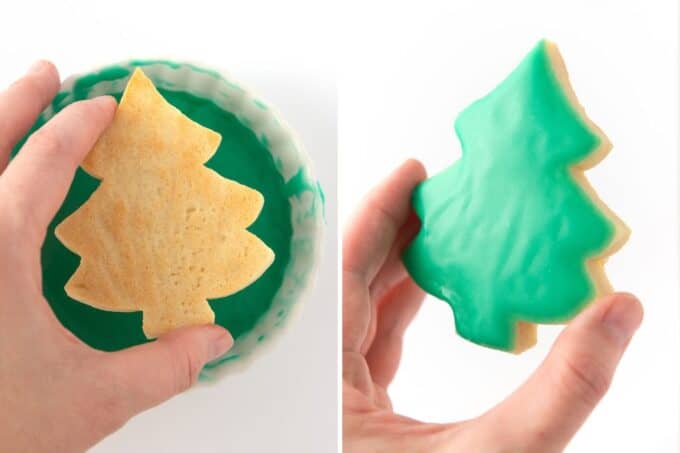
This method is great when you just want a solid color icing on top of your cookie! It's fast to do, dries & hardens quickly, and is great for those times when you only want a thin cookie glaze. This is what I used for my Easy Decorated Snowman Cookies and it just goes to show how cute even the simplest cookies can be!
Tools needed:
- Shallow bowl or dish (with a bottom wide enough to fit a cookie)
- Quick Icing Glaze
- Dip the top of the cookie into the glaze, ensuring the surface is covered.
- Before flipping it over, gently shake the cookie to remove the excess icing.
- Flip over and allow to dry on parchment paper or cooling rack.
Tip: If you wish to add more detail or color to your cookie, you can immediately drizzle or pipe dots on top of the cookie immediately after dipping (referred to as a "wet on wet" technique") or you can wait for the first layer to dry before drizzling or piping on more detail.
Technique #6: Pipe with a Liquid Icing
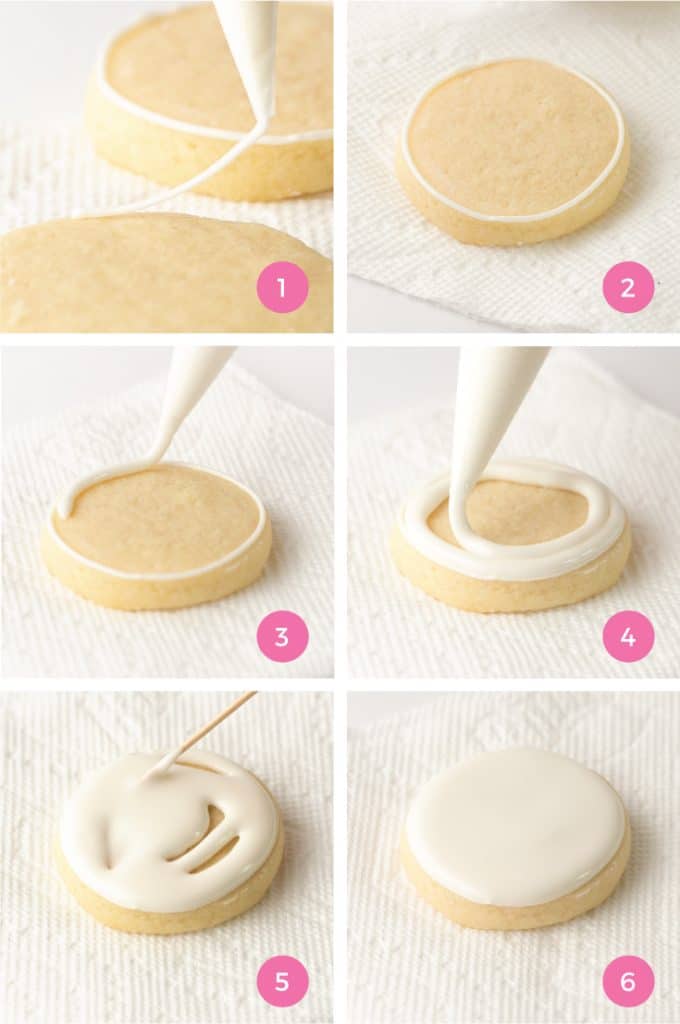
While this technique requires a bit more skill, don't let that scare you! You can use this method with either my Easy Sugar Cookie Icing Recipe (for less details) or a more traditional Royal Icing (for more intricate details). Royal icing gives you the most controlled, although mastering the consistency can take some work.
Tools needed:
- Tipless Piping Bag or traditional piping bag with coupler & Wilton Round #2
- Royal Icing for Sugar Cookies (will completely harden) or Easy Sugar Cookie Icing Recipe
- Gently "touch down" the icing tip to the cookie and apply light pressure. Lift the piping bag about 1 centimeter above the cookie and slowly move along the edges of the cookies. You want the icing to fall onto the surface; you don't want to drag the tip on the actual cookie.
- Once you finish the border, work from the outside-in to fill the cookie.
- Use a toothpick to smooth out any gaps and pop any air bubbles.
- If adding sprinkes or sanding sugar, add immediately.
Tip: If you wish to add more detail or color to your cookie, you can immediately drizzle or pipe dots on top of the cookie immediately after dipping (referred to as a "wet on wet" technique") or you can wait for the first layer to dry before drizzling or piping on more detail.
Technique #7: Spread & Dip in Sanding Sugar
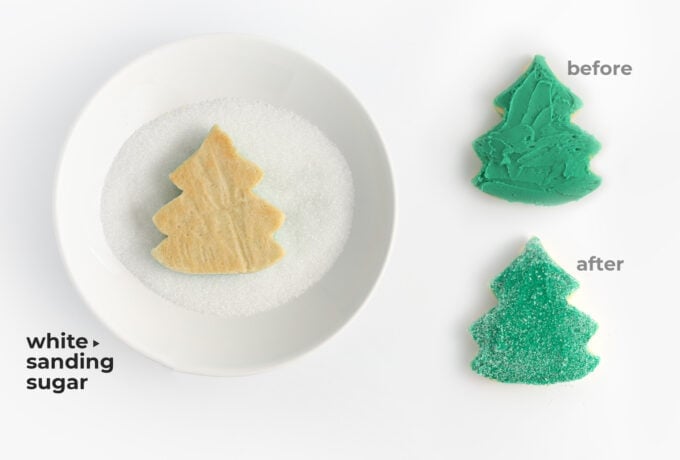
If you don't want to mess with any of those decorating techniques (ha!), simply spread your frosting on with a knife and dip in white sanding sugar. This is a super easy technique to smooth out the frosting, without needing to do any fancy decorating! For a more refined look, use Technique #1 before dipping.
Tools needed:
- Pipe or spread frosting on sugar cookie.
- Immediately dip the top in sanding sugar, gently moving it around so all corners are covered.

7 Sugar Cookie Decorating Techniques (with recipes!)
Ingredients
Before you begin! If you make this, will you do me a huge favor and leave a review and rating letting me know how you liked this recipe? This helps my small business thrive so I can continue providing free recipes and high-quality content for you.
Instructions
- Linked above are 4 frosting recipes. While I typically use buttercream, I wanted to link to all the recipes demonstrated in this post so that you can use the one that best fits your project!
Last Step! Please leave a review and rating letting me know how you liked this recipe! This helps my small business thrive so I can continue providing free recipes and high-quality content for you.
Let's Get Decorating!
After reading through these tips, I hope you can see that you don't have to decorate sugar cookies like a pro in order to make cute, super delicious cookies!
If you use any of these sugar cookie decorating techniques, be sure to leave a comment below and tag me on Instagram @designeatrepeat - I LOVE seeing your creations!



Leave a Comment