
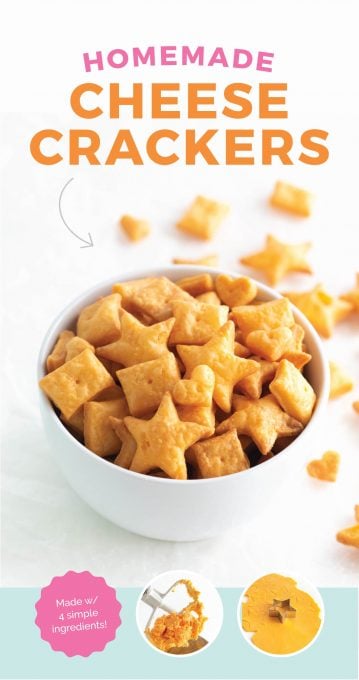
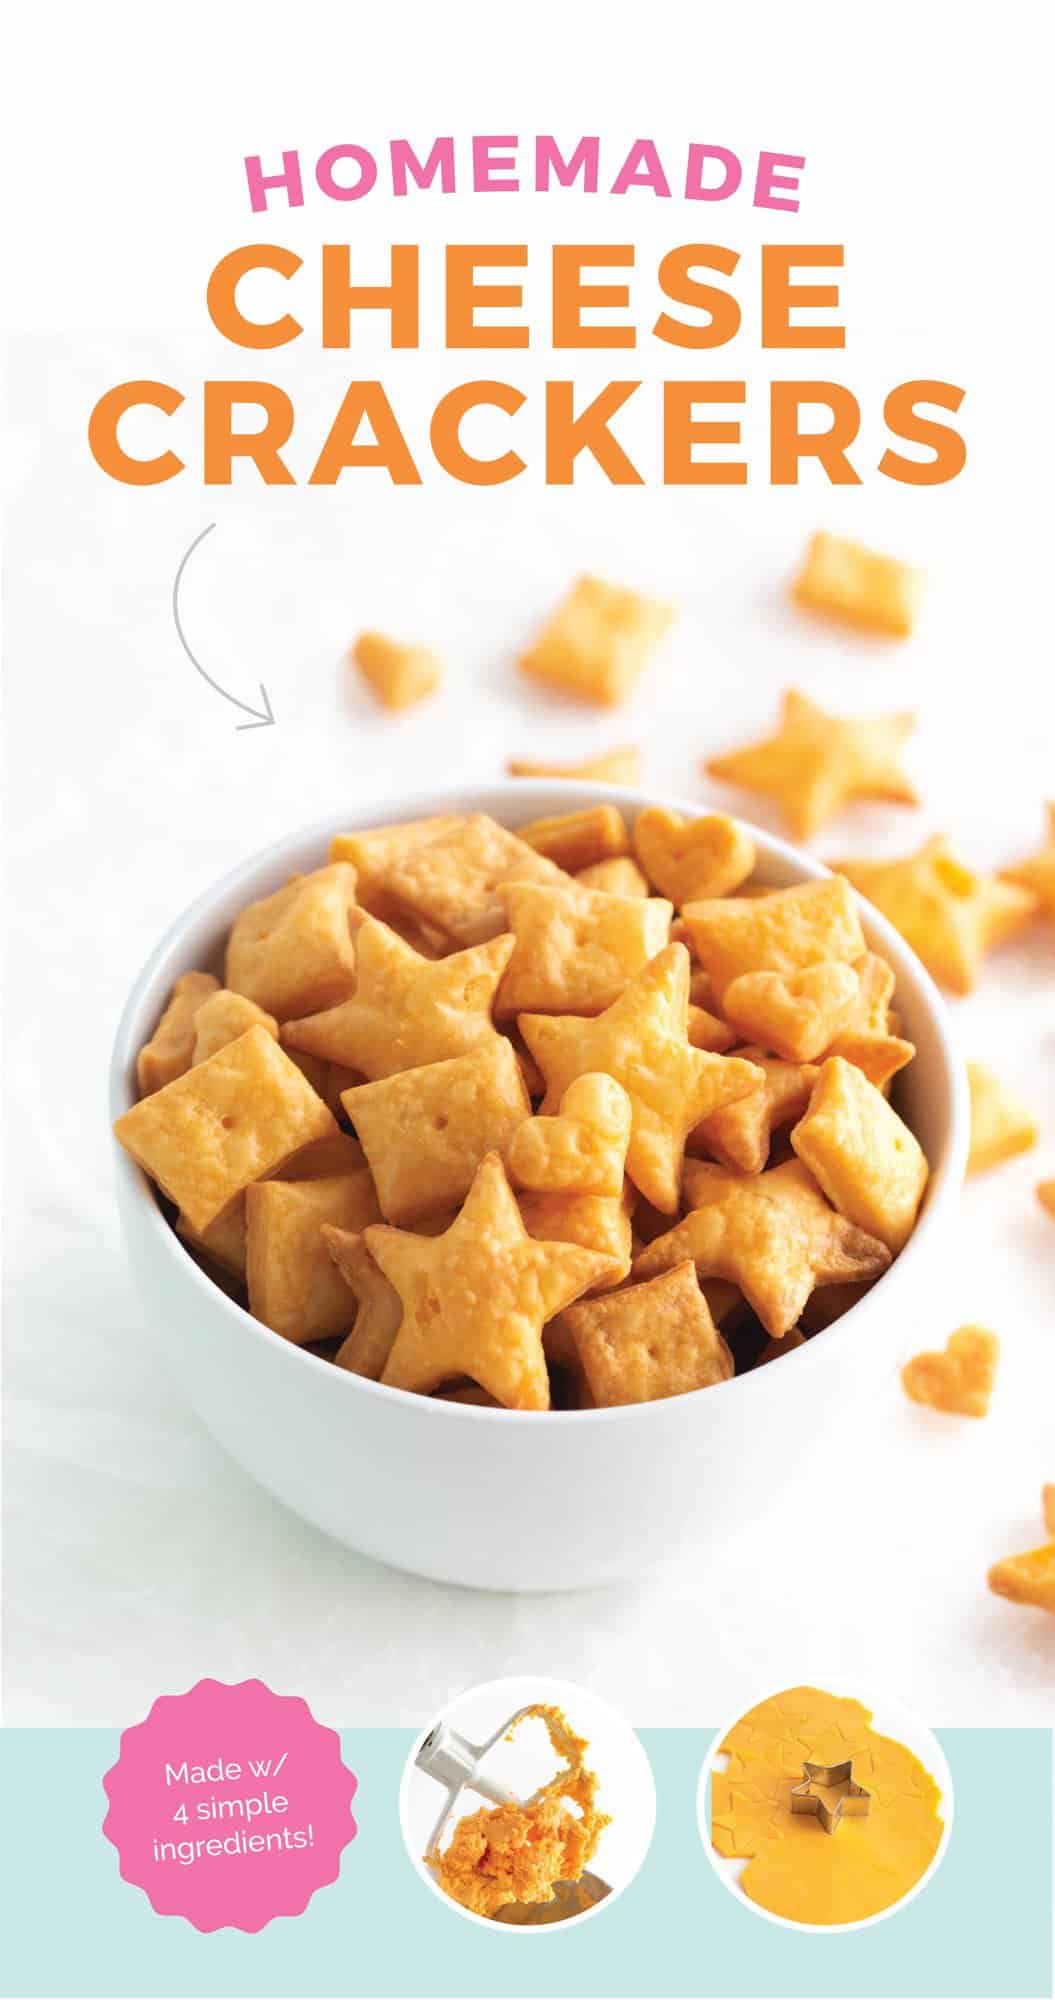
Make homemade copycat Cheez-its at home in under 30 minutes that taste even better than store-bought! Using just 4 simple ingredients, you can make these Homemade Cheese Crackers without a food processor using your normal mixer. Makes for a fun weekend activity to do with the kids, as they can help cut out the shapes!
For the past year or so, I've wanted to do a series of homemade variations of our favorite store-bought treats. I've already done homemade animal cookie wafers and homemade soft pretzels in the past and am excited to do so many more this year.
So I figured I'd start with one of my favorite childhood treats and kick off the series with how to make Homemade Cheez Its! I always thought they were hard or tedious to make, but turns out that these are so easy and even more fun to make!
- 4 simple ingredients (no hidden ingredients!)
- Can be made with a stand mixer, food processor, or hand mixer
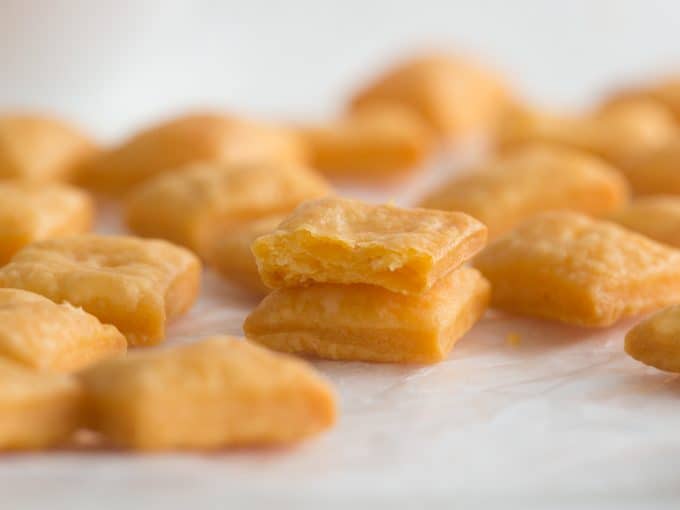
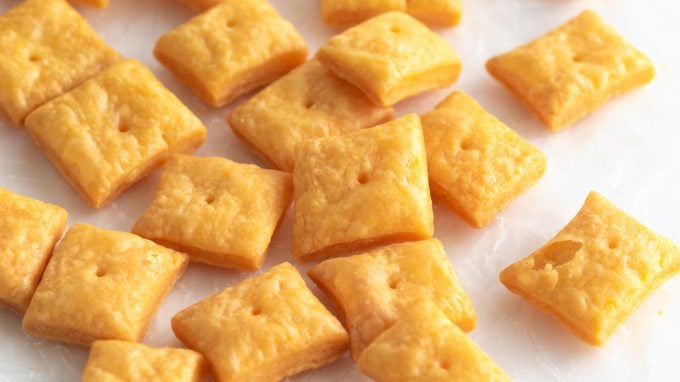
- Super crunchy with a flaky inside
- Full of cheddar cheese flavor (seriously tastes like Cheez-its!)
- Super cute when cut into tiny shapes!
What You Need to Make Homemade Cheese Crackers
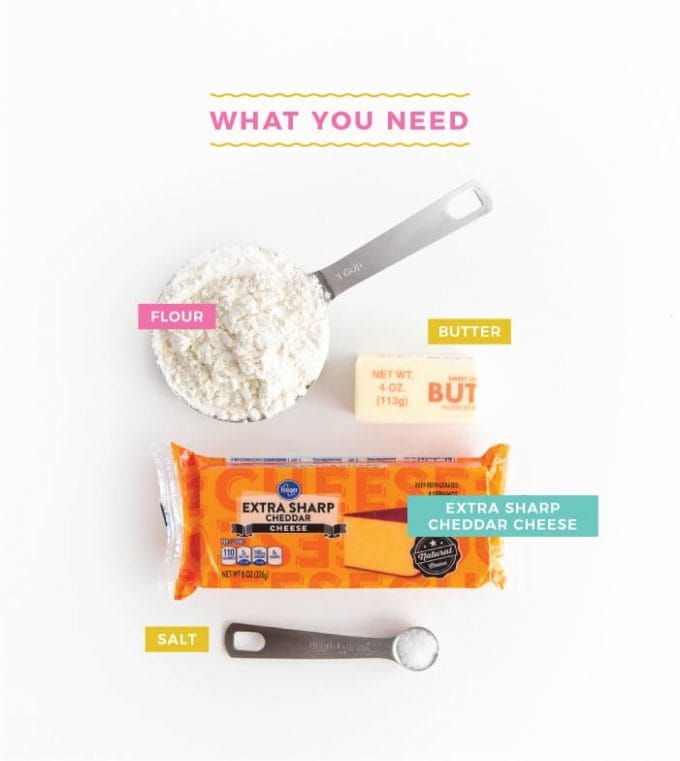
- 1 (8oz.) block sharp cheddar cheese, straight from the fridge
- 4 tablespoons real butter, straight from the fridge
- ½ teaspoon salt
- 1 cup all-purpose flour (see notes below on other flours)
- 2-3 tablespoons ice water
- Optional: 1-2" shaped cookie cutters (like this tiny fish)
How to Make Homemade Cheese Crackers
Step 1: Cut cheese & butter into cubes, then mix cheese
Take the cheese and butter out of the refrigerator (you want them cold) and cut into small cubes (about ½" in size).
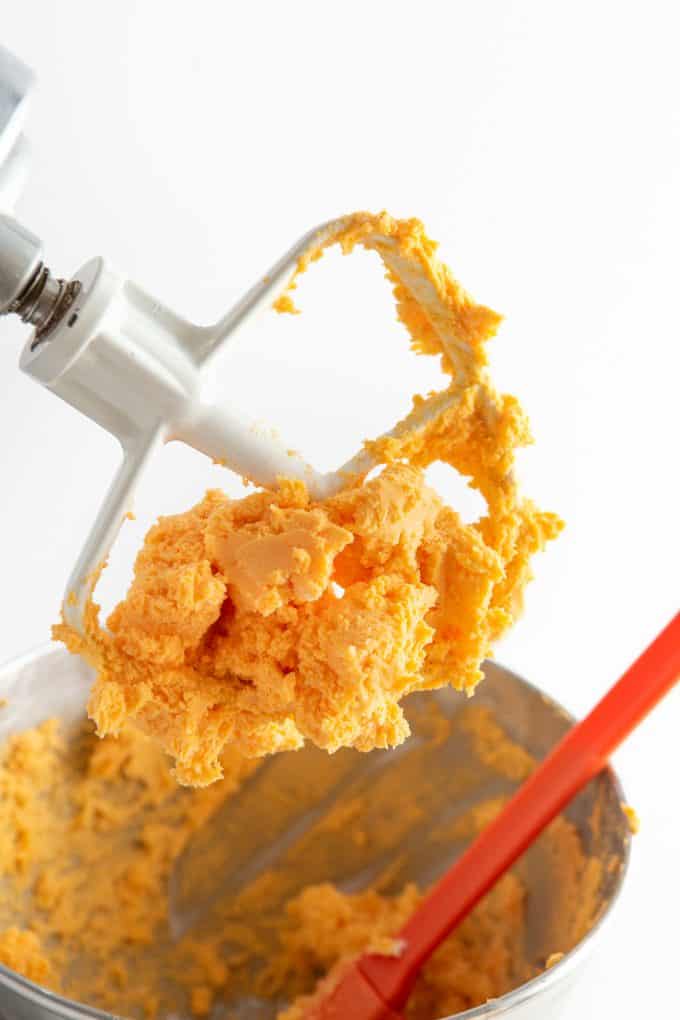
In the bowl of a stand-mixer, add just the cheese and beat on medium-high speed (a level 6 on kitchenaid) for about 30 seconds until the cheese has broken down and looks "creamed together". When finished, prep for the next step by scraping down the sides of the beater or bowl.
Tip: Don't have a stand-mixer? No problem! Here's a few other ways you can mix:
- Food Processor: Add cheese, butter, and salt and pulse for about 30 seconds until incorporated.
- Hand-Mixer: Although this can be harder to do, you could use use a hand-mixer. To do this though, you would want to cut or grate the cheese into TINY chunks then continue to the next steps.

Step 2: Add Butter & Salt
Turn the mixer back on medium-high speed and add in the cubes of butter and salt. Mix for another 30-45 seconds until the cheese and butter are creamed together. Scrape down sides of bowl again.
Texture Tip: The texture should be creamy and you shouldn't see any chunks of cheese throughout. If you do, mix for a little longer.
Step 3: Slowly Flour
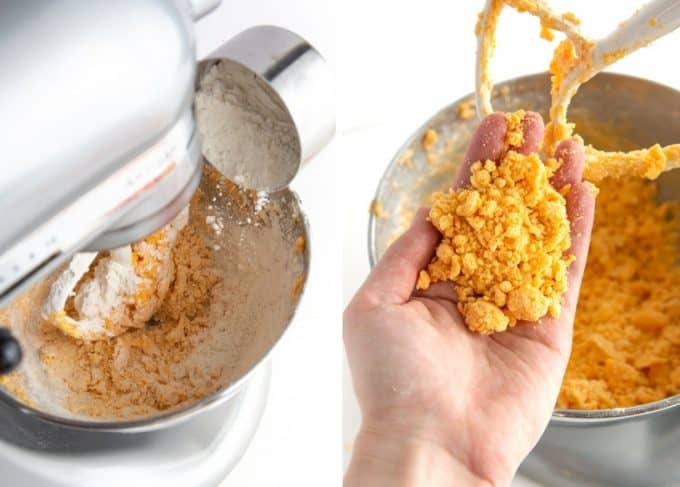
Turn the mixer to low speed then slowly add in the flour. Once it's all added, turn the mixer up to medium-high speed and beat for 30 seconds until all flour is incorporated.
Texture Tip: At this point, the texture will be a dry and crumbly. Have no fear, the ice water is here!
Step 4: Add Ice Water
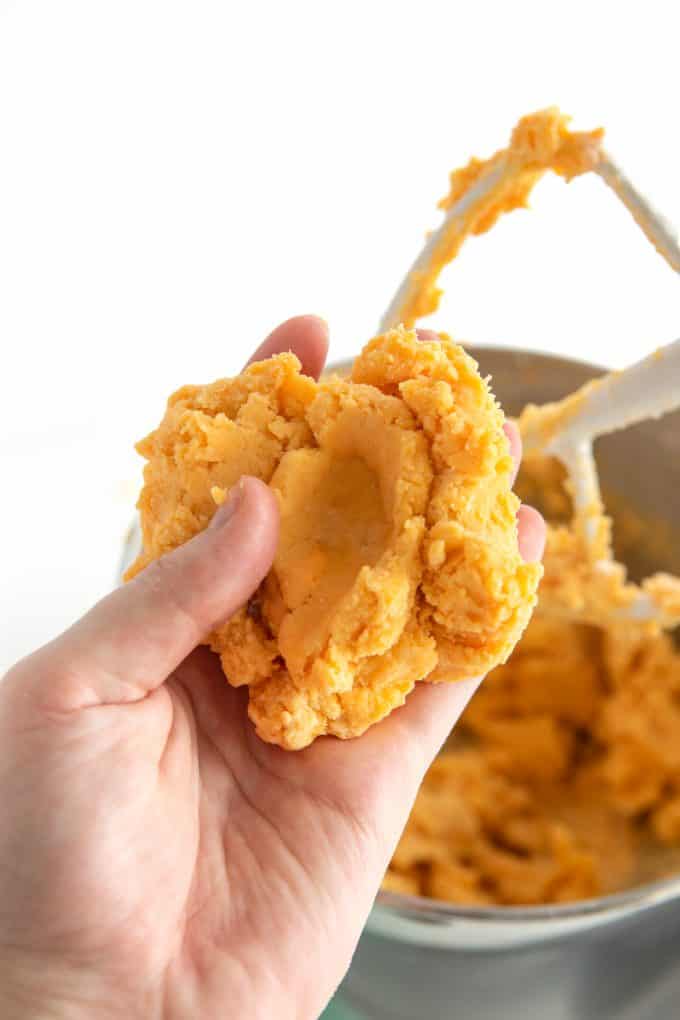
Turn the mixer on low speed and add the ice water, 1 tablespoon at a time. When I make this, my mixture only takes 2 tablespoons of water total. But depending on climate and specific brands of ingredients you use, you may need to add up to 3 tablespoons.
Texture Tip: You want the dough to feel solid and soft, but not sticky (a lot like play-doh). You should be able to press your finger in it and not have it stick to your finger.
Step 5: Roll out with rolling pin
Once mixed:
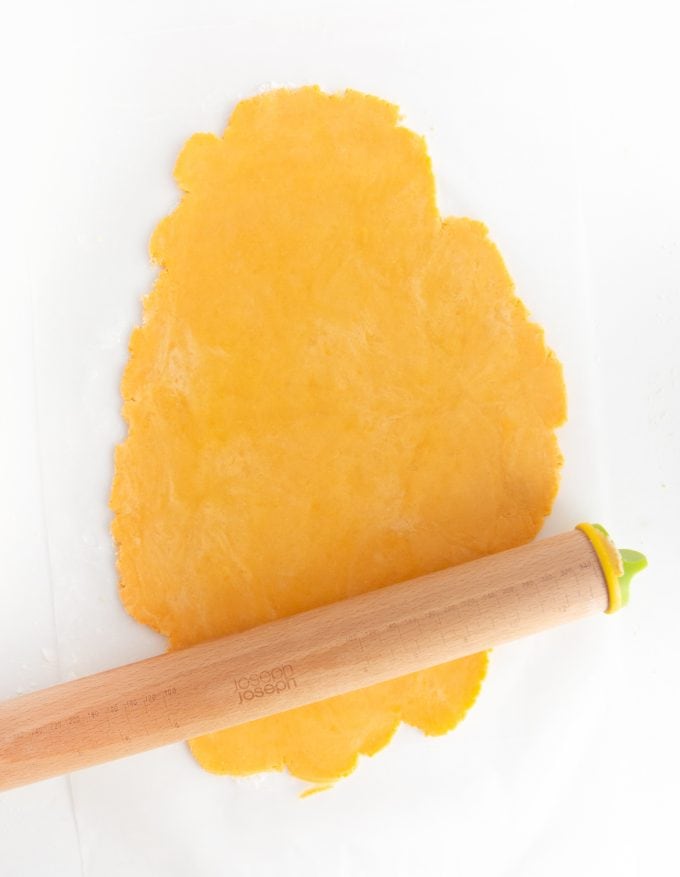
- Sprinkle flour on a piece of parchment paper and place dough ball on top.
- Use your hands to "knead" the dough into a solid ball (about 20-30 seconds). Again, this should not be sticky so if it is, add a little flour. The goal here is to have a solid ball.
- Flatten the dough ball into a thick disc. Just like I do with my cut out sugar cookies, this helps prevent cracking as you start rolling.
- Use a rolling pin to roll dough into a 1/16" thickness (aka, really thin where it's just a step above being translucent). I use my adjustable rolling pin on the lowest yellow ring.
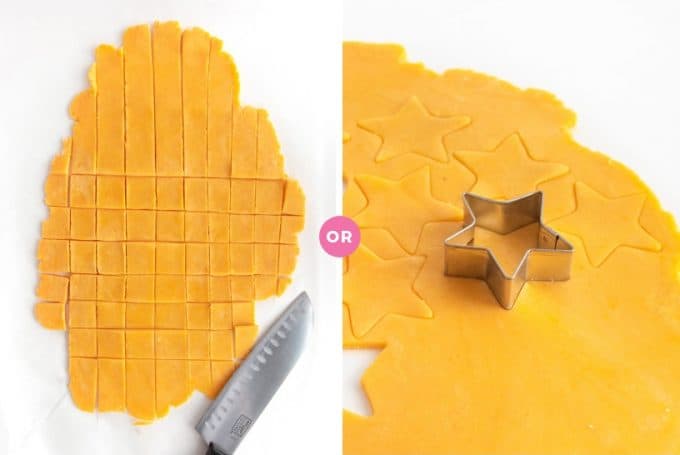
Step 6: Cut into squares or shapes
Once rolled, use a sharp knife to cut into 1" squares. You can also use fun 1-2" cookie cutter shapes like I did to create stars, hearts, or animal shapes (like this cute goldfish cookie cutter).
Tip: For the cleanest cut, use a pizza cutter OR use a large knife to press directly down on the dough. Pressing down (as opposed to sliding the knife) will help prevent the edges from crinkling.
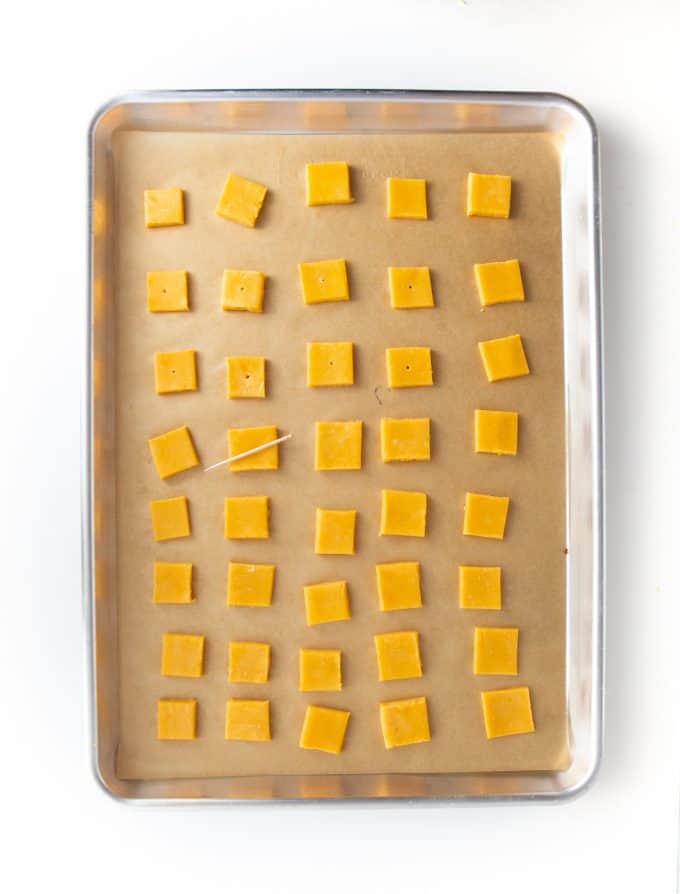
Step 7: Poke hole & bake
After cutting, transfer the cut crackers to a parchment-lined baking tray and bake at 375 degrees for 15-17 minutes. If you made smaller or larger shapes than 1" (or made them thinner), you may need to bake for a little less or longer.
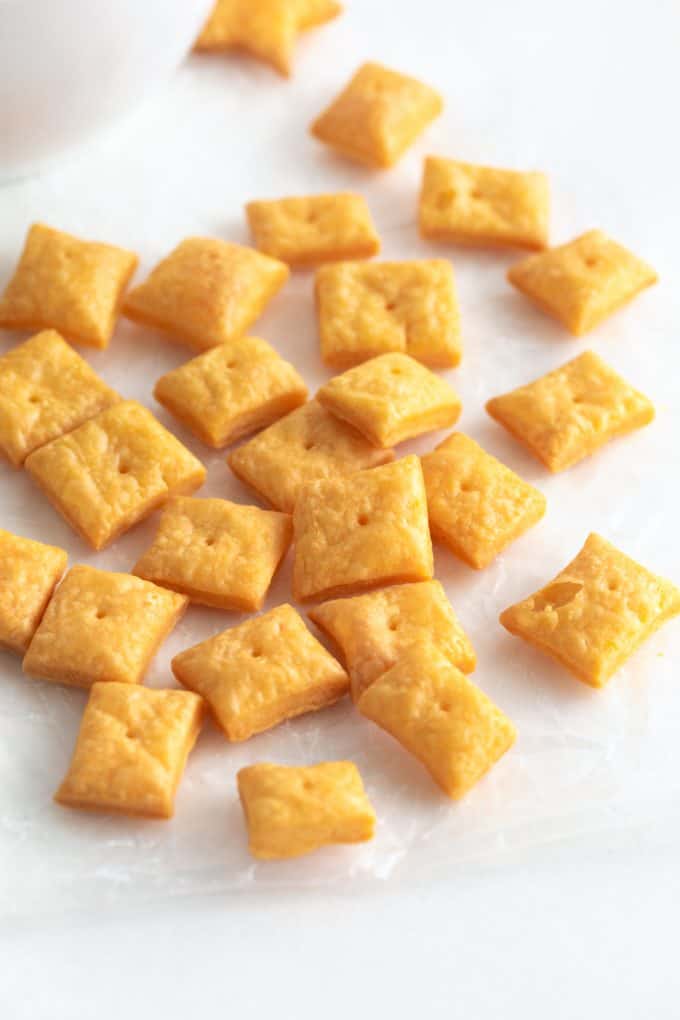
Baking Tip: Because all ovens bake differently, start checking on them around the 10-12 minute mark. You want them to have a little brown on the edges, but still have the orange color.
To test for doneness, take one off the tray, allow it to slightly cool on the pan for 2-3 minutes, then give it a taste. If it's not crunchy, put back in the oven for 1-3 minutes. Depending on how thick you rolled them, they may need several extra minutes. The main thing here is that if you try them and the texture is soft, you need to put them in to bake longer.
General Tips For Perfect Homemade Cheese Crackers
- Space Out Crackers: Make sure to leave a little space on the pan between each cracker, as they will raise a bit.
- Keep an eye on the timer: Like I mentioned above in #7, baking time will vary a bit depending on size and thickness. But if they aren't crunchy after 2-3 minutes of being out of the oven, simply pop them back in for 1 minute at a time. While doing this, don't walk away! I did this and accidentally left a pan in for an extra 8 minutes. Even though they were pretty dark, they had a extra toasty flavor like the burnt Cheez It flavor they used to sell.
- Use Real Butter: Margarine or butter substitutes won't result in as flaky as a texture, so I do not recommend using them.
- Store in Fridge or Freezer: Since they have real butter and cheese, they won't last super long at room temperature (mine usually stay crunchy for about 4-6 hours). So store them in an airtight container or bag in the fridge or freezer for longer keeping.
- Don't want to cut? You can roll the dough in a log and slice like you would a tube of cookie dough.
Frequently Asked Questions:
How to store homemade cheez its?
Because of the real butter and cheese, you'll want to store these in a plastic bag or container inside the fridge. After baking, they'll stay crunch for several hours but will start getting soft if you were to leave them out all day or overnight.
Can I use whole wheat flour to make these homemade cheez its a little healthier?
Yes! The crackers will taste a little nuttier and be darker in color, but still result in a tasty, crunchy homemade cheese cracker. When making whole wheat cheez its, I like to add about ⅛ teaspoon of garlic powder and ⅛ teaspoon of onion powder to give them a little more flavor.
Do I need to chill the dough before rolling?
So here's the thing. Most recipes out there for homemade cheese crackers will tell you to chill the dough. But I've tested this 3-4 times and the chilling is just not necessary. Chilling naturally helps make the dough not as sticky, but if you are using cold cheese and butter like I mention in the recipe and have a little extra flour on hand while rolling, the chilling is not worth the time.
Plus, when I tested chilling the dough, the square and shapes shrunk down a lot while baking which I didn't like.
All this said, chilling the dough doesn't hurt but isn't necessary.
How do you make CRISPY homemade cheese crackers?
If you want them even crispier, bake for an extra 5-7 minutes. I accidentally did this and while they were pretty dark (not burnt), they had a extra toasty flavor like the burnt Cheez It flavor they used to sell.
Can I make these Homemade Cheez Its gluten free or keto?
I haven't personally tried this, but there are so many great gluten-free flours out there these days that I would definitely say to try it!
In designing one of my clients websites, I noticed she has a recipe for low-carb keto cheez-its, so you should check out that recipe!
Can I add seasonings to make other flavors?
You sure can! You can add spices or use different types of hard cheeses to make different flavors of homemade cheese crackers. Here's just a couple ideas:
Homemade Hot and Spicy Cheez Its: Add 1oz. dry ranch dressing mix + 2-3 teaspoons red pepper flakes
Homemade White Cheddar Cheez Its: Substitute the sharp white cheddar for a solid white cheese. Vermont white cheddar would likely be great here.
What are Cheez Its made out of?
Store-bought cheez-its are made with a variety of things like oil, milk, and enriched flours. But the great thing about this easy homemade cheez it recipe is that it only takes 4 simple, straight-forward ingredients. Sharp cheddar cheese, butter, flour, and salt.

Homemade Cheese Crackers
Ingredients
⭐️ Before you begin! If you make this, will you do me a huge favor afterwards and leave a review and rating letting me know how you liked this recipe? This helps my small business thrive so I can continue providing free recipes and high-quality content for you.
Instructions
- Take the 8 ounces extra sharp cheddar cheese and 4 tablespoons unsalted butter out of the refrigerator (you want them cold) and cut into small cubes (about ½" in size).
- In the bowl of a stand-mixer, add just the extra sharp cheddar cheese and beat on medium-high speed (a level 6 on kitchenaid) for about 30 seconds until the cheese has broken down and looks "creamed together". When finished, prep for the next step by scraping down the sides of the beater or bowl. (*If you don't have a stand-mixer, see tip box below.)
- Turn the mixer back on medium-high speed and add in the cubes of the unsalted butter and ½ teaspoon salt. Mix for another 30-45 seconds until the cheese and butter are creamed together. Scrape down sides of bowl again. Texture Tip: The texture should be creamy and you shouldn't see any chunks of cheese throughout. If you do, mix for a little longer.
- Turn the mixer to low speed then slowly add in the 1 cup all-purpose flour. Once it's all added, turn the mixer up to medium-high speed and beat for 30 seconds until all flour is incorporated. Texture Tip: At this point, the texture will be a dry and crumbly. Have no fear, the ice water is here!
- Turn the mixer on low speed and add the 2-3 tablespoons ice water, 1 tablespoon at a time. When I make this, my mixture only takes 2 tablespoons of water total. But depending on climate and specific brands of ingredients you use, you may need to add up to 3 tablespoons. Texture Tip: You want the dough to feel solid and soft, but not sticky (a lot like play-doh). You should be able to press your finger in it and not have it stick to your finger.
- Once mixed:1. Sprinkle flour on a piece of parchment paper and place dough ball on top.2. Use your hands to "knead" the dough into a solid ball (about 20-30 seconds). Again, this should not be sticky so if it is, add a little flour. The goal here is to have a solid ball.3. Flatten the dough ball into a thick disc. Just like I do with my cut out sugar cookies, this helps prevent cracking as you start rolling.4. Use a rolling pin to roll dough into a 1/16" thickness (aka, really thin where it's just a step above being translucent). I use my trusty rolling pin on the lowest yellow ring.
- Once rolled, use a sharp knife to cut into 1" squares. You can also use fun 1-2" cookie cutter shapes like I did to create stars, hearts, or animal shapes like goldfish. Tip: For the cleanest cut, use a pizza cutter OR use a large knife to press directly down on the dough. Pressing down (as opposed to sliding the knife) will help prevent the edges from crinkling.
- After cutting, transfer the cut crackers to a parchment-lined baking tray and bake at 375℉ for 15-17 minutes. If you made smaller or larger shapes than 1" (or made them thinner!), you may need to bake for a little less or longer.Baking Tip: Because all ovens bake differently, start checking on them around the 10-12 minute mark. You want them to have a little brown on the edges, but still have the orange color.
- To test for doneness, take one off the tray, allow it to slightly cool on the pan for 2-3 minutes, then give it a taste. If it's not crunchy, put back in the oven for 1-3 minutes. Depending on how thick you rolled them, they may need several extra minutes. The main thing here is that if you try them and the texture is soft, you need to put them in to bake longer.
Notes from Melissa
- Food Processor: Add cheese, butter, and salt and pulse for about 30 seconds until incorporated.
- Hand-Mixer: Although this can be harder to do, you could use use a hand-mixer. To do this though, you would want to cut or grate the cheese into TINY chunks then continue to the next steps.
- Space Out Crackers: Make sure to leave a little space on the pan between each cracker, as they will raise a bit.
- Keep an eye on the timer: Like I mentioned above in #7, baking time will vary a bit depending on size and thickness. But if they aren't crunchy after 2-3 minutes of being out of the oven, simply pop them back in for 1 minute at a time. While doing this, don't walk away! I did this and accidentally left a pan in for an extra 8 minutes. Even though they were pretty dark, they had a extra toasty flavor like the burnt Cheez It flavor they used to sell.
- Use Real Butter: Margarine or butter substitutes won't result in as flaky as a texture, so I do not recommend using them.
- Store in Fridge or Freezer: Since they have real butter and cheese, they won't last super long at room temperature (mine usually stay crunchy for about 4-6 hours). So store them in an airtight container or bag in the fridge or freezer for longer keeping.
- Don't want to cut? You can roll the dough in a log and slice like you would a tube of cookie dough.
THE PUFF IS REAL.
These are very very good, the recipe is awesome!
I definitely did *not* get this done within 30 mins of prep time (rolling this stuff out was a beast), but that's likely because I don't do stuff like this typically. Was a fun experience and definitely a great recipe! 😊
(my cracker puff army was a lot bigger than this one tray, just elsewhere)