
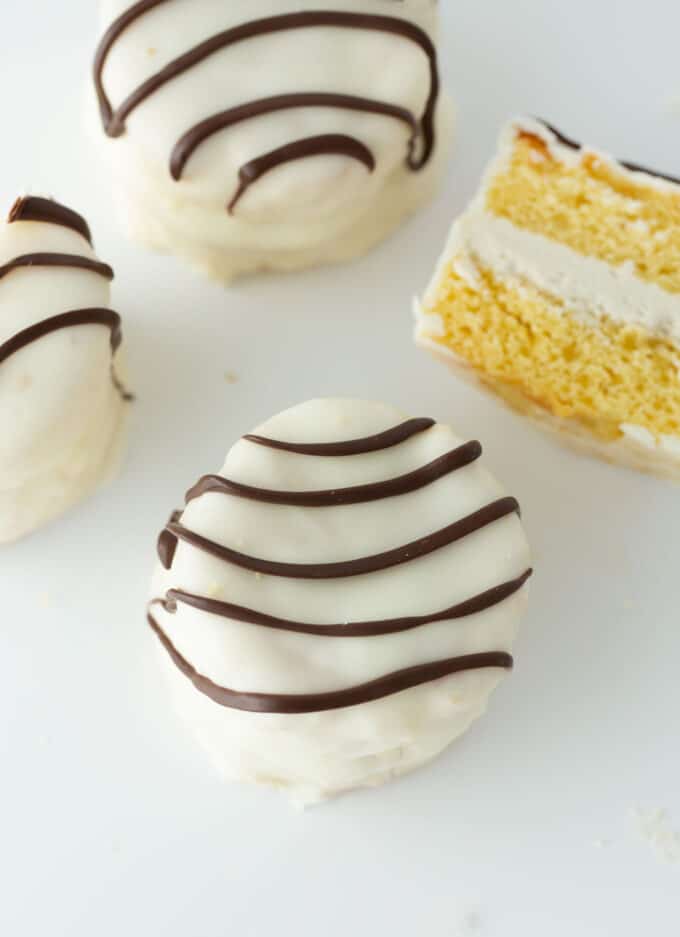
Make my TikTok viral Homemade Zebra Cakes using a doctored cake mix, a delicious fluffy buttercream, and candy coating! Remaking Little Debbies are a fun weekend baking project & taste so much better than store-bought!
Psst! Don't want to make individual ones? Try my new 9×13 Zebra Cake instead! Similar recipe, just an easier process!
Zebra Cake Recipe Recap!
- Easy Cake: While making zebra cakes homemade is definitely a project, we're keeping the cake nice & simple! By adding butter, milk, eggs, and an extra egg yolk to a yellow cake mix, we are able to achieve a more dense texture than the package instructions.
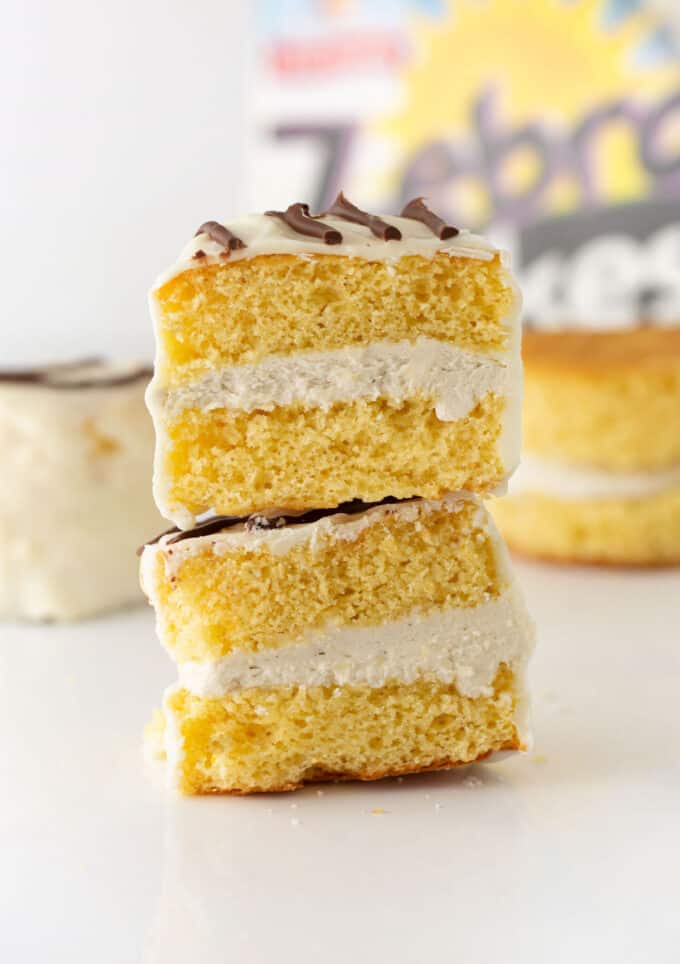
- Thick: Move on over little Debbie, we're making BIG DEBBIES that are 4x as thick as store-bought (just like my thick cosmic brownie recipe!).
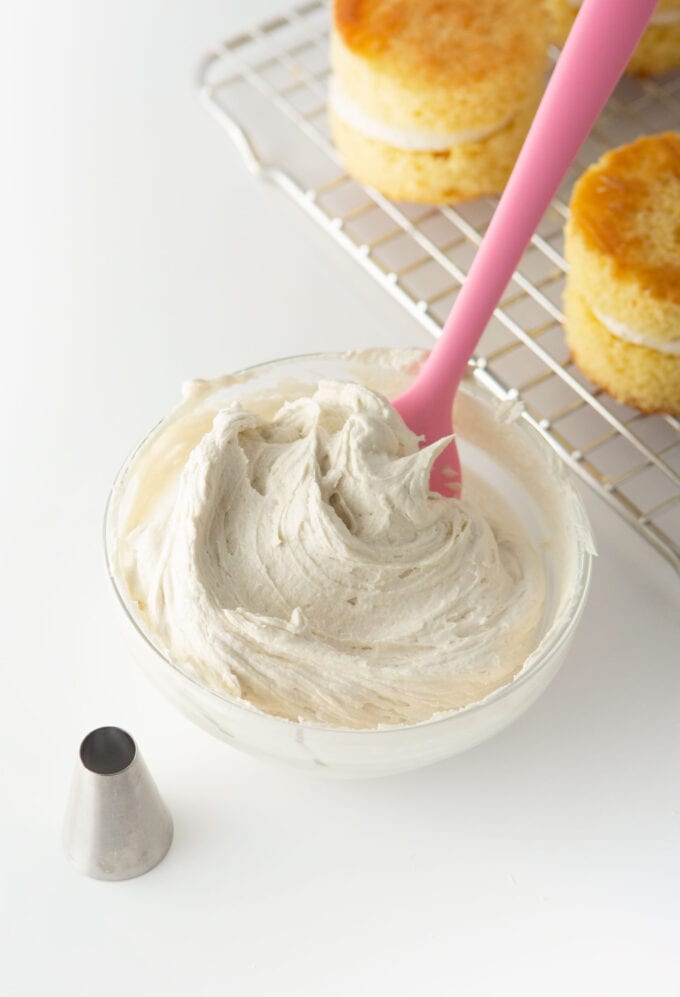
- Fluffy, light buttercream: This buttercream is so light, creamy, and so freakin' delicious. You have to beat it for about 5-8 minutes to get the light texture, but it's worth it!
- Versatile: While we cut a 9x13 cake in half for this, you can also bake them in a cupcake pan or double the recipe and bake in a rimmed sheet pan!
Love Little Debbies? Try my other recipes like Cosmic Brownies, Star Crunch Cookies, and Oatmeal Creme Pies!
Zebra Cake Ingredient Notes
FULL RECIPE: Click to jump down to the condensed recipe card. This Little Debbie Zebra Cake recipe has a few crucial steps, so be sure to follow all my tips & tricks!
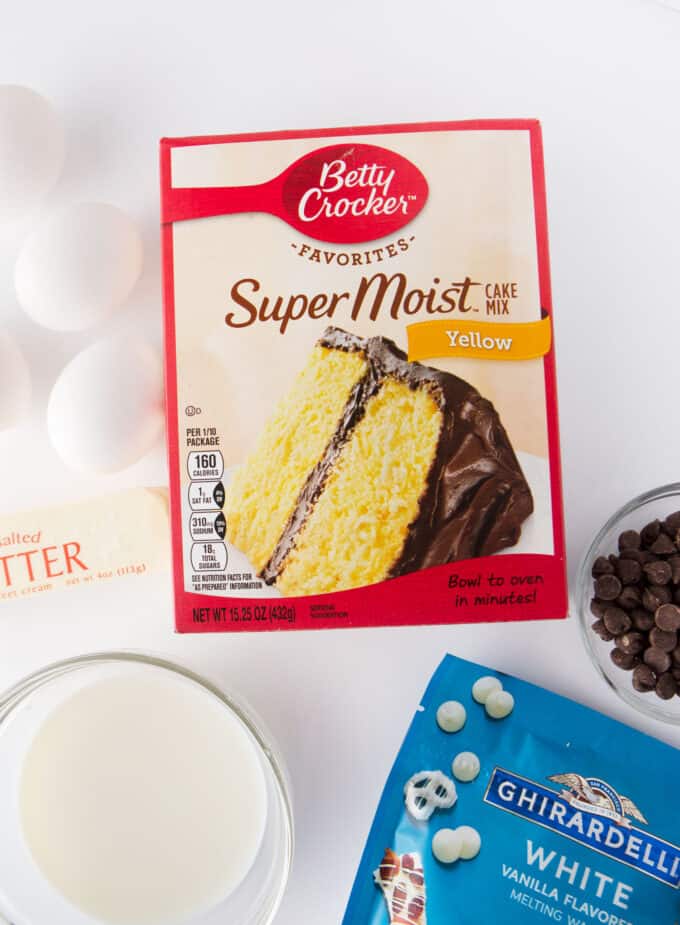
- Yellow Cake (yellow boxed cake mix, melted butter, milk, eggs + extra egg yolk) - instead of following the instructions on the box, we're using milk, butter, and an extra egg yolk to make the cake denser and easier to slice.
- Fluffy Creme Filling (butter, powdered sugar, vanilla extract, salt) - You'll need an electric mixer for this, as you need to whip the frosting for 5-8 minutes to get it super fluffy. But its so worth it...it tastes amazing!
- Coating: You need thin white chocolate for this, so I recommend using melting wafers or almond bark with vegetable shortening added (I don't recommend using just straight-up white chocolate chips because they'll be too thick to coat the cake and will end in disaster). I've included the best options in the FAQ section below or in the recipe card notes section.
- Zebra Stripes: Melt about ¼ cup of chocolate chips and place in ziploc bag with a tiny corner snipped off.
How to Make Homemade Zebra Cakes:
FULL RECIPE: Click to jump down to the condensed recipe card. This Little Debbie Zebra Cake recipe has a few crucial steps, so be sure to follow all my tips & tricks!
Step 1: Mix, Bake, Freeze Cake
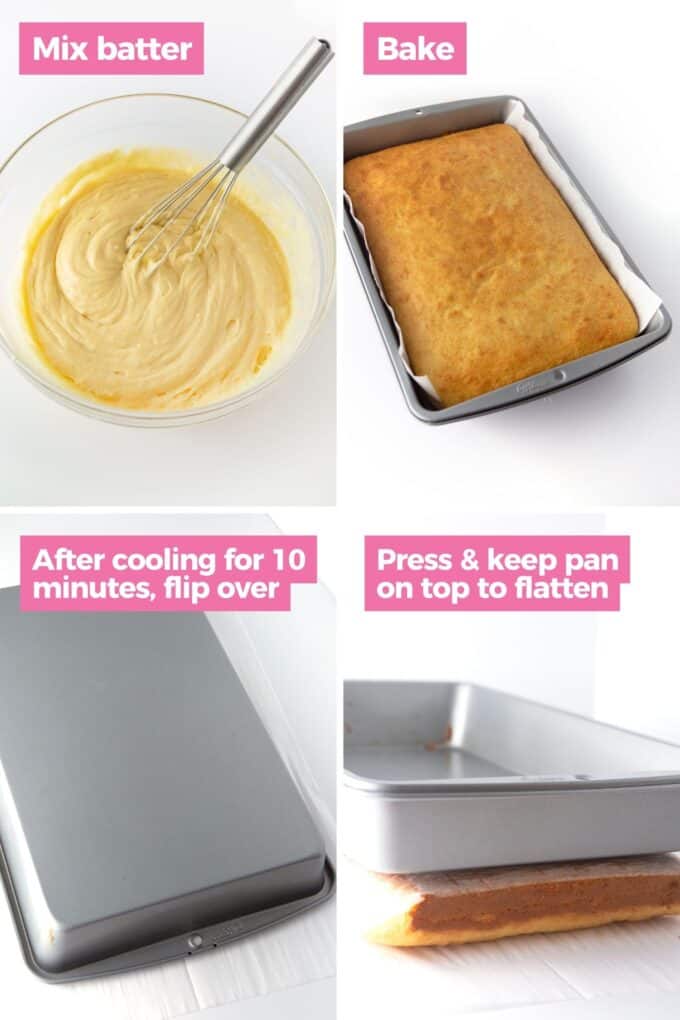
- Make Cake: Instead of following the instructions on the package, add butter, milk, vanilla extract, eggs, and extra egg yolk to the yellow cake mix (this will help the cake be a bit denser and easier to slice). Spread batter into a greased & parchment-lined 9x13 light-colored metal pan, tap pan on counter to remove air bubbles, then bake at 350 for 20-22 minutes or until toothpick comes out clearn.
- Cool, Flip, Freeze: After baking, let cool for 10 minutes then flip the hot cake upside down onto a piece of parchment paper. Place the pan on top of the cake (technically the bottom) to help "press" the cake to be a bit flatter on top. Allow to cool, then freeze cake for 30-60 minutes. This will help the cake firm up so that you can cut it into circles without it crumbling.
Step 2: Make Buttercream
While the cake is in the freezer, make your buttercream!
- Whip buttercream: Using an electric mixer (if using a Kitchenaid stand mixer, use the whisk attachment), cream butter and salt on high speed for 2 minutes until soft and creamy. Slowly mix in powdered sugar ½ cup at a time, add vanilla extract, then beat for 5-8 minutes at medium-high speed. It's important that you beat this for at least 5 minutes for it to be fluffy & creamy. If your frosting is thick, you can add 2-3 teaspoons of milk until desired consistency.
- Place in piping or ziploc bag: Put frosting in a piping bag with large round tip or ziploc bag with the large corner cut off, then set aside for next step.
Step 3: Cut Circles & Pipe Filling
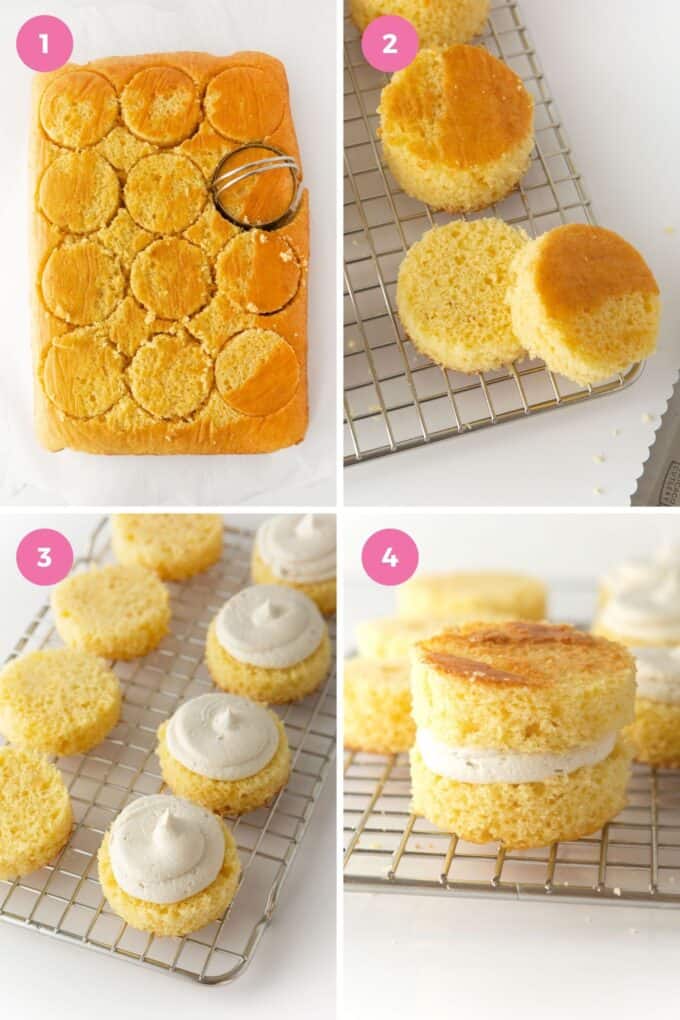
- Cut into circles: Remove cake from the freezer then immediately cut into (12) 2.5" circles. A sharp biscuit cutter works best but you can also use a sharp-edged cup or cookie cutter. I recommend wiping the cutter every 2-3 cuts to prevent crumbs from sticking.
- Slice in half horizontally & pipe frosting: After circles are cut, use a serrated edge knife in a "sawing" motion to cut each circle in half horizontally. On one half, pipe a double layer of frosting (i.e. do one full swirl, then another one on top). Place the other half of the cake on top and gently press down.
- Freeze: To prevent cakes from falling apart, freeze the assembled cakes for 30-60 minutes before dipping in white chocolate coating. I know, I know...freezing takes time but is required for these or else your cake will crumble when you dip them!
Tip: If you don't have a circle cutter, you can totally still make these as squares by just cutting the cake into squares like normal. To do this, I recommend trimming off the rounded corners so that you have crisp-edged squares for all of them.
Step 4: Roll in White Chocolate Coating & Add Stripes
Be sure to read my FAQ section below for options for the white chocolate coating. It's important not to just use melted white chocolate chips for this.
- Melt white chocolate wafers: Melt white chocolate melting wafers according to the instructions on the package (or for almond bark, melt at 50% power in 30-second increments, stirring in between each one). Once melted, scoop out about ¼ cup of white chocolate in a small bowl and set aside (since the main bowl will get crumbs in it, this is the "clean" white chocolate you'll use to cover the tops).
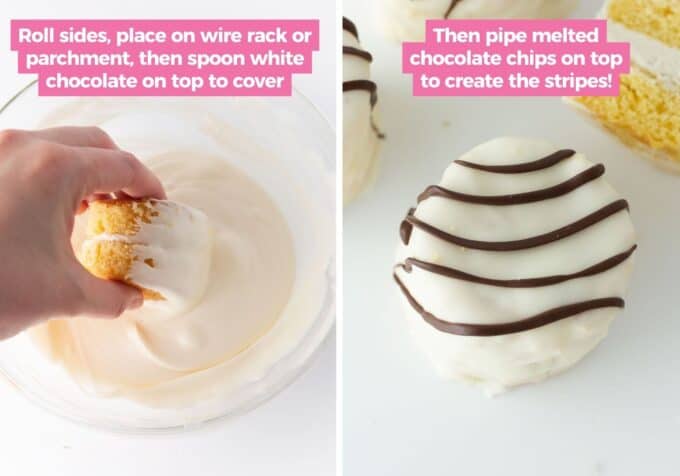
- Roll sides into white chocolate: Remove cakes from freezer, gently brush off any loose crumbs, then quickly roll only the sides into the melted chocolate (don't try to "dunk" the whole thing). Place on a greased wire rack or parchment paper to allow excess chocolate to drip off.
- Cover tops: Use the small bowl of reserved white chocolate and use a spoon to pour on top, then spread until the cake is fully covered. Finish it off by melting chocolate chips in the microwave (again at 50% power in 30 second increments), then put in a ziploc bag with a tiny corner cut off to pipe on "zebra" stripes on top.
- Let harden, then enjoy! Allow cakes to harden before serving.
Tip: If you want the zebra stripes to "blend" into the white chocolate, add them immediately after you add the white chocolate on top.
Storing & Freezing
Storage: Store in an airtight container and enjoy within 3-4 days for ultimate freshness!
Freezing: While you can freeze these for 1-2 months, just keep in mind that the coating will likely "sweat" when you remove them from the freezer. To freeze, allow chocolate to fully harden, wrap each cake in plastic wrap, then place in an airtight container.
Frequently Asked Questions:
I wouldn't recommend it, as cake mixes typically result in a really light & airy cake which would be hard to slice and dip. This is why we're adding more fat to the recipe with the milk, melted butter, and the extra egg yolk. We tested this with Betty Crocker, Pillsbury, and Duncan Hines and all worked well!
As I mentioned above, you need a thin white chocolate coating for this, so I don't recommend using just straight-up white chocolate chips. I've included the best options below.
Melting Wafers: Ghiradelli has white melting wafers that tend to melt thinner than chocolate chips, which will make them easier to roll. Wilton also has candy melts that will work, although I still like Ghiradelli better for taste and thinness.
White almond bark with vegetable shortening added: I don't usually like using almond bark because some brands are too thick, so if you use it be sure to add in a spoonful of vegetable shortening (to the bowl of almond bark, prior to microwaving) so that it melts much thinner. I tested these with Kroger brand almond bark, which I like the flavor of (Aldi brand did not melt as well & did not taste good, in my opinion!). Whatever you use, be patient and melt in 30 second increments on 50% power, stirring each time. Overheating almond bark is the reason most people hate using it, ha!
Ganache: You could technically use a white chocolate ganache for these, it just won't harden like a candy coating will. To make this, use a 1:2 ratio (½ cup white chocoalte chips with 1 cup heavy cream). To make this, pour hot cream over chocolate chips, let sit for a few minutes, then stir until creamy.
While I created this recipe with a 9x13 pan (since it's what most people have!) you can also double the recipe and bake it in a large, rimmed sheet pan. If doing this, you don't need to slice the cake horizontally as it will be thinner. Simply cut out circles, then layer them on top of each other.
While I haven't tested it & am not very familiar with the texture of gluten-free cake mixes, you can try making these with your favorite gluten-free cake mix!

Homemade Zebra Cakes
Ingredients
⭐️ Before you begin! If you make this, will you do me a huge favor afterwards and leave a review and rating letting me know how you liked this recipe? This helps my small business thrive so I can continue providing free recipes and high-quality content for you.
Instructions
- Be sure to read through the blog post above for important tips & tricks (and step-by-step photos!).
- In a large mixing bowl, stir together 15.25 oz yellow cake mix (don't use instructions on back), melted ½ cup unsalted butter, ¾ cup milk, 1 teaspoon vanilla extract, 3 large eggs + 1 egg yolk. Pour in a greased and parchment-lined 9x13 light-colored metal baking pan, spread until smooth, then tap the pan on the counter about 20 times to remove the air bubbles.
- Bake at 350°F for 20-22 minutes or until toothpick comes out clean. Allow cake to cool for 10 minutes, then flip over onto a wire rack or piece of parchment paper. If your cake has a bit of a dome, press the pan on top as "weight" to help it flatten while it continues cooling.
- Once cooled, freeze cake for 30-60 minutes. This will help the cake firm up so that you can cut it into circles without it crumbling.
- Using an electric mixer (if using a Kitchenaid stnad mixer, use the whisk attachment), cream ½ cup unsalted butter i.e. 1 stick)[/adjustable and ¼ teaspoon salt on high speed for 2 minutes until soft and creamy.
- Slowly mix in 3 cups powdered sugar, ½ cup at a time. Add 1 tablespoon vanilla extract, then beat for 5-8 minutes at medium-high speed. It's important that you beat this for at least 5 minutes for it to be fluffy & creamy. If your frosting is thick, you can add 2-3 teaspoons milk (as needed) until desired consistency.
- Put frosting in a piping bag with large round tip or ziploc bag with the large corner cut off, then set aside for next step.
- Remove cake from the freezer then immediately cut into (12) 2.5″ circles. A sharp biscuit cutter works best but you can also use a sharp-edged cup or cookie cutter. I recommend wiping cutter every 2-3 cuts to prevent crumbs from sticking.
- Use a serrated edge knife in a "sawing" motion to cut each circle in half horizontally.
- On one half, pipe a double layer of frosting (i.e. do one full swirl, then another one on top). Place the other half of the cake on top and gently press down.
- To prevent cakes from falling apart, freeze the assembled cakes for 30-60 minutes before dipping in white chocolate coating. I know, I know...freezing takes time but is required for these or else your cake will crumble when you dip them!
- Melt 24 ounces white melting wafers OR almond bark according to the instructions on the package (or for almond bark, add a spoonful of vegetable shortening and melt at 50% power in 30-second increments, stirring in between each one).
- Once melted, scoop out about ¼ cup of white chocolate in a small bowl and set aside (since the main bowl will get crumbs in it, this is the "clean" white chocolate you'll use to cover the tops).
- Remove cakes from freezer, gently brush off any loose crumbs, then quickly roll only the sides into the melted chocolate (don't try to "dunk" the whole thing). Place on a greased wire rack or parchment paper to allow excess chocolate to drip off.
- With the small bowl of reserved white chocolate, use a spoon to pour on top, then spread until the cake is fully covered.
- Finish it off by melting ¼ cup milk or semi-sweet chocolate chips in the microwave (again at 50% power in 30-second increments), then put in a ziploc bag with a tiny corner cut off to pipe on "zebra" stripes on top. If you want the zebra stripes to "blend" into the white chocolate, add them immediately after you add the white chocolate on top.
- Allow cakes to harden before serving, then enjoy!
Notes from Melissa
- Melting Wafers: Ghiradelli has white melting wafers that tend to melt thinner than chocolate chips, which will make them easier to roll. Wilton also has candy melts that will work, although I still like Ghiradelli better for taste and thinness.
- White almond bark with vegetable shortening added: I don't usually like using almond bark because some brands are too thick, so if you use it be sure to add in a spoonful of vegetable shortening (to the bowl of almond bark, prior to microwaving) so that it melts much thinner. I tested these with Kroger brand almond bark, which I like the flavor of (Aldi brand did not melt as well & did not taste good, in my opinion!). Whatever you use, be patient and melt in 30-second increments on 50% power, stirring each time. Overheating almond bark is the reason most people hate using it, ha!
- Ganache: You could technically use a white chocolate ganache for these, it just won't harden like a candy coating will. To make this, use a 1:2 ratio (½ cup white chocoalte chips with 1 cup heavy cream). To make this, pour hot cream over chocolate chips, let sit for a few minutes, then stir until creamy.
Did you make this?
I'd LOVE to hear your thoughts! Leave a review & photo of your creation and be sure to mention @DesignEatRepeat or tag #DesignEatRepeat on Instagram!If you make these zebra cakes, be sure to leave a comment below and tag me on Instagram @designeatrepeat. I LOVE seeing what you made!
Excellent recipe. Great flavor. I made it for 9" cake instead of smaller ones. My only problem was I needed to add more powdered sugar to the filling as I found it too soft. I'll definitely use this recipe again.
I’m so glad you enjoyed it! Adding extra powdered sugar is a great adjustment to firm it up. That can happen based on how soft the butter is, so I'm glad you were able to make it work on the fly!
These are absolutely amazing! I used ghiardelli white melting wafers and I poured the batter into a sheet pan topped with parchment and just used two of the pieces to form my zebra cake. My biscuit cutter was a little too big so I made huge cakes, next time I will use a smaller biscuit cutter than I would normally think to as they are so rich you want to have a smaller cake. But these exceeded every expectation and I have been dreaming about them since I made them! :)
I am so glad to hear you loved this recipe! Thank you so much for taking the time to leave a review, Kristen! I really appreciate it!
Made these for my boyfriends birthday, turned out amazing! Definitely a messier thing to make, but i followed directions to a T and it was seamless. Will be making again I am sure!
So glad to hear you enjoyed the recipe, Michelle! Thank you so much for leaving a review!
My family absolutely loves these! My dad said it was the best dessert he’s ever had. Mine do not look at pretty as yours, but the taste is great. A little too sweet for me personally, but still amazing!
So happy to hear everyone enjoyed the recipe! Thank you so much for leaving a review, Bailey!
filling is WAY TOO SWEET!!!!!!! I'm sick to my stomach just sampling half of one.. Next time I'll make a fluffy german buttercream filling.. I wasted so much time on this recipe for little sweet treat gifts I'm embarrassed to share. Unfortunately, I don't have time to make something else. Lesson learned.
Oh no, I'm sorry you didn't like this!
I just used your recipe for the dip, the white chocolate wafers. I don't like how thick it is, I like the thin chocolate like the cakes you buy.
Hi Bridget! A petit four icing may be closer to what you're wanting. If you google it, lots of recipes will pop up! It's a thinner glaze that a lot of cakes use. I haven't used it myself on these zebra cakes but worth a look into!
Loved the recipe! Was a huge hit for family and a great treat for potlucks. These homemade ones are superior to storebought and don't leave a greasy film in your mouth.
After two trail runs here are my notes and tips.
The cake mix rises a lot and that makes thick cakes in a 9" x 13" pan. I also had to double to cook time because it was so thick. I use cookie sheets now so the cake is nice and thin and cooks much faster. (10-13 minutes).
I also thin down the white chocolate with coconut oil because if the white chocolate is thick, it crumbles and makes a mess after a bite.
Glad to hear everyone enjoyed the recipe, Helen! Thank you so much for leaving a review and for leaving some tips!
I have not made this yet. I was wondering how to ship them before I make them. I need to mail them from DE to FL. What would you suggest/recommend?
Hmm, that's tricky! I'd be a bit worried about the heat, as the coating and buttercream may melt unless you have ice packs and such. I don't have any great suggestions for this, but I'd probably wrap them individually and then put them in some kind of box that had enough packing peanuts around it so that the box inside can't shift at all.
I haven't ever tried shipping something like this but if you google "how to ship fragile baked goods", something may come up with a better idea!
Easy and yummy! My family loved them and will definitely be making them again
RUN, don’t walk to the grocery store and get the ingredients to make these. I can’t even begin to describe how yummy these turned out. I made them in a cupcake pan because I didn’t have anything to cut them with, and it made this recipe super easy for me!
Once again she nailed it!! My husband loved this one, said it was better than the original!
Yay! So glad you loved them! The cupcake pan is so smart, totally going to add that trick to the post!
Thank you so much for taking the time to leave a review!
These little cakes were a delight to make! My family raved over how delicious they are and now I can’t go back to buying the boxed cakes.
Yours looked so perfect!! It made my day to see you be the first to make them!