
My craft room reveal is finally here! Today, I'm giving you an in-depth peek inside my craft room storage, organization, and decor ideas to hopefully inspire some craft room ideas of your own!
PS. this is not a sponsored post, just sharing alllll the links and details with you because I like to believe rainbow things make the world go round.
Photography by Evin Photography
My Craft Room Vision
Before jumping into the specifics, I'll start by saying that having a proper craft room and office is something I've been dreaming of since graduating college. And it probably even goes back to junior high, as I'd scour scrapbook magazines while babysitting and be so inspired by all the organization and beauty that filled the pages. With my first two apartments after college, I had my "craft space" in the living room and even though my last place had an extra bedroom that I turned into my office, the walls were cement so I could never hang up the wire wall organizers that I had purchased. It was a cute little space but never felt like my own.
Fast forward to my current home, my main priority in choosing a place was to have a good sized bedroom to convert to my office. And this time, I decided that I was finally going to do it. To just crack down, order a bunch of stuff, and set aside a weekend to get. it. done. Luckily, my mom likes organizing and taking spontaneous trips so after a solid weekend of having her here, we put on our craft organizer hats and were able to crank it out and get it almost picture perfect!
Going into it, I wasn't 100% sure on the craft room design or layout I wanted to go with but I just jumped in and am so happy with how my little space turned out. It's not a large room or anything too permanent (it's still a rental after all!), but I now have a colorful, inspiring space to work in and I can't wait to spill all the sprinkles details. So without further adieu, let's get started!

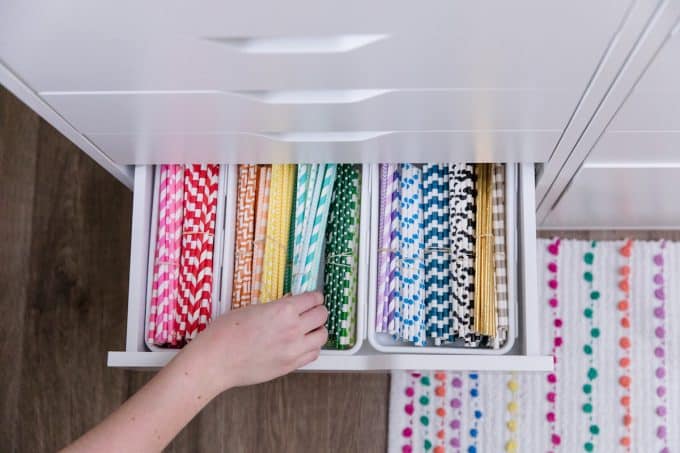
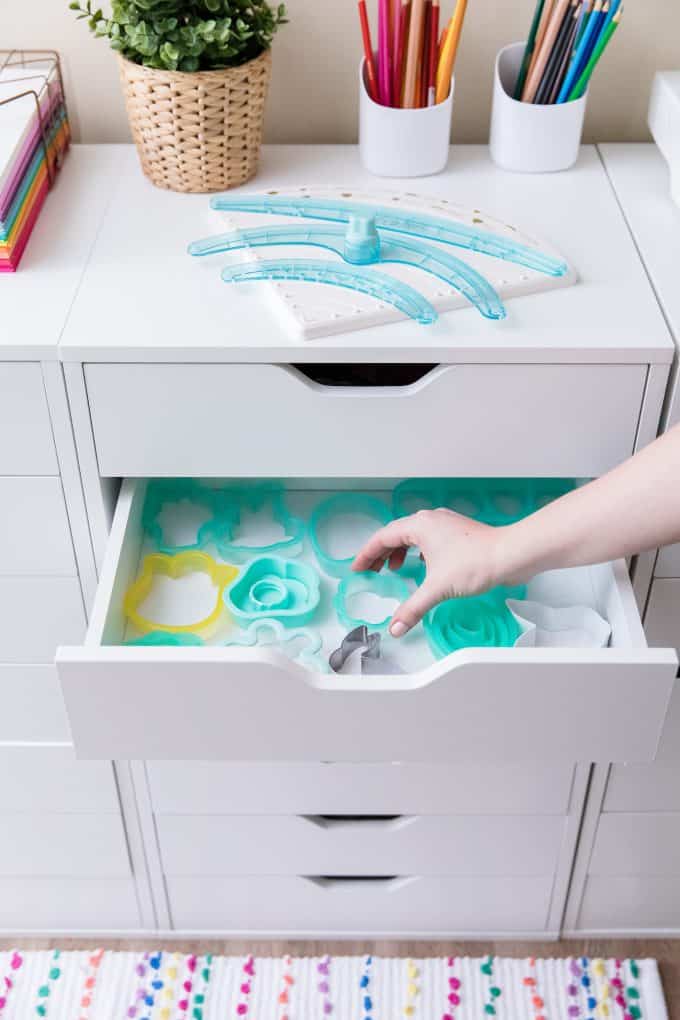
Craft Storage Drawers
The biggest question I've gotten since posting sneak peeks of my craft room has been where I got the white craft storage drawers that you see here on the back wall. After searching for MONTHS, reading reviews, scouring the web for craft room ideas and inspiration, and debating whether to drive 3 hours to IKEA, I decided to bite the bullet and get them off of Amazon. Craft storage furniture delivered right to my door? Sign me up! (Sorry UPS man for having to drag these giant boxes off the truck...)
I was a little weary because buying furniture off of Amazon seemed a little risky, but they were cheaper than the similar IKEA craft storage drawers which were $179.99 each at the local "we sell IKEA stuff store". So I hit purchase and held my breath until they arrived.
Spoiler alert: They work great and I would order more (despite my assembly trouble mentioned below).
- Brand: Winsome Halifax
- Assembly: Not going to lie, the instructions were just as bad as the IKEA ones. No words, just pictures. It took us about 2 hours to figure out the first one, but once we figured it out, the other three only took about 30 minutes each. Highly recommend using a drill, as screwing these together by hand will take 500 years (there were A LOT of screws).
- Quality: Better than I had expected from reading some of the reviews. They're about the same quality level as IKEA. Nothing crazy fancy, but enough to do the job.
- Size: I got the 7-drawer craft storage drawers but they also have a 5-drawer ones. Once assembled, they're 19.2" (deep) x 16" ( wide) x 35.4" (tall). The one thing I wish were different about these is that they'd fit 12 x 12" scrapbook paper, but the drawers aren't quite long enough for that (they do work well for 8.5 x 11" paper though). That said, these drawers are great for storing cookie cutters, cardstock, tape, pencils and they'd also work great if you were looking to organize a small sewing room.
What I Love: The size. Having had everything in closets or larger craft storage cabinets in the past, these smaller sized drawers are perfect for keeping all the small craft supplies organized without them swimming around in a ton of space. I also ordered one for my jars of sprinkles, which they've worked great for. I apparently had a thing for Marie Kondo organization even before I knew she existed.
What's Inside the Craft Storage Drawers?
Like I mentioned, I had been scouring the web for craft room storage ideas and organization tips for years. My biggest issue with all my crafting supplies is that it's all small stuff that was just getting lost in the bigger storage bins I had. I never knew what I had, so the idea of crafting had become overwhelming. Plus, because my craft room was also my home office, I needed to find a way to organize it so that I had a peaceful place to work each day.
That was the biggest motivator in this craft room organization project - I needed a place for all the trinkets so that it felt like a place of zen, rather than a place where there were 30 spools of ribbon flying every which way (#DoesNotSparkJoy).
Inside the craft storage drawers, I have:
- Basic craft supplies like tape runners, colored pencils, rubber bands, pens, pencils, glue dots, etc.
- Drawers for cookie cutters storage, organized by holiday.
- Drawers for holiday props/trinkets/straws (yeah, I realize that's kind of weird but hey, it's the craft stylist way of life!)
- Drawers for paper, cardstock, memory cards, batteries (all the boring stuff).
Paper Storage
It's no secret that every paper crafter has a unruly stash of cardstock. To keep things simple, I decided to store my cardstock in a magazine rack so that it was easily accessible and in sight. Since this is the paper I use most with my Silhouette, I wanted to keep it close by rather than hiding it away.
All my larger paper (like 12 x 12" scrapbook size) is still in a sad stack in the closet. I'm still trying to figure out a good way to organize that without having to buy any more large paper storage contraptions. If push comes to shove, I may end up getting a white paper rack shelf system, but that may be something for later down the road. I don't use the larger paper as much, so having it in the closet works fine for now.
- Cost: $14ish
- Brand: Got at Target a while back in their office section. They probably don't still have this one, but always have something similar that is reasonably priced and still stylish.
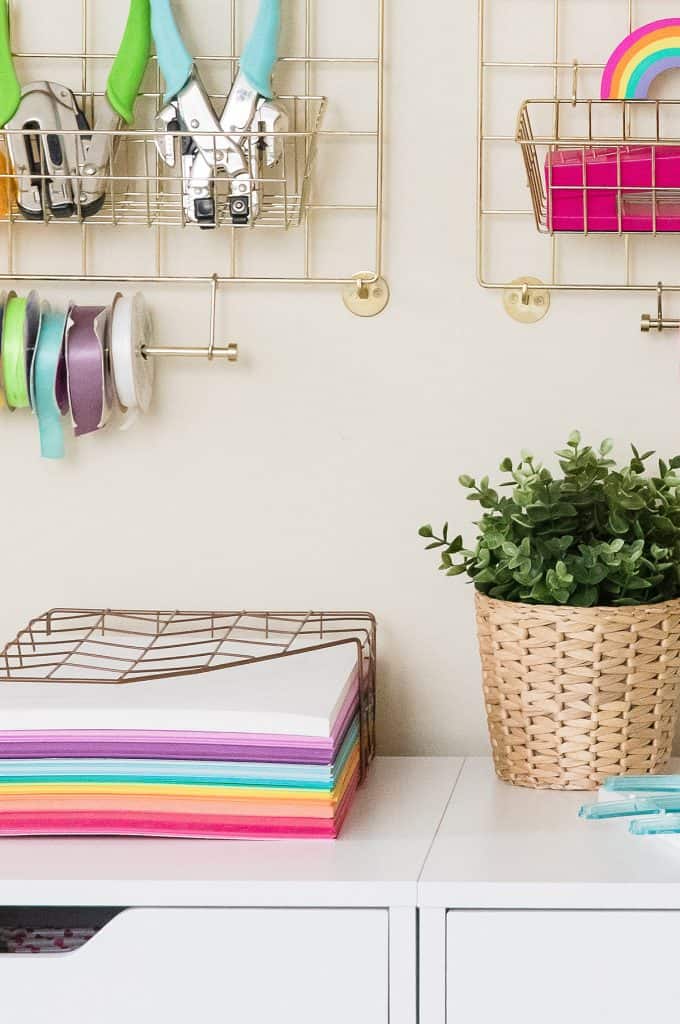
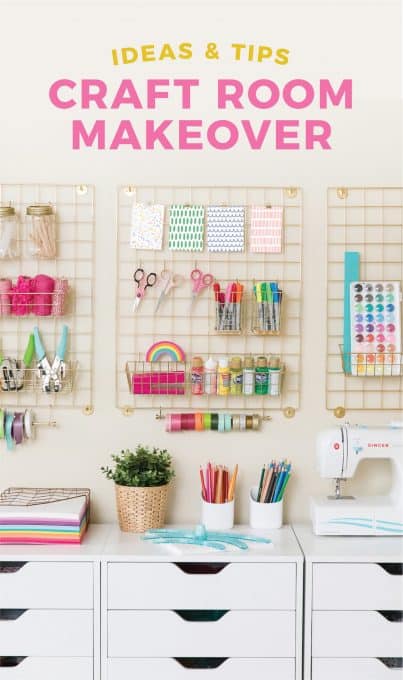
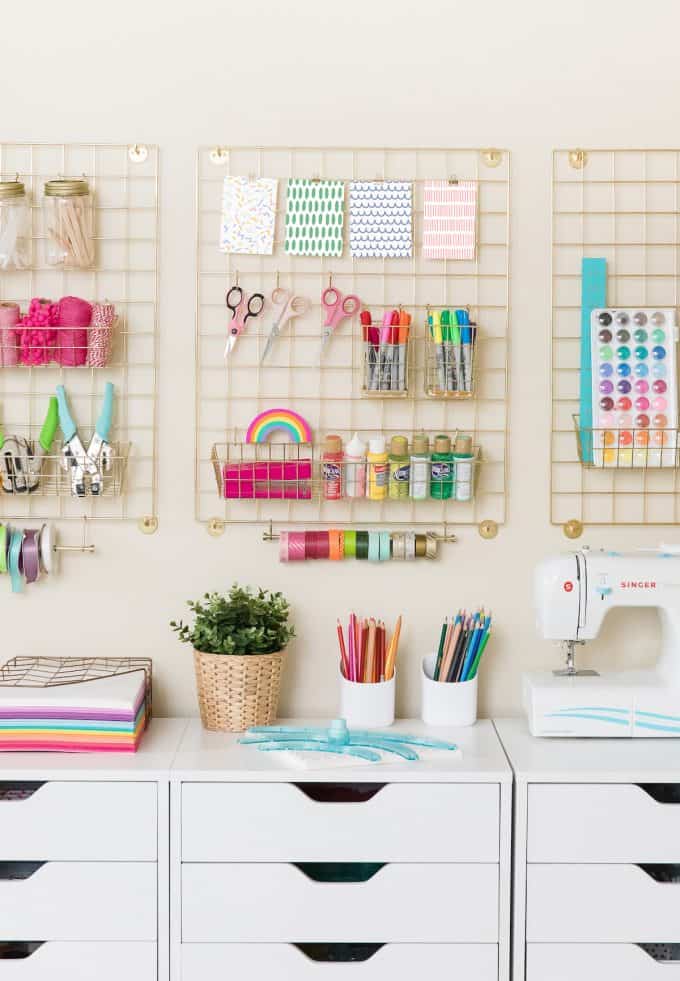
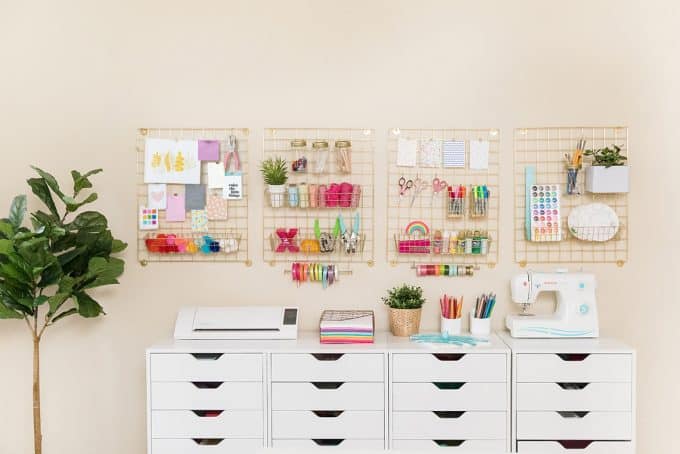
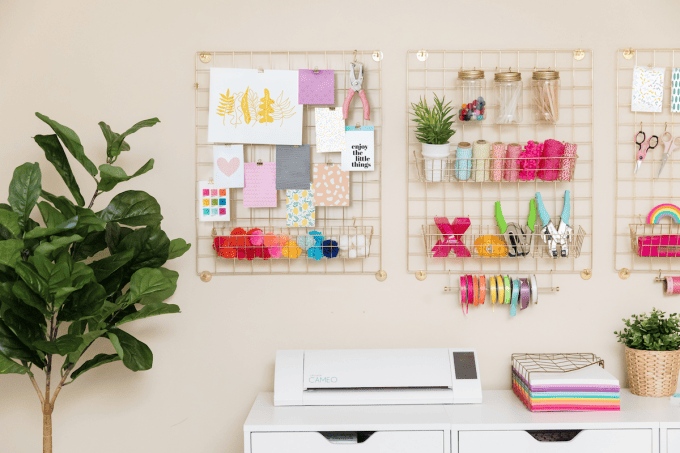
Wire Wall Grid Organizers
Having worked at a craft company for a few years, one of the perks was getting products at a discounted cost. I've had this wire wall grid system in storage for about two years, so I was just a tad bit excited when I finally had a space to use them! Wall storage has always been something I've wanted to implement in my craft room and these were the perfect way to do that. A lot of the inspiration I found online when searching for craft storage ideas used some sort of wall system, so I knew that was a key component I wanted to incorporate.
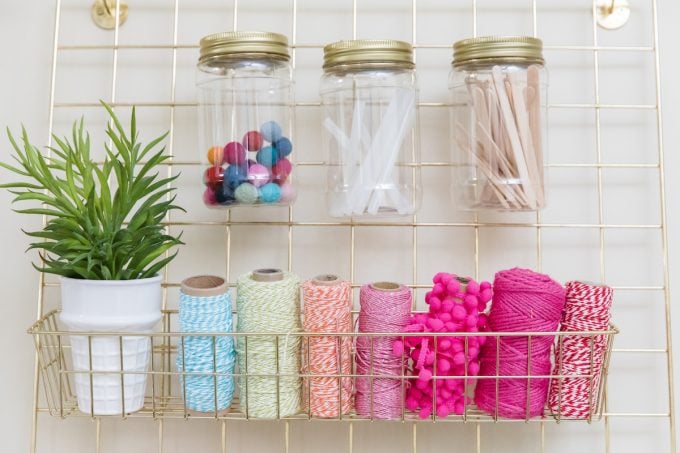
They come in a gold color and attach to the wall using screws (so you will need a drill). As part of the collection, there's also an assortment of wire wall baskets, plastic mason jars, hanging rods for string and washi tape, wire pencil cups, and tin boxes that you can attach. So many great attachments and craft supply storage ideas just in this one collection!
- Cost: Wire Wall Grid $30/each | Medium Bin $10 | Small Bin $8 | Plastic Mason Jars $6 | Hanging Rod $4 | Extra Hooks & Clips $6
- Brand: American Crafts Crate Paper
- Assembly: Mounting these to the wall did take some time, as I was doing it myself. If I had someone to help, the process would have been much quicker since I wouldn't have had stop between each step of measuring, marking, leveling, and hanging.
- Size: Each Wire Grid is 20 x 24"
What I Love: The look - it's my dream craft wall storage that I'm going to be sad taking down when I end up moving!
Cons: They do make a lot of holes in the walls, so if you're in a rental like me, just make sure you A) have permission and B) are willing to spackle and repaint. Each wire frame requires 8 screws (2 on each corner), which I'm positive was designed for stability, but created a lot of holes (x4). The other thing I don't love about these is that the hooks that they come with (that you hang the baskets/jars with) don't "snap" to the wire frame, meaning things wiggle around a bit and every time you grab a scissors or a jar, the hook comes off with it. I'll probably look for different hooks at some point, but for now, they do the job.
Other Uses: I also thought about using one of these wire grids in my entryway with a few of the medium wire wall baskets for keys and mail. I ended up using them all in the craft room, but that's something I'd love to do in the future.
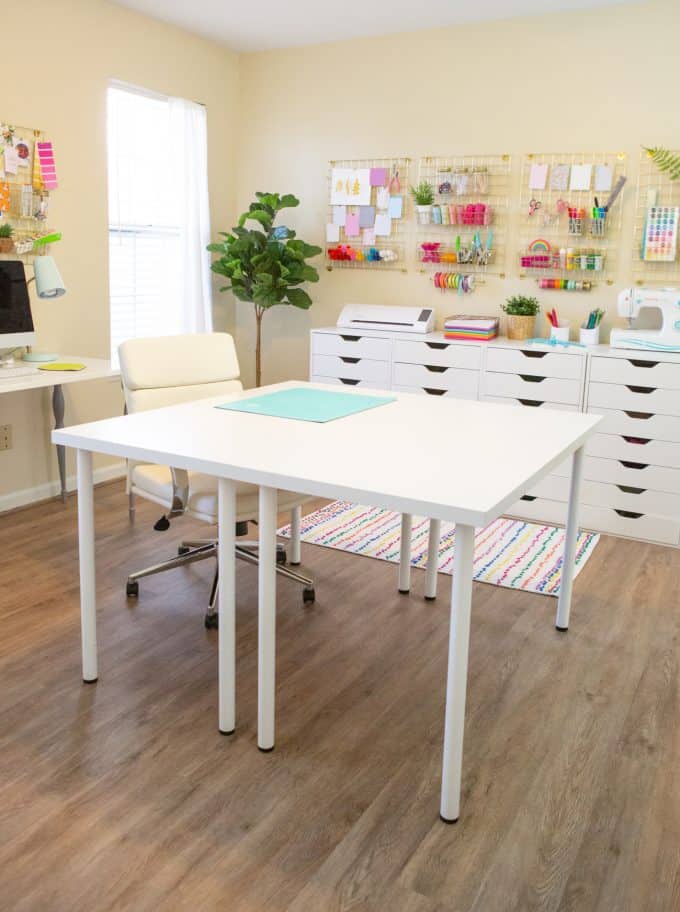
Craft Room Tables & Desk
As you can see in the center of the room, I have two desks that I push together to create one mega table. One day I want to get a large craft table island, but for now, I really like the flexibility of being able to split them apart (plus they're easier to move!). These desks are from IKEA and are pretty lightweight. The tops do scratch pretty easily, so I suggest putting down a plastic cover or being better at using a cutting mat than I am ;)
- Brand: IKEA
Assembly: Very easy, basically just screwing in the legs.
Size: 39 ⅜" L x 23 ⅝" W x 29 ⅛' H
The other desk that my desktop computer is on is a different brand that I got at a local furniture store a few years ago that was a little pricier than IKEA if I remember correctly. But it has more stylish legs and has a better coating on top for less scratching.
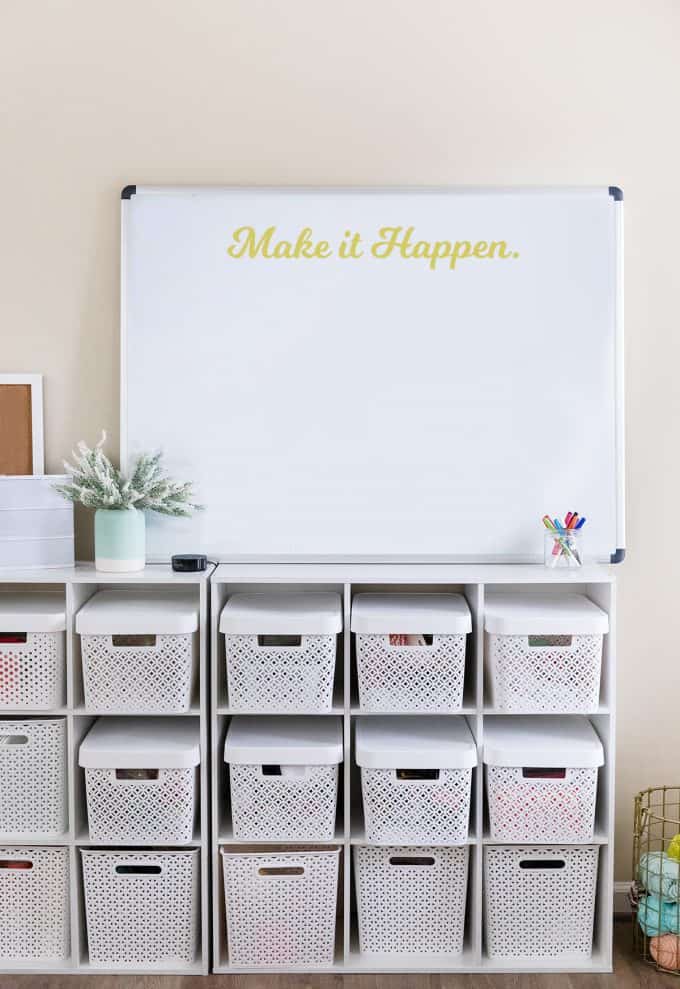
Craft Storage Boxes & Bins
On the other side of the room are my white storage cubes with plastic storage bins. This is where I store some of the bigger craft supplies and props like stashes of prop napkins, spray paints, overflow string, and more. The thing I love about these craft storage containers are that they are DEEP. They can fit a lot of stuff in them, which is greater for the bigger items. These are what I used to store all my smaller trinkets in and while the size is great for the big stuff, the smaller thing was just getting too jumbled.
Now here's the kicker with these storage bins. I got them at Target a few years back and they have since discontinued this exact model (trust me, I've scoured the web!). For a while in 2018 they had similar ones, but not ones this exact size or depth. Luckily, when I was redoing my craft room in November of 2018, I was able to found some taller ones (seen in the bottom row of the shelves) that still fit in the cube storage. They don't have lids like the other ones did, but with them being as tall as the cube, you can't really see inside anyways.
- Closetmaid Storage Cube Shelves (I have two sets of the 3x3)
- Storage Bins: I don't have a link but Target often comes out with new ones
- Size: My cube storage openings are just over 11 x 11", so the original boxes shown here are 10.5" W x 14" L x 9" H and stick out of the front just a tad. The newer ones I've gotten are 11 x 11 x 11" and fit well in the cube without sticking out.
What I Love: Cute organizers and bins are a great way to organize the craft room on a budget without putting holes in the walls.
Craft Room Decor
Once the wire wall grids were put up and filled with supplies, a lot of my main decorating was done. But because I wanted to spruce it up a bit, I added some faux plants (I can't keep real ones alive) and put up a little inspiration wall above my desk. I still want to make some kind of craft room sign, but just need to think of a fun saying first. Overall, the main things I used to decorate my craft room were:
- Faux Plants and Vases (my fiddle leaf tree is fake and also from Amazon but it's currently showing sold out)
- Wire Wall Storage
- Inspiration images and color/paint swatches are a great way to decorate and add inspiration to the room.
- Colorful cutting mats
- Art Prints (the beautiful mustard one shown here is from an Atlanta Letterpress Studio)
- Craft Supplies (arrange the craft supplies by color for a fun added touch!)
- Colorful Rugs
- Crafting Machines like my Silhouette & sewing machine (I like to keep these on display vs. in the closet so that I remember to use them!)
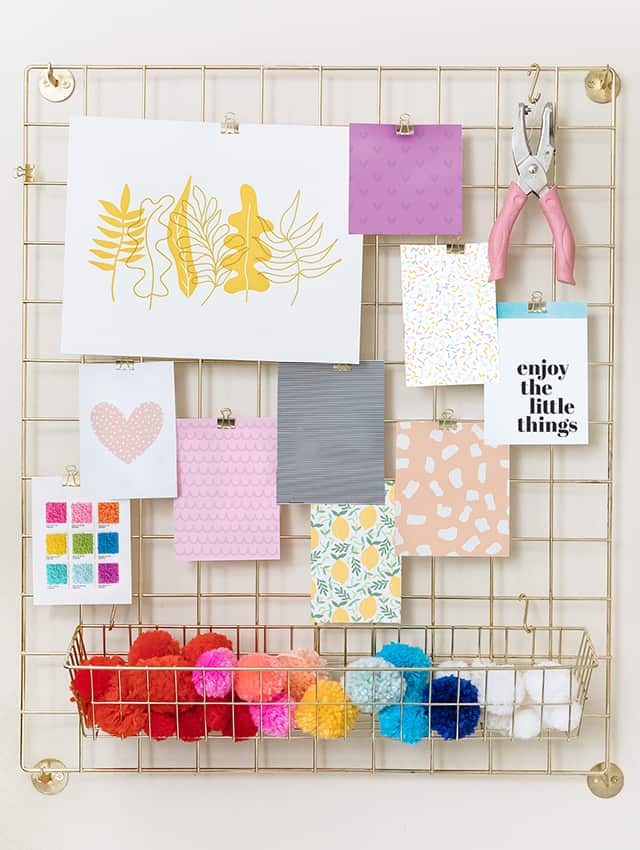
Prints: Enjoy the Little Things / Heart / Patterns
More Craft Organization Ideas & Tips
- Use plastic utensil trays to store exacto knifes, markers, and tape runners right on your desk.
- Add small drawer storage bins inside drawers to help keep smaller items compartmentalized.
- Keep things visible - the more you can see them, the more they'll get used!
- Organize ribbon and washi tape by color.
- Store pom poms, buttons, glue sticks, or popsicle sticks in mason jars.
- Organize paper and cardstock by color in a magazine rack.
And that about covers it! I think this may be the longest post I've ever written but I didn't want to leave out any details. It's been a long time coming and I hope it brought a little inspiration and color to you day. Plus, it was nice reliving the days when it was this nice & clean because the pile of paper I currently have on the floor to shred is definitely not as pretty as these pictures make it look. LOL.
If you have craft room organization tips or spaces you've seen that make your crafting heart melt, I'd love to see them! Leave a comment below with your favorite craft room hack!
Hi, do you know if you can still
Purchase these wall wire grids?
Sadly I don't think they sell them anymore!
I love it! where did u get the medal squares?
Thanks, Dana! I think I still have the metal squares linked in the post but they were from Crate Paper a while back; I'm not sure they still have them but if they do they'd probably be found by googling "crate paper wall wire grids" or something similar. Hope that helps!
Oh my gosh that looks amazing! I LOVE it!
I love this post! One question...How are the hanging plastic mason jars held In place? I can see S hooks behind them but wondering if they are glued on to the lid?
Hey Candy! These particular jars have a ring around the lid that have little hooks where the S-hooks go. So the hooks themselves aren't glued on, but the ring is secured to the jar if that makes sense.
Hey Melissa! Just stumbled across your page for some hacks and I wanted to share with you, the desks are much cheaper in store at Ikea, I purchased the table top with the legs for $22 total (per desk). Thank you for the awesome tips! Can't wait to use them in my craft room.
Oh that's a great tip, Chy! Thanks so much for sharing! Going to add that tip to the post :)