
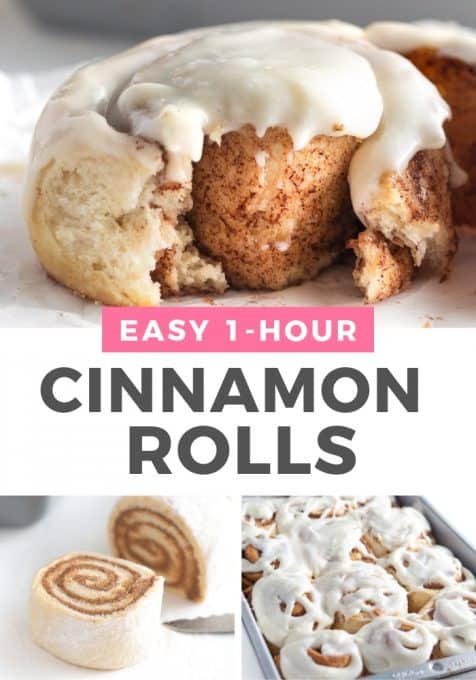
Easy no-rise soft, buttery quick cinnamon rolls made in UNDER ONE HOUR! Yes, you read that. No overnight rise! Made in a 9x13 pan and yielding 12 cinnamon rolls, these make for the perfect weekend treat, special birthday mornings, or neighbor thank you gifts!
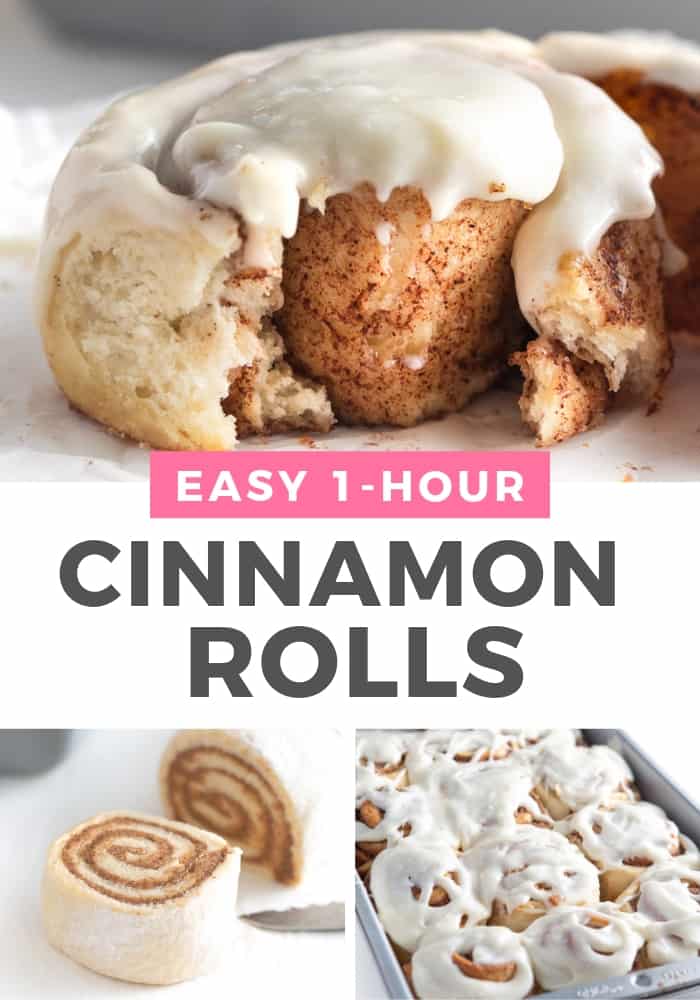
I've been on a mission to develop the perfect EASY & QUICK cinnamon roll recipe that didn't require overnight rising (in fact, basically no rising at all) and after 8 batches & 2 weeks of me swimming in recipe development, I have finally concocted the perfect, easy and quick cinnamon rolls. If you ever wanted to know how to make yeast cinnamon rolls from scratch, I've got the full, step-by-step tutorial here for you below! I mean, just look at that texture and tell me you don't want to devour the entire pan right this second...
What makes these 1 hour cinnamon rolls so perfect?
- You can make these quick cinnamon rolls in under an hour, start to finish. Yes that's right; wake up at 9am and be devouring warm cinnamon rolls by 10am! No need to prep ahead of time or make the night before!
- They have a super soft, buttery, yet perfectly-stretchy bread texture that rivals the bakery or cinnabon. The texture (aside from flavor of course!) was my top priority and these are spot on, if I say so myself.
- Although this recipe does require active dry yeast, all the rest of the ingredients are likely ones you have on hand! (Trust me, you'll start keeping yeast on hand after this!)
What You Need to Make One Hour Quick Cinnamon Rolls:
This is just an overview, click here to jump down to full recipe card for the recipe amounts and condensed, printable recipe instructions.
- Unsalted butter
- Milk (1%, 2%, Whole)
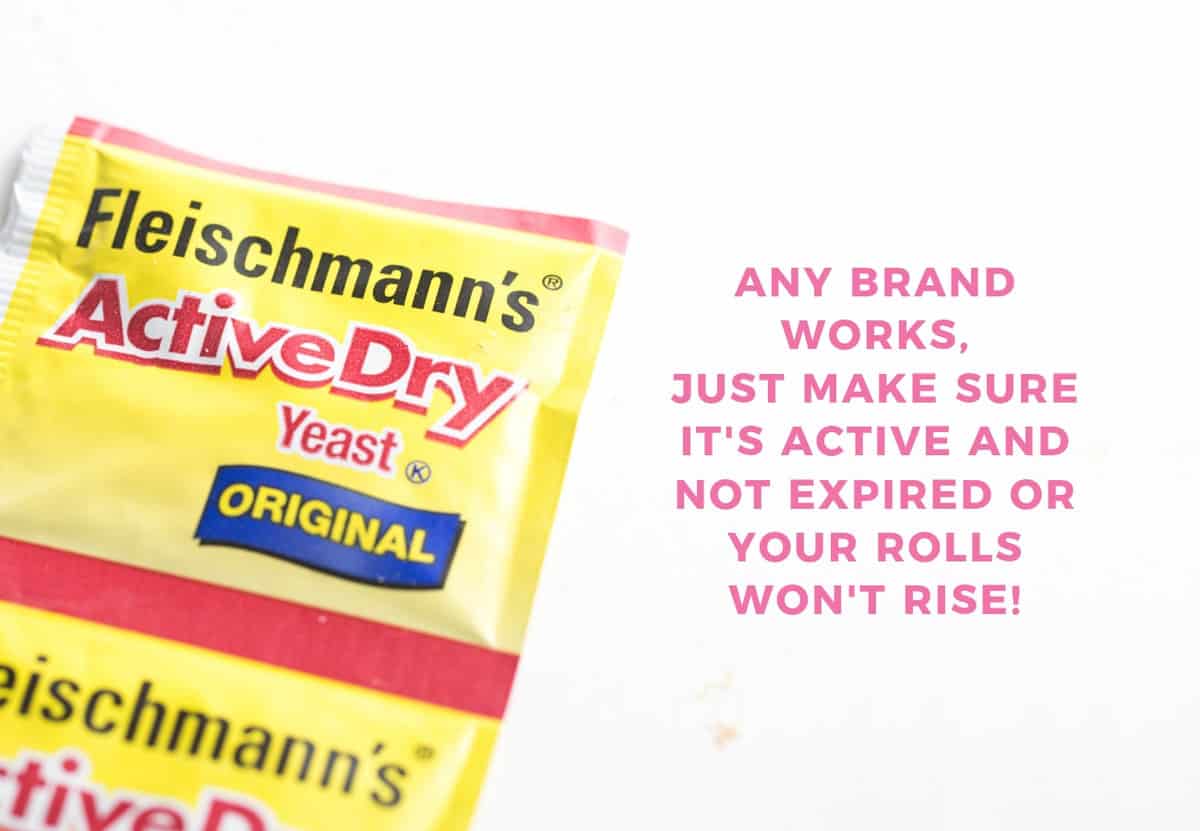
- 2 ¼ teaspoons active dry yeast *(0.25oz packet, see photo below)
- Granulated sugar
- Light brown sugar
- Egg
- Cinnamon
- Salt
- Vanilla Extract
- All-Purpose Flour
- + Cream Cheese Frosting: Cream cheese, powdered sugar, milk, vanilla extract, and pinch of salt
How to Make One Hour Quick Cinnamon Rolls:
This is just an overview, click here to jump down to full recipe card for the recipe amounts and condensed printable recipe instructions.
Step 1: Start Dough Mixture & Let Sit for 10 Minutes
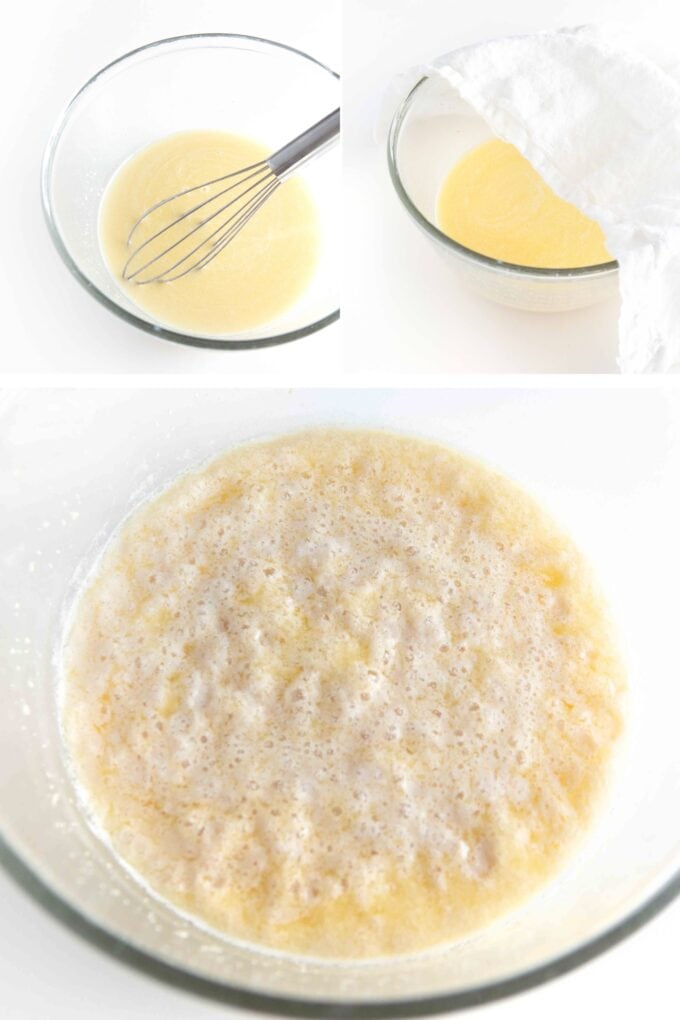
In a small microwave safe bowl, melt ¼ cup unsalted butter for 45 seconds. Pour into a larger, medium-sized bowl. Using that same bowl you just microwaved the butter in, pour in 1 cup milk and microwave that for 45 seconds. Once done, pour that in with the melted butter. Add in 2 ¼ teaspoons dry active yeast and ¼ cup granulated sugar and stir with a whisk until combined. Cover with a clean dish towel or plastic wrap and let sit for 10 minutes, or until foamy.
Tip: If your yeast mixture doesn't foam after about 20 minutes, your yeast was likely dead and you need to restart with fresh yeast.
Step 2: Add Flour Mixture
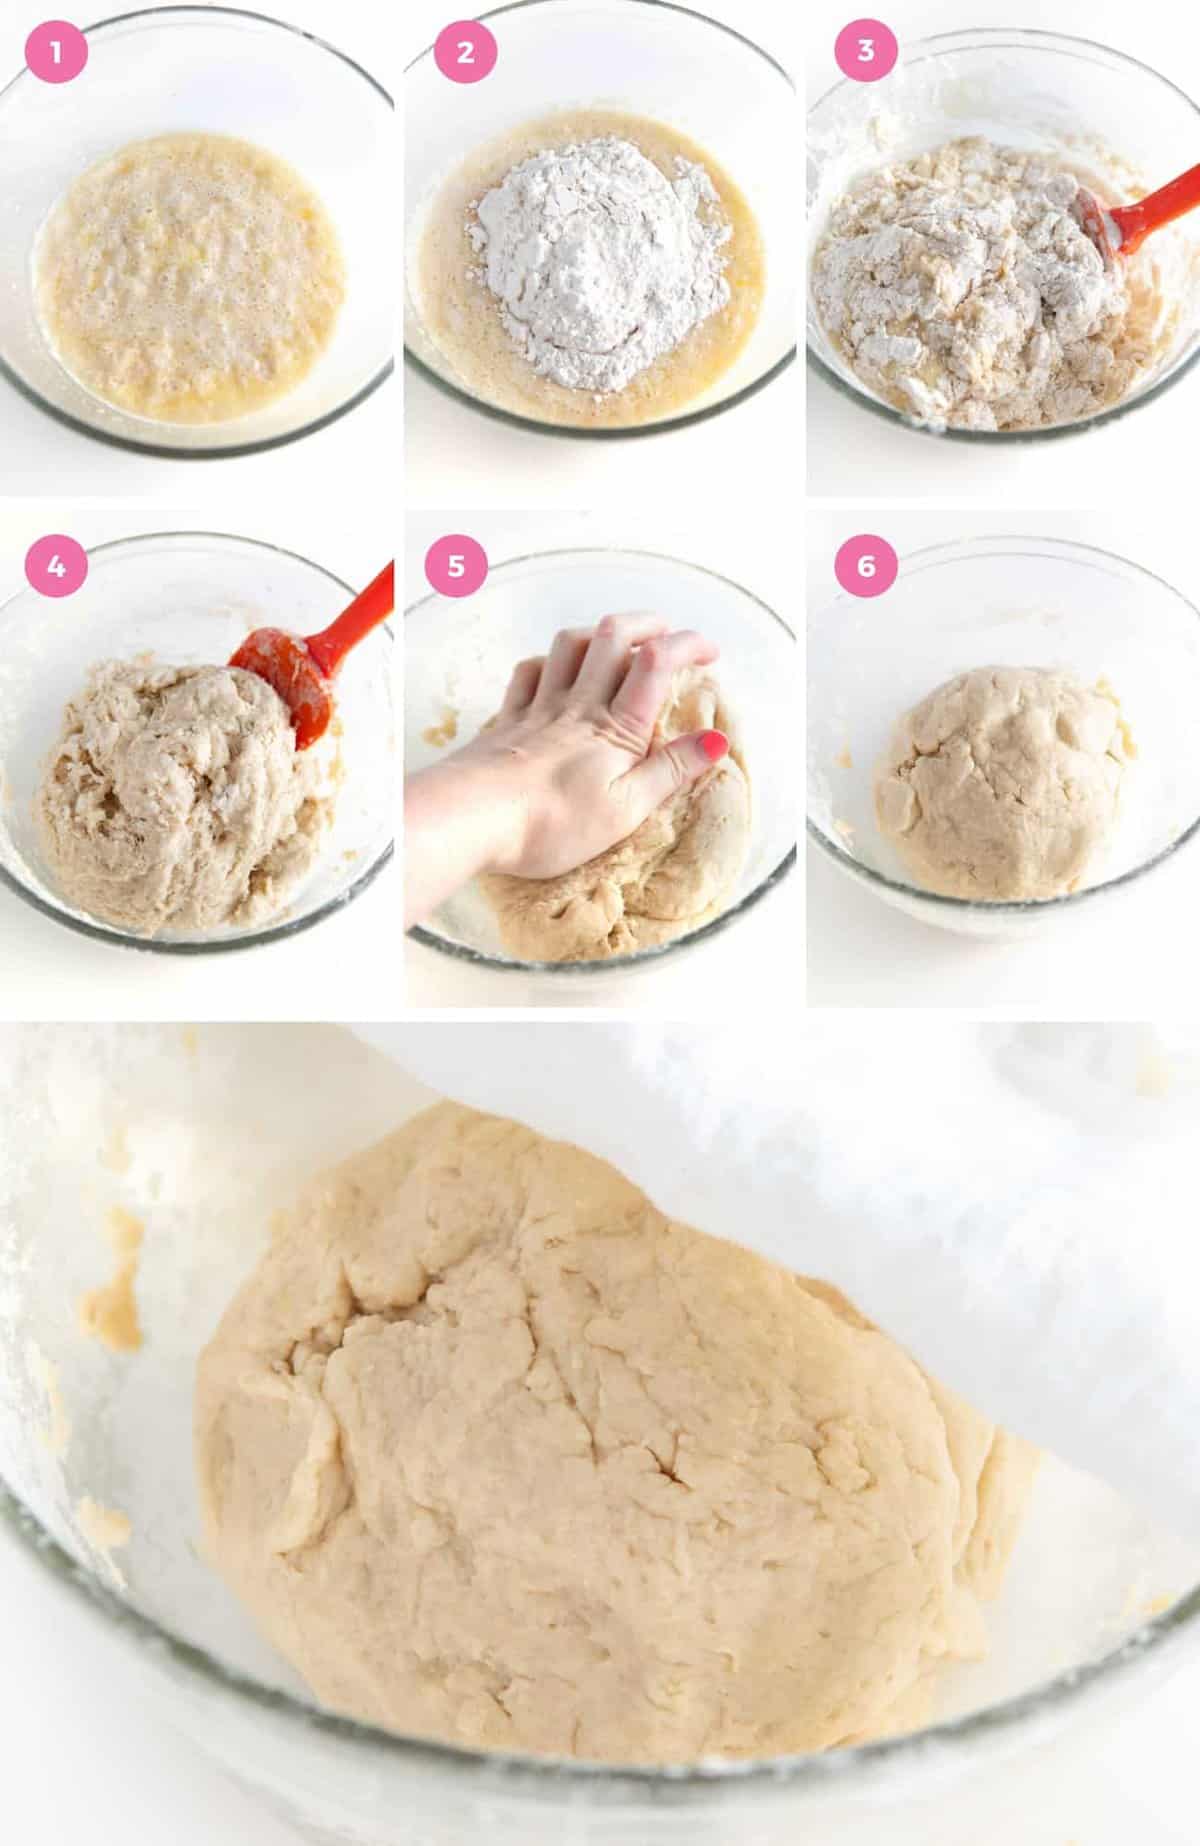
Once your dough starter has been sitting for 10 minutes and has a layer of foam on top (see image 1) remove cover and mix in 1 egg, ½ teaspoon salt, and 1 teaspoon vanilla extract.
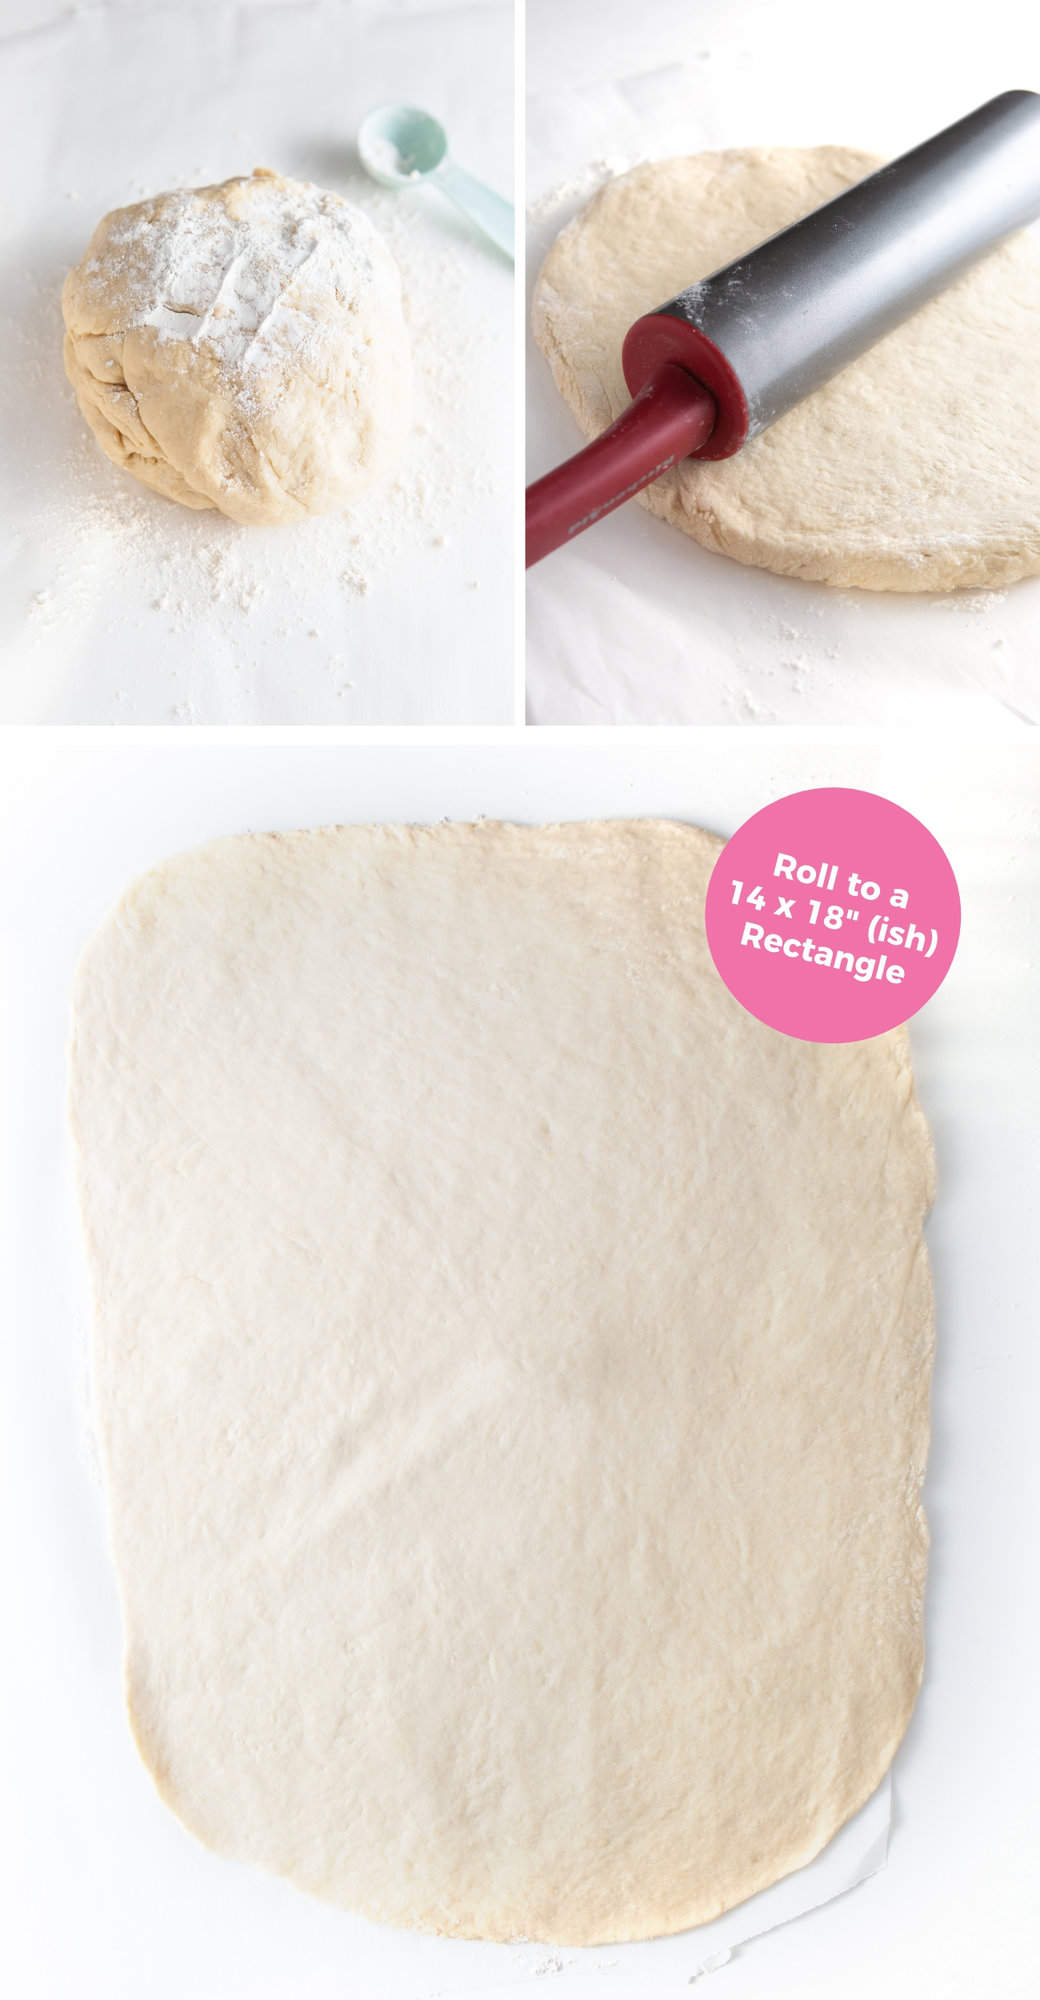
Once combined, start adding in 3 ½ cups all-purpose flour, one cup at a time. You should be able to mix this with a spatula until you get to the end of adding the flour. At that point, you will need to use your hands. Keeping the dough in the bowl, gently form it into a ball. If dough is sticky, sprinkle 1 tablespoon of flour to the outside. Cover and let sit for 10 minutes.
Step 3: Mix Cinnamon Roll Filling
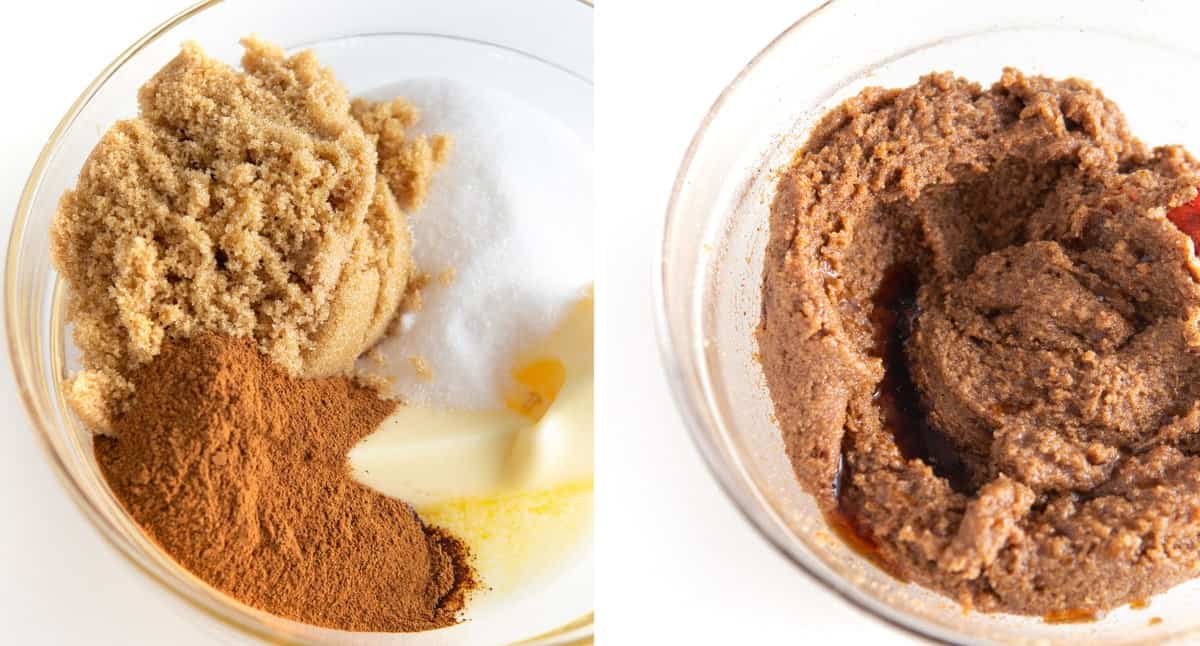
While the dough is proofing for 10 minutes, go ahead and mix up the cinnamon filling so it's ready! To do so, mix together ½ cup softened butter (if straight from fridge, microwave for 30 seconds), ½ cup light brown sugar, ½ cup granulated sugar, 2 tablespoons cinnamon, and 1 teaspoon vanilla extract. As long as your butter is soft enough, this can easily be mixed by hand with a spatula. If your butter isn't mixing well, you can use a mixer to whip it all together. Set aside.
Tip: You don't want your butter to be super melted (just a little is okay!) or the filling will be more likely to seep through the bottom of the pan and crystallize.
Step 4: Roll Out Dough
After 10 minutes, remove cover and place dough on a flour-covered surface (about ½ - 1 tablespoon flour). I prefer taping down a piece of parchment to my counter, but you can also roll directly on a clean countertop. Sprinkle a little flour on top of the dough and on the rolling pin, then roll the dough until it is approximately a 14x18" rectangle that is ¼" thick.
Step 5: Spread on Filling
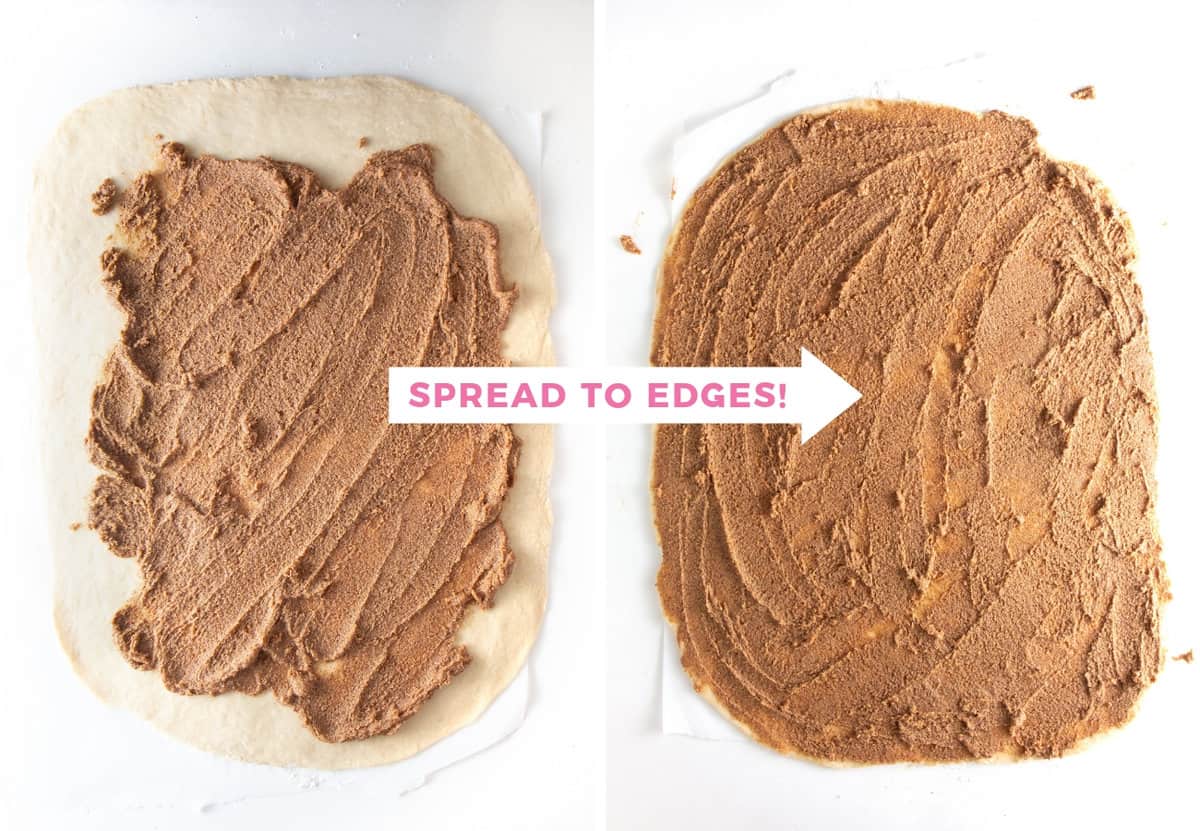
Once rolled, spread on cinnamon sugar mixture making sure to spread to the outside edges.
Tip: I like using a mixture of both white & brown sugar as I feel it has the best flavor and doesn't get too sticky. I tested this with only brown sugar and felt it was too gritty & sticky, while the all-white sugar was too sweet and didn't have the depth of flavor that brown sugar provides. So I use both!
Step 6: Roll Dough into Log
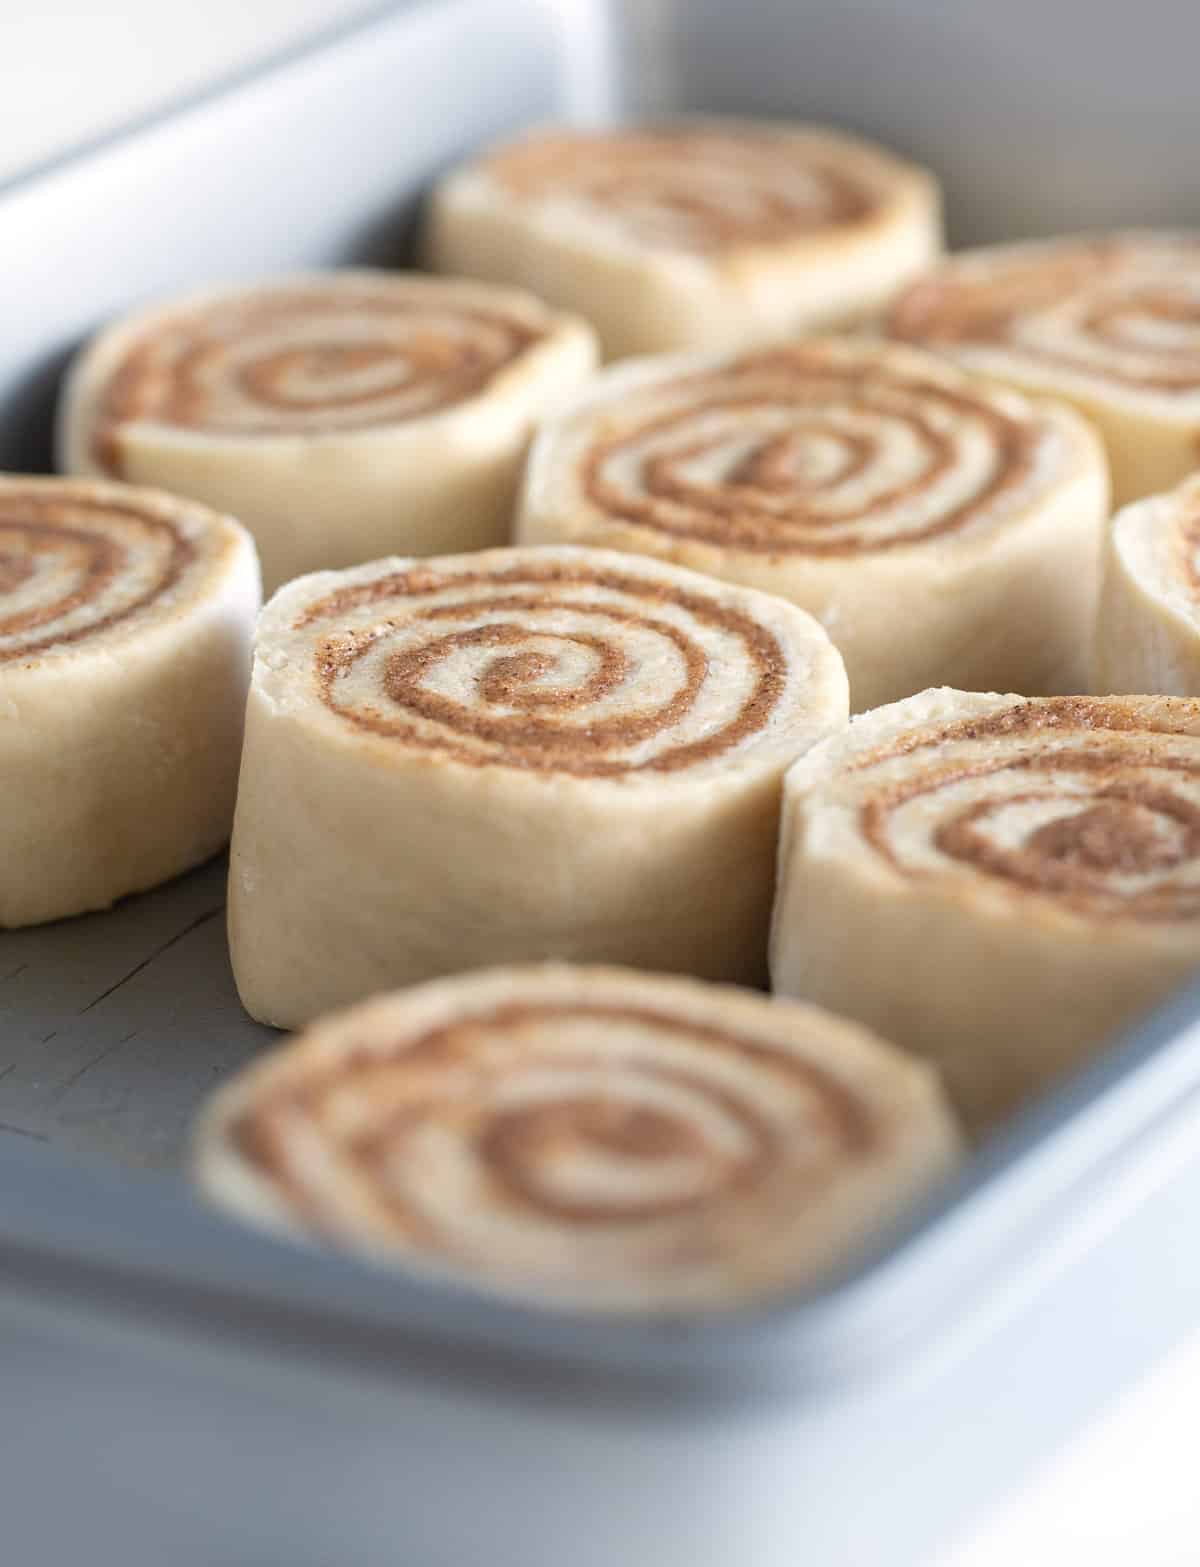
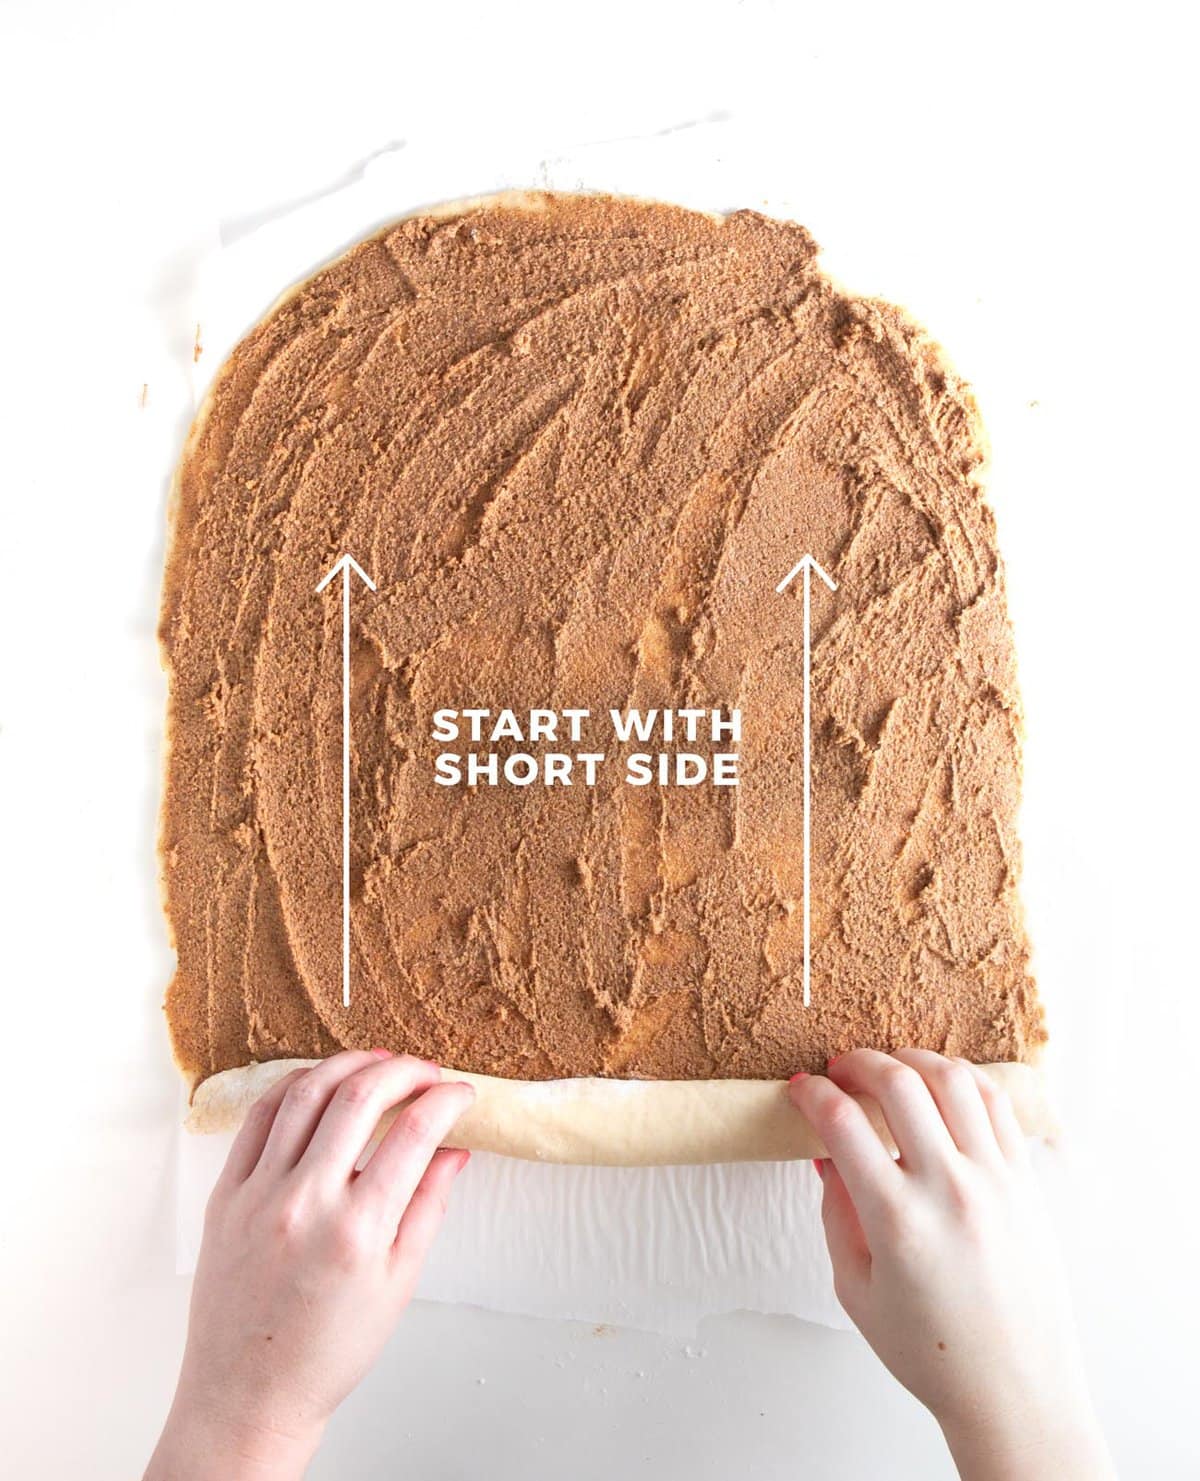
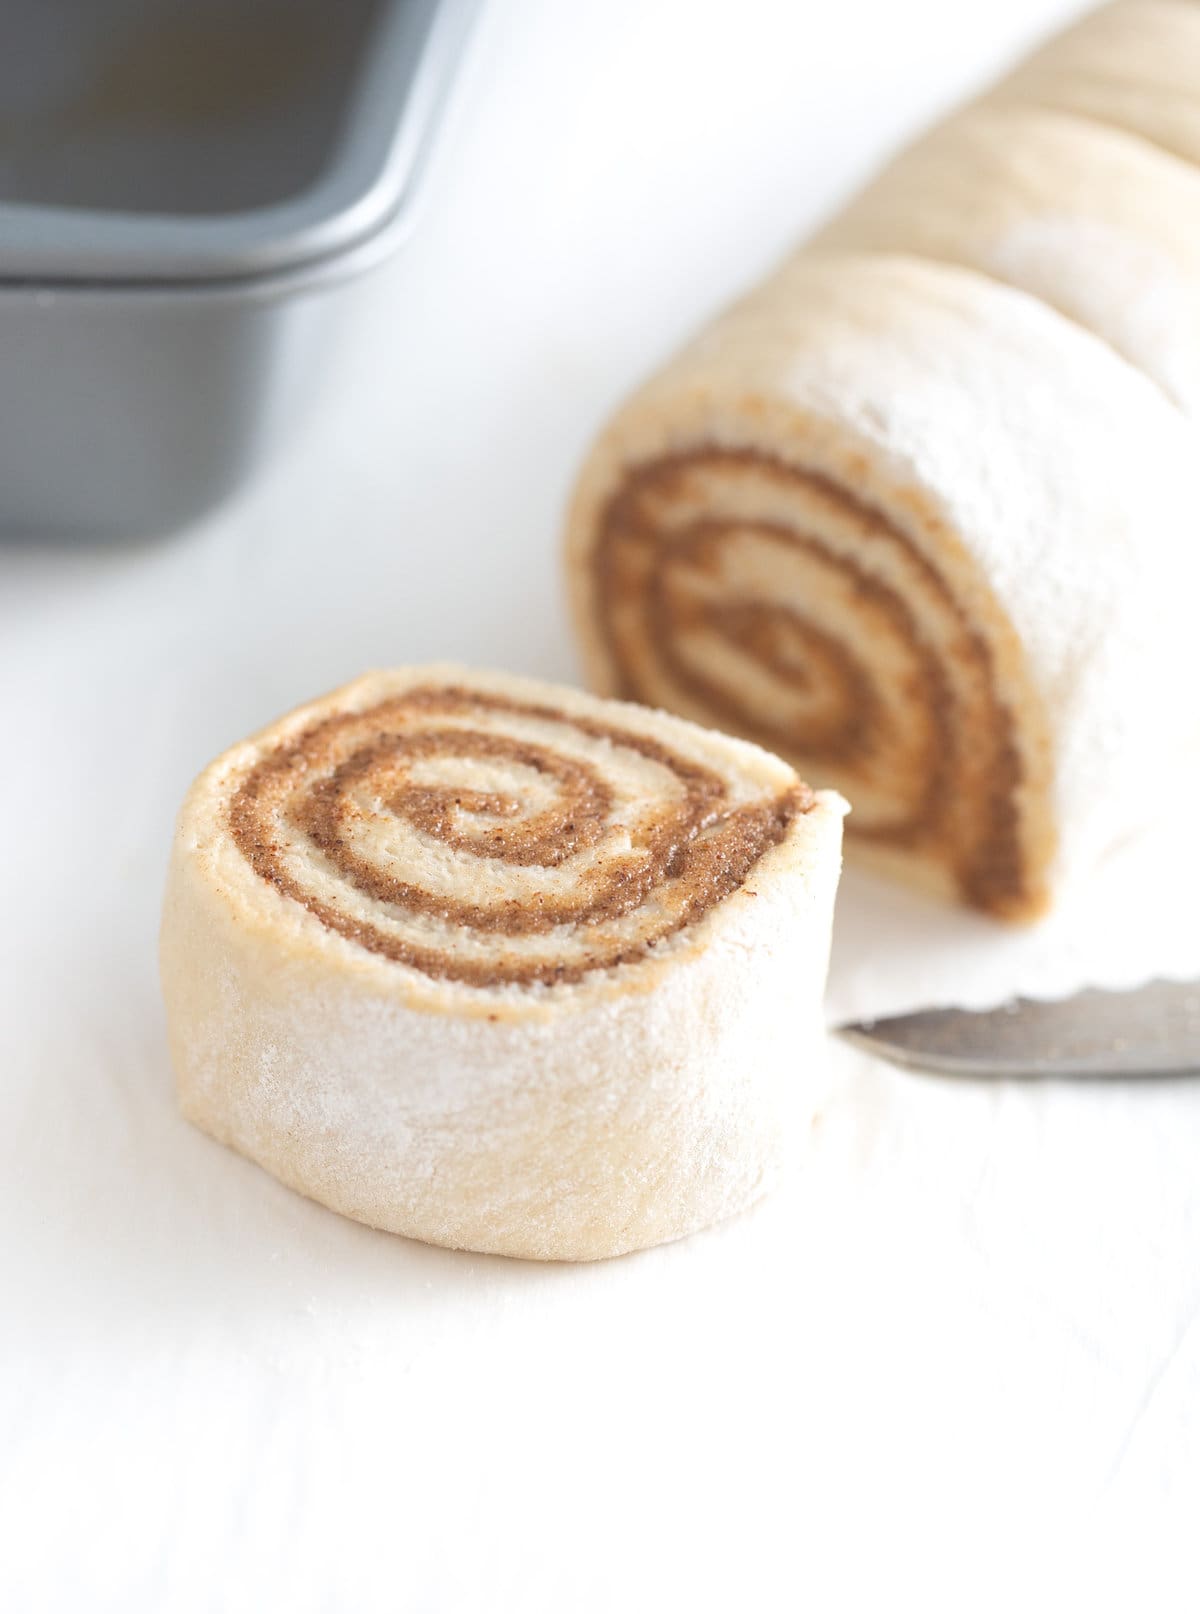
Now it's time to roll! It's important to roll vertically (i.e. start rolling at a SHORT side) so that your cinnamon rolls are nice & thick and so you can yield 12. If you roll it the other way, they'll be smaller and a bit dinky. You want to roll relatively tight, but not too tight.
Step 7: Cut Dough into 12 Rolls
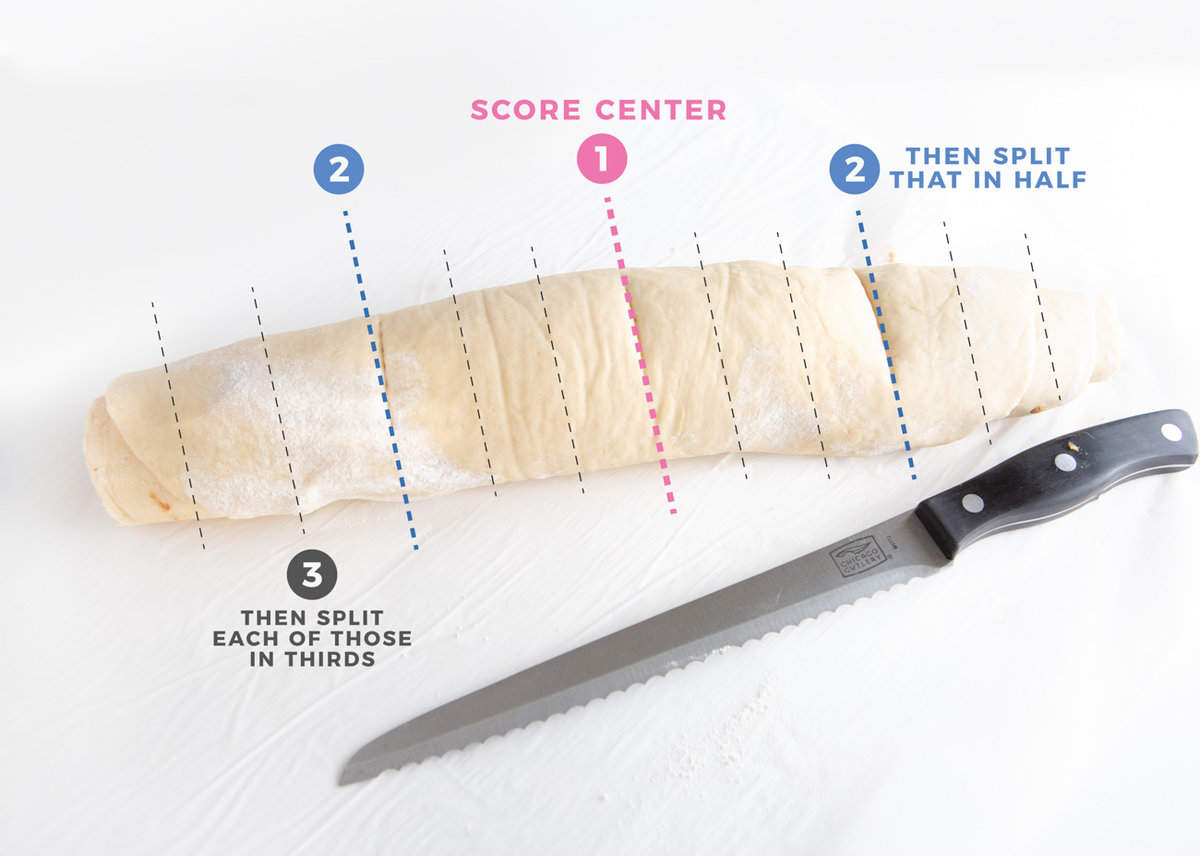
Once rolled, use a serrated edge knife to slightly "score" the tops so you know where to cut. Start in the center, then add slits in the center of those and then divide each of those sections into two parts. I know that sounds confusing, so just look at the picture below!
Tip: Using a serrated edge knife and cutting slowly in a sawing motion is important, as a normal knife will likely squish the dough.
Step 8: Bake
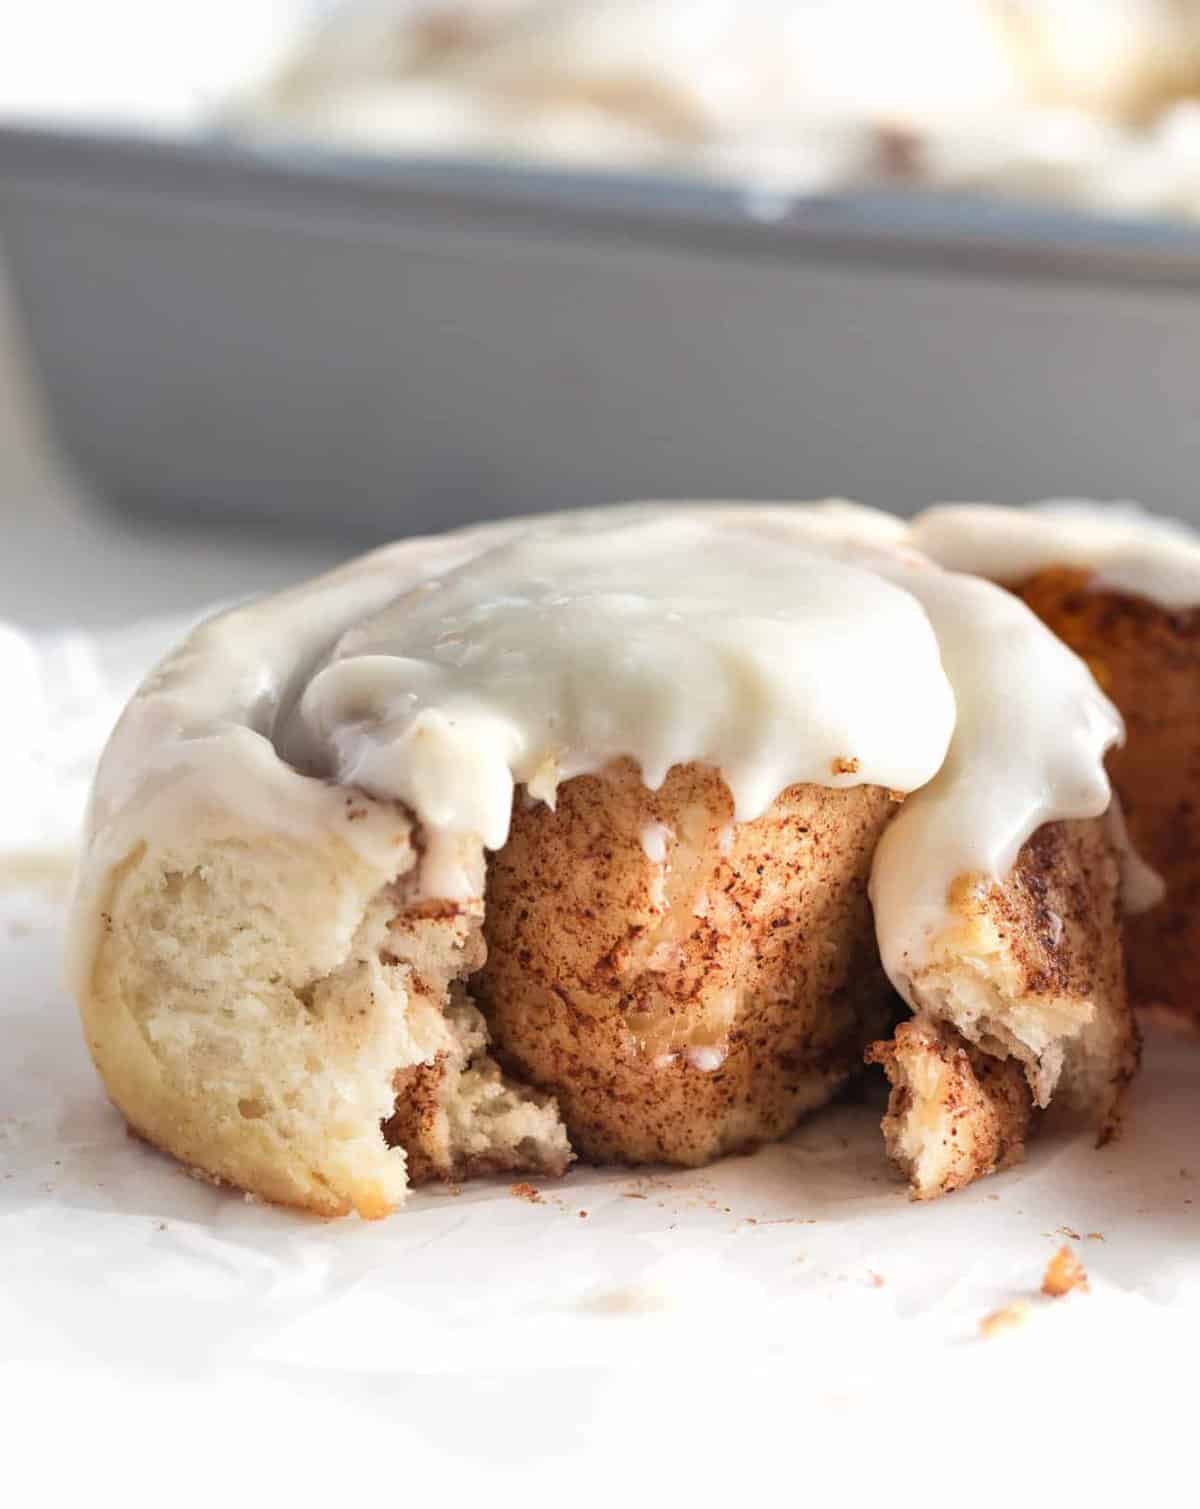
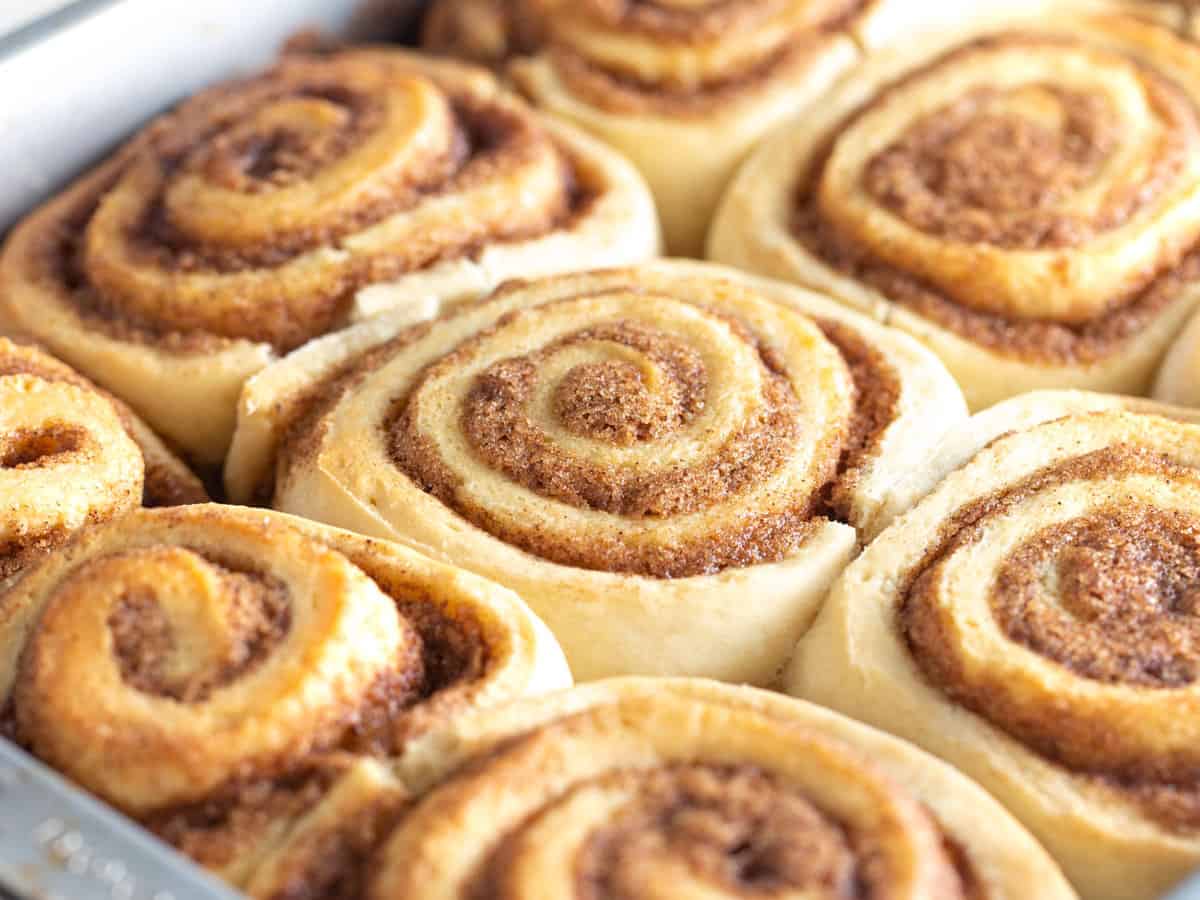
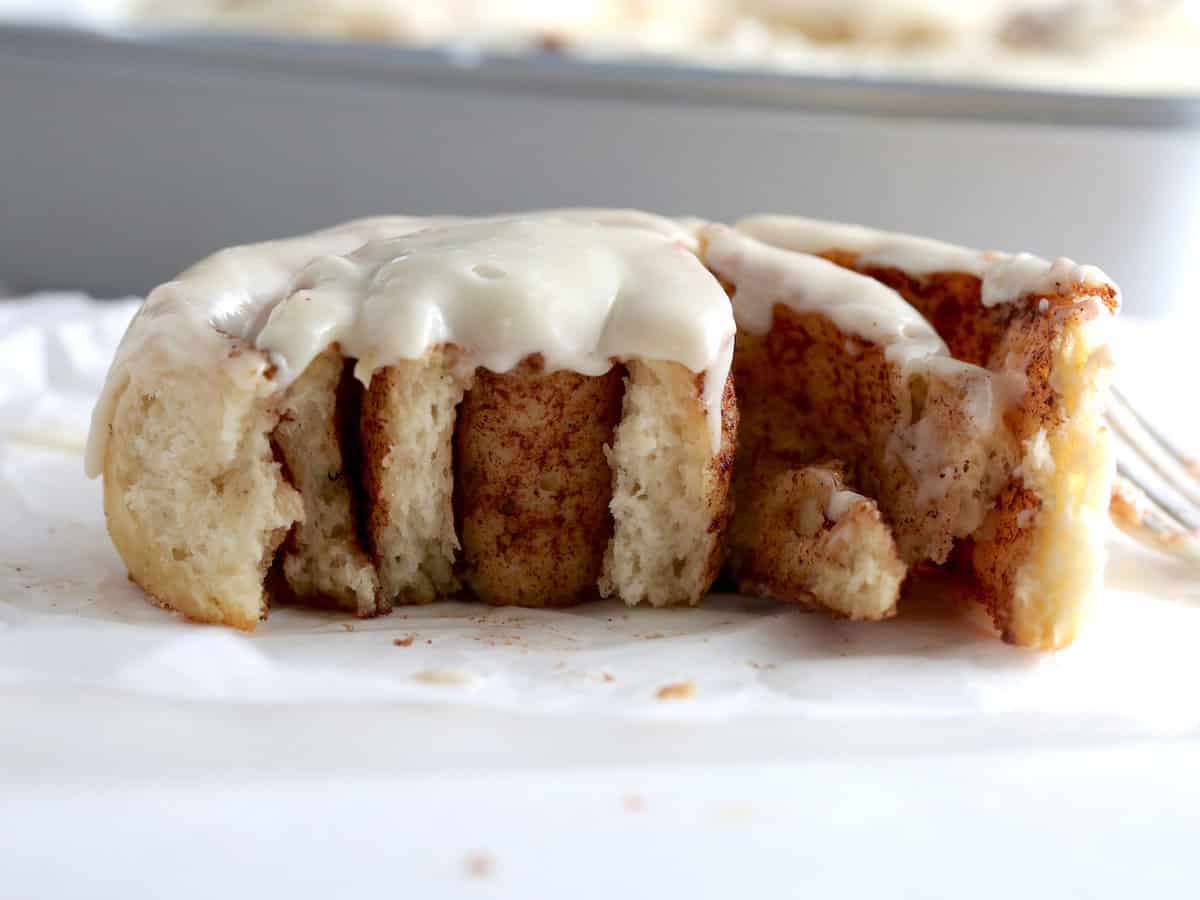
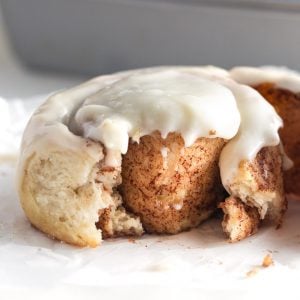
Place cut cinnamon rolls in a greased 9x13 baking pan and bake for 24-26 minutes until the tops are slightly golden brown. Allow to cool for a bit (10-15 minutes) before adding frosting to prevent the frosting from totally melting. If you plan to eat them later, wait to frost until they're cooled for a prettier frosting presentation.
Tip: You can technically split this into two 9-inch round pans, but I prefer 9x13 because you'll get more soft rolls (as the round pan exposes more edges and the edges will be a little harder). I don't know about you, but the center rolls are the best ones!
Step 9: Top with Cream Cheese Frosting
To make cinnamon roll icing: add softened cream cheese, powdered sugar, vanilla extract, and a pinch of salt to a medium-sized bowl and use a hand or stand mixer to mix until combined and smooth (about 30-60 seconds). Slather on warm cinnamon rolls and enjoy!
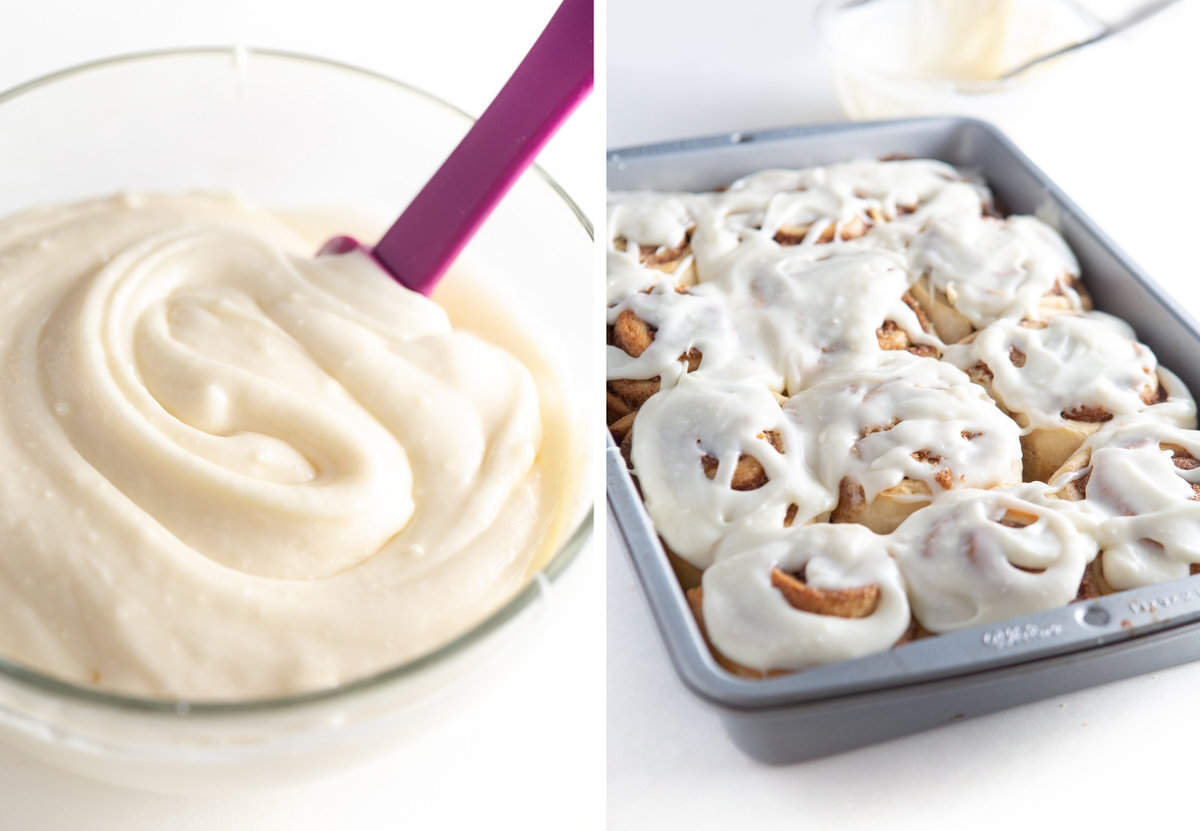
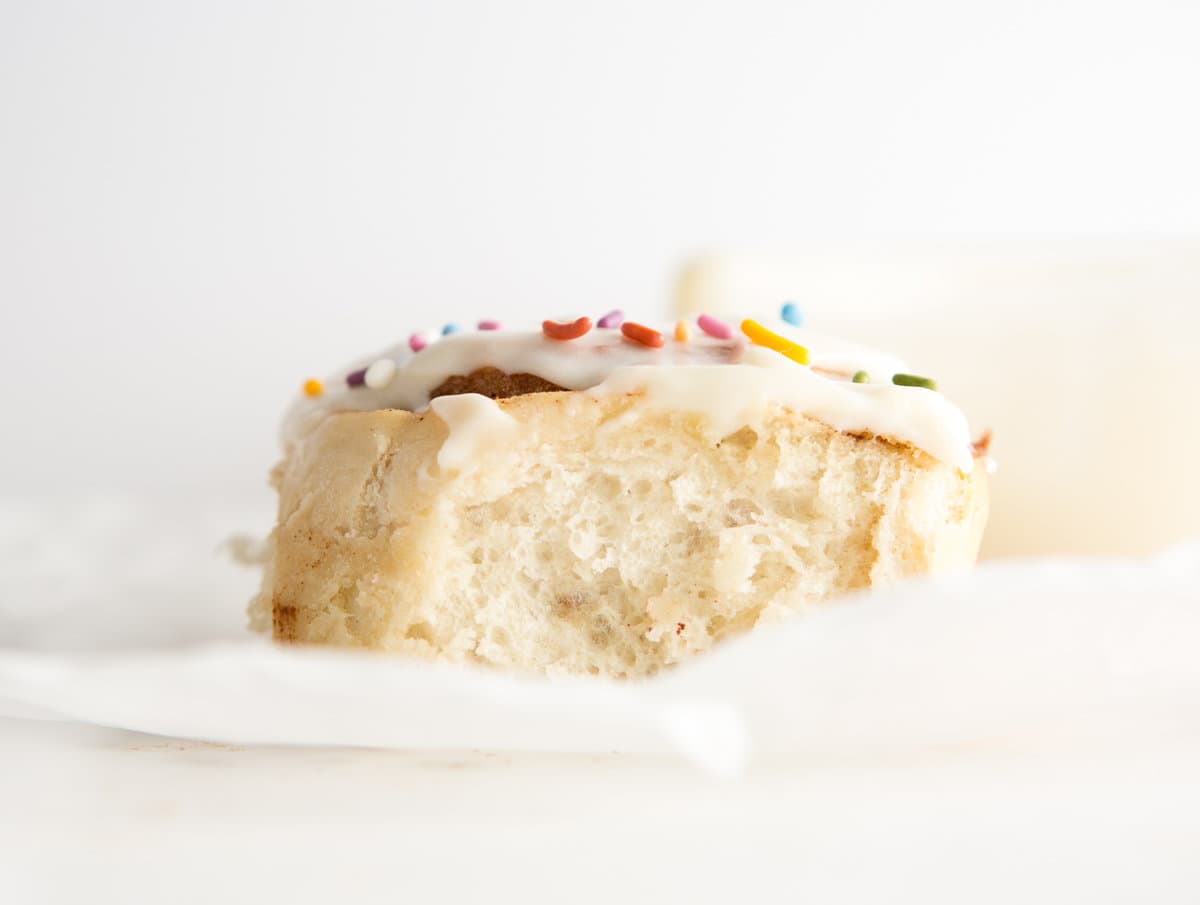
For birthday cinnamon rolls or any celebratory event, add on a few sprinkles because WHY NOT?!
Scavenger Hunt Answer
We're hosting a scavenger hunt on Instagram to celebrate the launch of my cookbook!
Answer: (must type this phrase into the box!): "NOOVERNIGHTRISE"

Frequently Asked Questions:
What if I don't have yeast? Can I substitute something else? Is there a way to make these "no yeast cinnamon rolls'?
I tested these with 1 tablespoon of baking powder instead of the yeast and while they did puff up a bit, the texture wasn't great. So I wouldn't recommend it unless you're OK with the texture being more dense, less "bread-like" and a little gummier. But if it was me, I'd just wait to make these until you pick up a packet of yeast - it's worth it! (If you do add this, skip the first 10 minute proof and add baking powder at the same time as the flour.)
Can I use water instead of milk?
The milk definitely gives the rolls a more moist, stretchy, and perfect bread texture. Water will work, the texture will just be a little different. So I definitely recommend using milk when you can! Using 1%, 2% or whole milk is best (or even buttermilk!), as we want a little fat in there that skim milk doesn't offer.
Can I make these the night before?
You can, although they will end up being much puffier than what these photos show (which can sometimes mean they bake faster & are more airy & therefore crunchy). To make the night before: prep the recipe up until baking, cover the pan with a clean cloth or plastic wrap, and let sit out overnight until ready to bake (no refrigeration needed).
Can I freeze cinnamon rolls?
Yes! These freeze beautifully. You can freeze them using any of these methods:
- Freeze Unfrosted, Baked Cinnamon Rolls: Bake, allow to completely cool, thoroughly wrap with plastic wrap, then freeze the entire pan (unfrosted). When ready to serve, allow to thaw to room temperature then place pan in oven (covered with foil) at 400 degrees for 10-15 minutes to warm up. Allow to slightly cool before adding frosting.
- Freeze Frosted, Baked Cinnamon Rolls: You can also freeze after frosting, just be aware that the frosting is going to melt down when you warm them back up. Not a bad thing if you don't care about presentation! * If using this method, I recommend removing the rolls from the pan and using the defrost function on your microwave. Defrost in 30 second increments until thawed, then switch to the normal microwave mode to heat for 20-30 seconds until warm.
- Freeze Cinnamon Rolls Before Baking: After slicing dough and placing in pan, wrap the entire pan thoroughly in plastic wrap. When ready to bake, thaw completely to room temperature (1-2 hours), then bake. Since the rolls will likely raise a bit when thawing, you will likely need to cut baking time down to about 18-22 minutes. If you don't want to freeze them in the pan, you can just freeze the rolls in the pan for 2-3 hours until they're frozen & hard then transfer the frozen rolls in a freezer ziploc bag.
- Freeze Baked Individual Cinnamon Rolls: After baking, cooling and frosting, wrap each cinnamon roll individually (in plastic wrap or a freezer ziplock bag). When ready to eat, reheat cinnamon rolls in microwave for 20-30 seconds until warm. Again, frosting is going to get messy here but this is a great thing to send back with college kids for a quick treat!
How to keep homemade cinnamon rolls fresh?
For the freshest rolls, cover pan with plastic wrap or place in plastic bag for 1-2 days. If the rolls are frosted and you don't enjoy them immediately (like within 2-3 hours), cover and place in fridge. But really, do cinnamon rolls ever last that long?
Do you have a cinnamon roll frosting without cream cheese?
Yes! See the notes section below for an alternative cinnamon roll icing without cream cheese. I personally prefer the cream cheese one, but this one is good if you like a sweeter, sugary icing.
Quick 1 Hour Cinnamon Rolls
Ingredients
⭐️ Before you begin! If you make this, will you do me a huge favor afterwards and leave a review and rating letting me know how you liked this recipe? This helps my small business thrive so I can continue providing free recipes and high-quality content for you.
Instructions
- Be sure to view images in post above for visuals for each step!
- Preheat oven to 350°F.
- In a small microwave-safe bowl, melt ¼ cup unsalted butter (½ stick) for 45 seconds. Pour into a larger, medium-sized bowl. Using that same small bowl you just microwaved the butter in, pour in 1 cup milk and microwave for 45 seconds. Once done, pour milk in with the butter. Add in 2 ¼ teaspoon active dry yeast and ¼ cup granulated sugar; stir with a whisk until dissolved. Cover with a clean dish towel or plastic wrap and let sit for 10 minutes.
- Once your dough starter has been sitting for 10 minutes, remove cover and mix in 1 large egg, ½ teaspoon salt, and 1 teaspoon vanilla extract. Once combined, start adding in 3 ½ cups all-purpose flour, one cup at a time. You should be able to mix this with a spatula until you get to the end of adding the flour. At that point, you will need to use your hands. Keeping the dough in the bowl, gently form it into a ball. If dough is sticky, sprinkle 1 tablespoon of flour to the outside. Cover and let sit for 10 minutes (while waiting, proceed to next step to make filling).
- While the dough is proofing, go ahead and mix up the cinnamon filling so it's ready! To do so, mix together softened ½ cup unsalted butter (1 stick), ½ cup light brown sugar, ½ cup granulated sugar, 2 tablespoons cinnamon, and 1 teaspoon vanilla extract. As long as your butter is soft enough, this can easily be mixed by hand with a spatula. If your butter is too cold and isn't mixing well, you can use a mixer to whip it all together. Set aside.Tip: You don't want your butter to be super melted (just a little is okay!) or the filling will be more likely to seep through the bottom of the pan and crystallize.*If your butter is straight from fridge, microwave for 20-30 seconds to soften.
- After 10 minutes, remove cover and place dough on a flour-covered surface (about ½ - 1 tablespoon flour). I prefer taping down a piece of parchment to my counter, but you can also roll directly on a clean countertop. Sprinkle a little flour on top of the dough and on the rolling pin, then roll the dough until it is approximately a 14×18" rectangle that is ¼" thick.
- Once rolled, spread on cinnamon sugar mixture, making sure to spread to the outside edges.
- Now it's time to roll! It's important to roll vertically (i.e. start rolling at a SHORT side) so that your cinnamon rolls are nice & thick and so you can yield 12. If you roll it the other way, they'll be smaller and a bit dinky. You want to roll relatively tight, but not too tight. (See images in post above)
- Once rolled, use a serrated edge knife to slightly "score" the tops so you know where to cut. Start in the center, then add slits in the center of those and then divide each of those sections into two parts. (See images in post above for a visual.)Tip: Using a serrated edge knife and cutting slowly in a sawing motion is important, as a normal knife will likely squish the dough.
- Place cut cinnamon rolls in a greased 9×13 baking pan and bake at 350°F for 24-26 minutes until the tops are slightly golden brown. Allow to cool for a bit (10-15 minutes) before adding frosting to prevent the frosting from totally melting. If you plan to eat them later, wait to frost until they're cooled for a prettier frosting presentation.
- Add softened ¼ cup unsalted butter (½ stick), softened 4 ounces cream cheese, 1 ½ cups powdered sugar, 1 teaspoon vanilla extract, and a pinch of salt to a medium-sized bowl and use a hand or stand mixer to mix until combined and smooth (about 30-60 seconds). Slather on warm cinnamon rolls and enjoy! (See notes below for a cinnamon roll frosting recipe without cream cheese.)
Notes from Melissa

2 cups powdered sugar
2 teaspoon vanilla extract
2-4 T. milk (add 1 tablespoon at a time until it's the consistency you want)
Pinch of salt Add butter, powdered sugar, vanilla extract, and a pinch of salt to a medium-sized bowl and use a hand or stand mixer to mix until combined and smooth (about 30-60 seconds). Add milk, one tablespoon at a time, until it's the consistency you desire.
Just made these, Amazing!!! My husband and kids loved them. Perfect consistency, I will definitely be making these again. Thank you for the recipe!
Delicious! These are fantastic. Thanks for sharing!!!
So glad you loved them, Nidia! Thanks so much for taking the time to leave a review!
Can you make this with gluten free flour?
Hi Bec! This is one recipe I haven’t gotten to work yet with GF 1-to-1 flour; I’ve tried and they don’t raise and are quite gummy. So for now, I’d seek out a recipe specific to gluten free!
These are the only cinnamon rolls I make! So easy and delicious!
That makes my day that you love them as much as I do! Thank you for taking the time to leave a review (on all 3 of the recipes!) - I appreciate it so much!
Tastes amazing! Although I did find I had to ad a couple more tablespoon to the dough at the start.
So glad you loved them, Ed!
Thank you for taking the time to leave a review - I appreciate it so much!
Very quick, easy and good! I was out of milk and subbed plain Greek yogurt and they were great!
I'm so glad you all love them! It's great to know the yogurt worked for you!
Thank you so much for taking the time to leave a review - I appreciate it so much!
Holy cow, I was super impressed. The rise I got on these was excellent for such a short prove time. Icing is fantastic. Got the tightest cinnamon swirl I've ever gotten in my life. I'm saving this.
Woot! This made my day - I'm so glad you loved them as much as I do! They become a dangerous addiction knowing you can make them so quickly ;)
Thank you so much for taking the time to leave a review - I appreciate it so much!
So yummy. Shared them at work too! Not dry around the outside like the rolls from the can.
thank you for this easy delicious recipe! the instructions were very detailed! I could only wait 5 mins to cool because they looked amazing. best recipe and so light and fluffy
This is the first time I’ve ever had sweet rolls turn out! The recipe was easy to follow with pictures and step by step instructions
That makes me so happy to hear! So glad you loved them!
Best cinnamon rolls ever! Constantly make these for friends and family and get so many compliments on them each time.
I have to admit, I’ve never made these myself, but I’ve had them from a friend making them and they are THE BEST. I like cinnamon rolls, but I wouldn’t say I’m OBSESSED with them like some folks. But I’ll tell ya, this recipe might make me obsessed!
Pro tip - if you’re eating them a day or two later, pop them in the microwave for a few seconds. Softened up makes alllll the difference.
My go to cinnamon roll recipe! I’ve tried others but this has the best flavor, is easy to make, and is the perfect size for feeding my crew without having to do math. I love that it’s not super duper sweet, just the perfect amount.
Probably the BEST cinnamon roll recipe I’ve ever used. This one is fool proof and so so quick to whip up. The best part…everyone loves them!!! This should be your only cinnamon roll recipe!
I was skeptical….bready, soft cinnamon rolls in one hour? No way….I’ve been making cinnamon rolls thar take hours with double proofing, how could you do this in one hour? But to my surprise they rose nicely in the oven and were soft and fluffy. They were not overly sweet, just right. The dough was easy to work with. I will be keeping this recipe. Perfect to make and serve in the morning.
Right?! They sound too good to be true, haha! So glad you loved them!
I love these! I have made them three times and they always turn out perfectly! Delicious, simple, and super quick!! Thanks a million!