

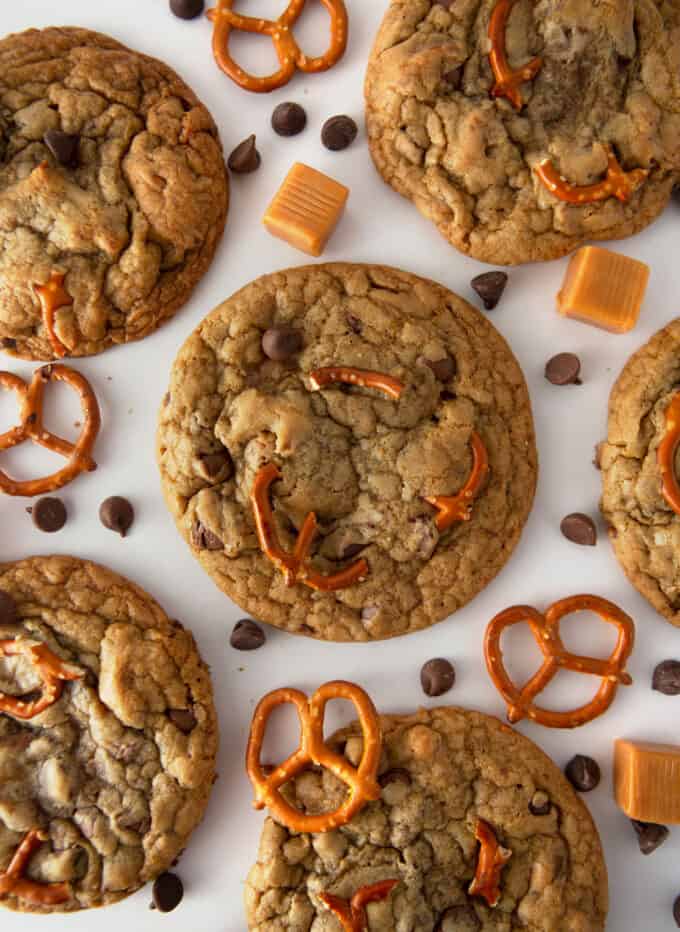
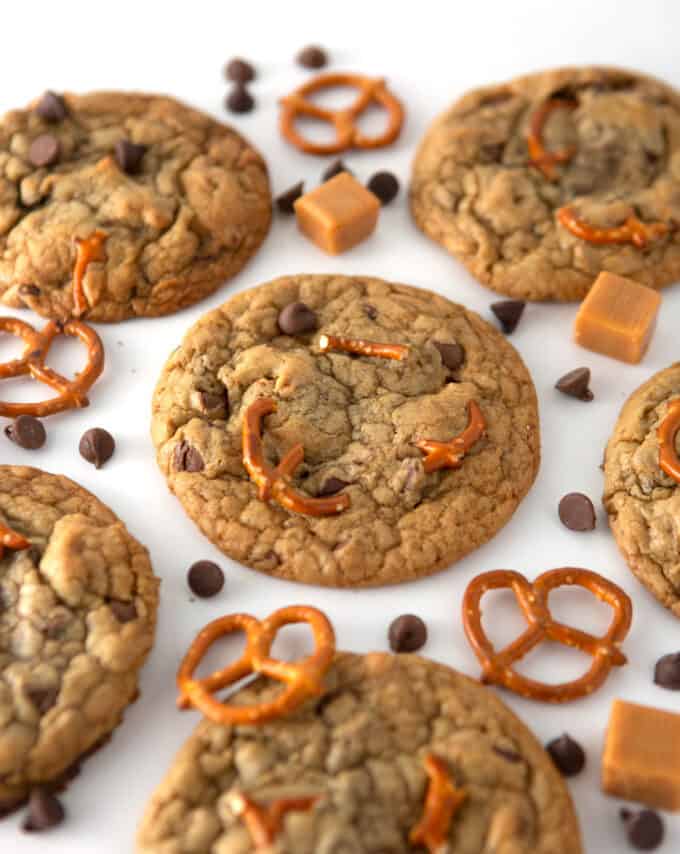
These soft & chewy kitchen sink cookies can be made in one bowl and are loaded with chocolate chips, pretzels, and caramel! Inspired by Panera, these are the sweet & salty cookies of your dreams!
These cookies went Tiktok viral with almost 4 million views - watch the video here!
Why are they called kitchen sink cookies?
Kitchen sink cookies are made with a chewy, chocolate chip cookie base & lots of delicious mix-ins! The name is based on the phrase "everything but the kitchen sink" where you can add anything you have in the pantry!
This recipe is inspired by Panera bread and is a slight alteration to my popular Panera chocolate chip cookie recipe...but is loaded with semi-sweet and milk chocolate chips, chopped caramel chunks, and pieces of pretzels! Some other kitchen sink cookie recipes add things like nuts, potato chips, or whatever sweet & salty things you have on hand!
Panera Kitchen Sink Cookie Ingredients & Notes
This is just an overview showing step-by-step photos, click here to jump down to full recipe card with exact instructions.
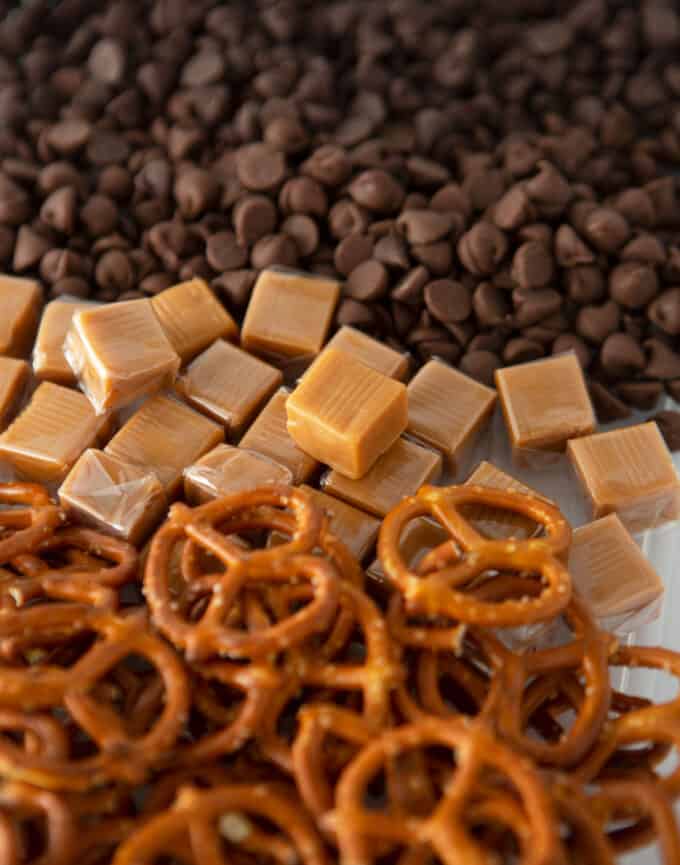
- Chocolate Chips: Panera uses a mix of both semi-sweet and milk chocolate chips but you can add whatever you like. Just be sure to chop at least half of the chocolate chips so that you have those small chocolate pieces in every bite (this also helps give the cookie that darker signature color!).
- Caramel: I used Kraft caramel and tore them into small pieces. You can also use the Kraft bits but I find they don't melt as well in cookies.
- Pretzels: Any salty pretzels will work!
- Butter: Use real butter here, not margarine. To get that signature flat vs. puffy cookie, we're melting the butter until it's pretty hot & then slightly flattening the top of the scooped cookies.
- Sea salt: Panera tops theirs with flaky salt, which is totally optional! My pretzels were already salty, so I left it off.
Make it gluten-free! You can substitute the all-purpose flour for half-almond flour and half of your favorite gluten-free flour! My favorite brand is Bob's Red Mill Gluten Free 1-to-1 Baking Flour.
How to Make Kitchen Sink Cookies
This is just an overview showing step-by-step photos, click here to jump down to full recipe card with exact instructions.
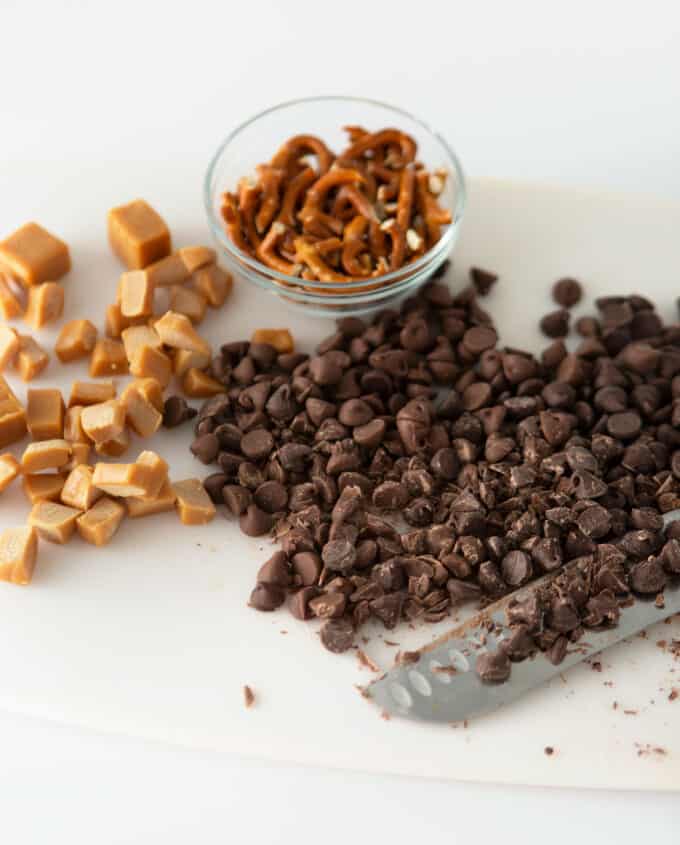
Step 1: Chop & Prep Mix-Ins
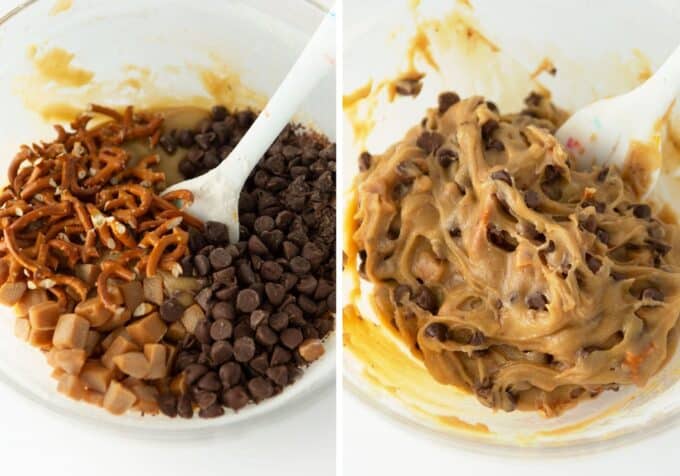
Measure out ½ cup semi-sweet chocolate chips, ½ cup milk chocolate chips, 10 caramels, and ½ cup chopped pretzels. Use a sharp knife to chop half of the chocolate chips into smaller shards and slivers. Next, chop the caramel into smaller pieces (I cut each into 6 pieces).
Tip: I recommend 1.5-2 cups of total mix-ins, so feel free to add more or less of each item as you wish!
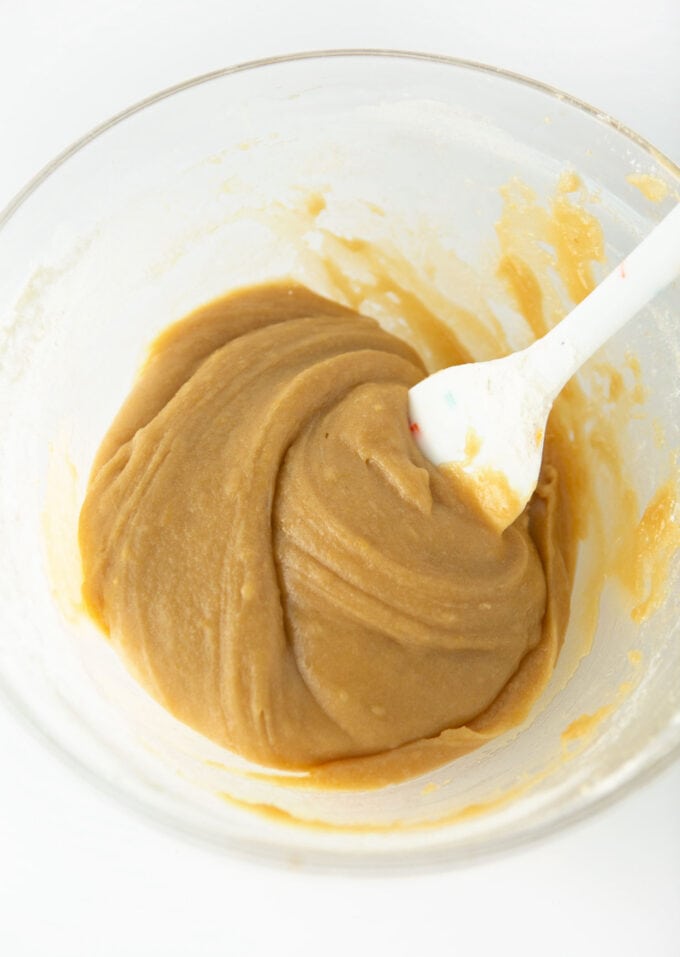
Step 2: Make Cookie Dough
In a large microwave-safe bowl, add ½ cup (1 stick) butter and cover with a paper towel (will help for splattering). Melt the butter for 30-60 seconds until all is melted (no chunks left). You want it hot; if you hear it "pop" then it's most likely done.
To the hot butter, add in ½ cup brown sugar and ¼ cup granulated sugar, then use a spatula to stir until combined (* do not use a mixer for this recipe). The sugars should cool off the butter but if it's still piping hot, let cool for a minute or two.
Stir in 1 large egg and 2 teaspoons vanilla. Next, mix in ½ teaspoon baking soda and ¼ teaspoon salt. Add in 1 ¼ cup flour and mix until all the flour disappears into the dough.
Note: The dough will be wet and sticky, this is normal and it will firm up as it sits.
Step 3: Add Mix-Ins
Add the chopped chocolate chips, whole chocolate chips, chopped pretzels, and chopped caramel into the dough and mix. Allow dough to sit for 1-2 minutes to slightly firm up, then stir (it will still be a soft & slightly sticky dough).
Tip: If your dough is really runny after it sits, you can add 1-2 tablespoons of flour to help it firm up.
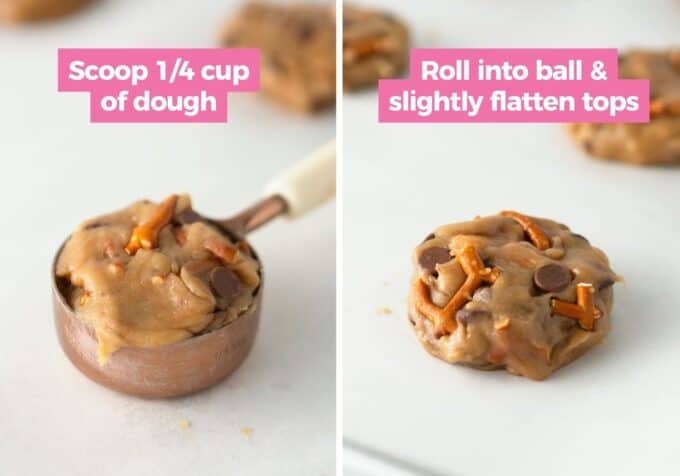
Step 4: Scoop & Roll
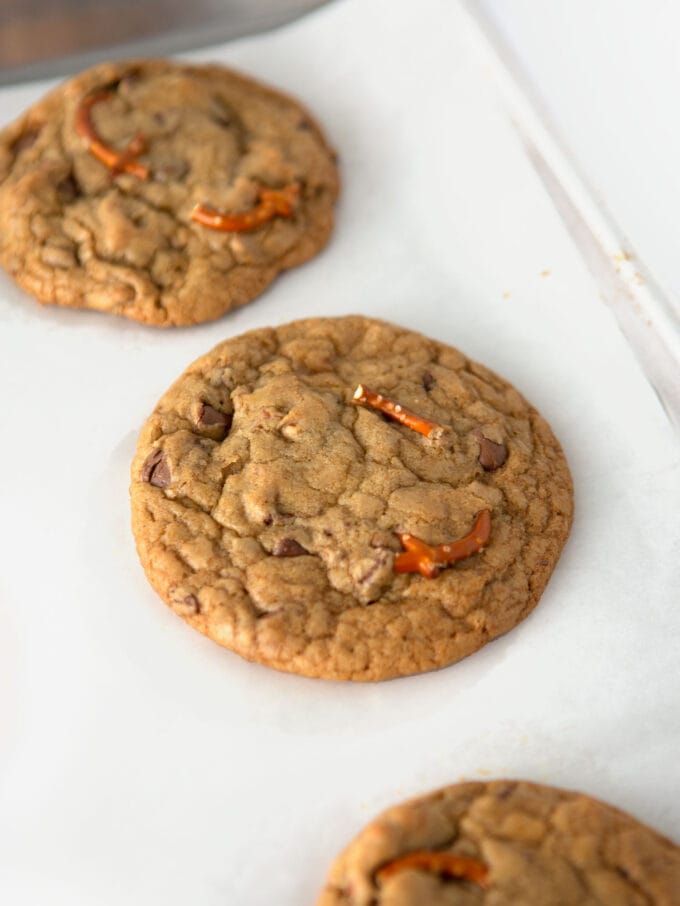
Line a baking sheet with parchment paper. Scoop dough into ¼ cup-sized scoops (i.e. 4 tablespoons) then gently roll into your hands to create a ball. Flatten the tops so that they're a thick disc vs. a round ball. Without flattening, your cookies will be thicker and more cakey. If desired, press extra pretzel pieces on top.
Step 5: Bake & Cool
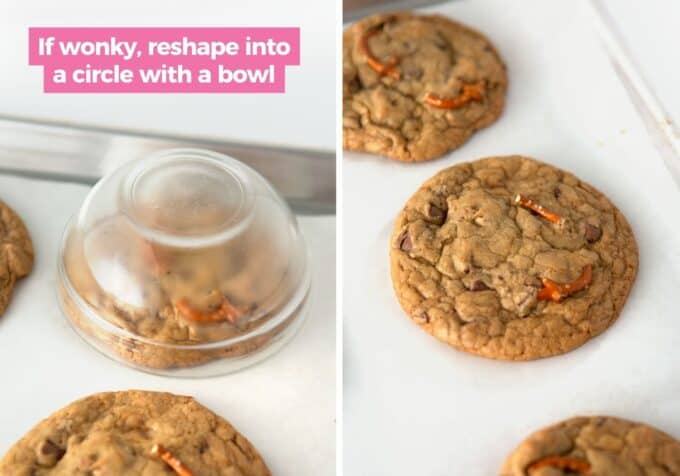
Bake at 350°F for 12-14 minutes. You want them to be slightly brown on the edges & top and look slightly underbaked in the center (my oven was perfect at 13 minutes).
If your cookies are wonky-shaped, immediately after taking out of the oven, use a bowl that is slightly larger than the cookie to "wiggle" it back into a circle shape.
Tip: The key to soft & chewy cookies is to take them out while the center still looks a tiny bit wet, as they will finish baking on the hot pan and firm up as they cool.
Storage & Freezing
Storing: For best texture, these are best enjoyed within 2 days but will last in an airtight container for 3-5 days.
Freezing: Freeze baked cookies in an airtight container for up to 1 month, then allow to thaw before eating (as the caramel will be too hard to eat when frozen).
Frequently Asked Questions:
I think they're better! I've found that most Panera locations overbake their cookies, which results in dry, hard cookies. These homemade kitchen sink cookies are perfectly soft & chewy!
If you follow the instructions and use a ¼-cup sized scoop, your cookies should end up being around 4 inches. This can vary depending on your altitude and climate, but that's how big mine spread in Tennessee. The "real" Panera kitchen sink cookies are even bigger than this, so if you want to make them true-to-size, I'd suggest using a ⅓ cup scoop of dough.
They do not contain nuts but you can certainly add some if you'd like! Other fun mix-ins are marshmallows, butterscotch chips, peanut butter chips, chopped Reeses candy, and more!

Kitchen Sink Cookies (Panera Copycat!)
Ingredients
⭐️ Before you begin! If you make this, will you do me a huge favor afterwards and leave a review and rating letting me know how you liked this recipe? This helps my small business thrive so I can continue providing free recipes and high-quality content for you.
Instructions
- Preheat oven to 350°F.
- Chop half of the chocolate chips (½ cup) into small shards and slivers. Cut ½ cup caramels, chopped into small chunks (about the size of the chocolate chips) and break up the ½ cup pretzels, chopped. Set aside.
- In a large microwave-safe bowl, add ½ cup unsalted butter, i.e. 1 stick and cover with a paper towel (will help for splattering). Melt the butter in the microwave for 30-60 seconds until all is melted (no chunks left). You want it hot; if you hear it "pop" then it's most likely done.
- To the hot butter, add in the ½ cup light brown sugar, packed and ¼ cup granulated sugar and use a spatula to stir until combined (* do not use a mixer for this recipe). The sugars should cool off the butter but if it's still piping hot, let cool for a minute or two.
- Stir in 1 large egg and 2 teaspoons vanilla extract. Next, mix in ½ teaspoon baking soda and ¼ teaspoon salt.
- Add 1 ¼ cups all-purpose flour and mix until all the flour disappears into the dough. Note: the dough will be wet and sticky, this is normal and it will firm up as it sits.
- Mix the chopped chocolate chips (½ cup), whole chocolate chips (½ cup), ½ cup pretzels, chopped, and ½ cup caramels, chopped into the dough. Allow dough to sit for 1-2 minutes to slightly set so it's not as sticky, then stir (if needed, you can add 1-2 tablespoons flour to help it firm up).
- Line a baking sheet with parchment paper. Scoop dough into ¼ cup sized scoops (i.e. 4 tablespoons) then gently roll into your hands to create a ball. Flatten the tops so that they're a thick disc vs. a round ball. See image in post above for reference. Without flattening, your cookies will be thicker and more cakey.If desired, press extra pretzel pieces into the top.
- Bake at 350°F for 12-14 minutes. You want them to be slightly brown on the edges & top and look slightly underbaked in the center (my oven was perfect at 13 minutes). Tip: If your cookies are wonky-shaped, immediately after taking out of the oven, use a bowl that is slightly larger than the cookie to "wiggle" it back into a circle shape.
- Remove from oven and place entire pan on a cooling rack. Allow the cookies to cool on the hot pan for 10-15 minutes before removing them. This will allow them to finish baking on the hot pan. Once cooled, use a spatula to transfer them to a wire cooling rack.
- Enjoy slightly warm for gooey caramel or allow to fully cool...both ways are amazing!
Kids loved them!
I am so glad that you and your kids loved them Lindsey, thank you for leaving a review!
Super easy, delicious cookies created by a very talented baker! Made these for my roommates, and they were gone in a day! I am making more as we speak!
So glad that you and your roommates enjoyed these cookies Ashlee! Thank you for leaving a review - I appreciate it so much!
I love this recipe, my cookies come out soft and gooey every time and is a perfect dupe for Panera cookies. I love the Carmel bits in it but sometimes instead I add the crushed up heath bar pieces and it’s very good that way too! I have definitely added this to my rotation of goodies I bake for my family.
The addition of the Heath bars sounds delicious Kelly! Thanks for putting this in your baking rotation, that's such an honor!
I love this recipe! Will use again!!
So glad that you liked the recipe Callie!
I couldn't find the Kraft caramel squares at my store so I bought the Worthers soft caramels. These were AMAZING and so easy and quick! My caramel may have been too soft so they kind of melted too much but I just smooshed them back together lol my only criticism would be you could add some finishing salt but it's definitely not needed. LOVED them! Will be making again regularly
Thank you for leaving a review Angela!
Glad that you could smoosh them back together, lol!
These cookies are amazing! I can never get the caramel to melt right and since I’m not a huge fan anyway, I replaced them with mini M&M’s! My new fave!
That sounds wonderful Kayla!
Thank you for taking the time to leave a review - I appreciate it!
so so good! my caramel did spill out on a few cookies but they were still devine. great recipe, only lasted 2 days even when i doubled the recipe!
I am so glad that you enjoyed the recipe!
Thank you for taking the time to leave a review.
Love this recipe!! I’ve made these cookies twice now and they’ve been a huge hit in my family.
So glad that you and your family have loved this recipe Reagan. Thank you for taking the time to leave a review!
These are amazing!! I gave some to my parents and my mom said, "I don't want a cake for my birthday next year, I want these!" They're going to be a new staple and standard for cookies going further!
Aww I love that, they would be such fun birthday cookies! So glad you all loved them. Thanks so much for taking the time to leave a review!
These cookies were fantastic to make all the way from the baking process to the yummy treat I enjoyed at the end! Perfect combination of sweet & salty. I did this for the August baking challenge and it did not disappoint. Adding to my collection.
Thank you for participating in the baking challenge Anna! I am so glad that you enjoyed them.
These are possibly the best cookies I have ever had and most definitely the best I have ever made! Next time I make them I may let the dough chill for a while first because the cookies did spread quite a bit. I took the authors advice and reshaped them and they were great!
So glad that you enjoyed the cookies Mitchell, and that you tried the method of reshaping!
Thank you for taking the time to leave a review, I appreciate it.
Amazingly wonderful cookies! I found that a spatula did not combine the melted butter and sugars well, so I used a whisk for that and for incorporating the eggs. I also tossed the cut-up caramels in a little flour before adding them to the batter since they wanted to clump up in a big ball otherwise. Such a great recipe!
Glad that you were able to apply some tweaks and enjoy these cookies!
Thanks for leaving a review, I appreciate it.
Love these so so much! The perfect sweet and salty treat
So that that you have enjoyed these cookies Sunnie, I appreciate you taking the time to leave a review.
I made this recipe and aside from putting caramels in the cookies (because I couldn't find any), I did everything else exactly as the recipe said. While they were good, they turned out very hard and crunchy. What did I do wrong?!?
Hi Brooke! It sounds like they were probably overbaked. Ovens are notorious for running 15-20 degrees off, so you might try baking them for a few minutes less. I take them out when they’re slightly underbaked so that they finish baking on the hot pan while cooling.
Using a light colored metal on with parchment will also help cookies bake more evenly and prevent them from baking too fast and becoming hard.
Hope that helps!
These taste amazing. Hated chopping caramels but you were right. So worth it
Haha yeah the caramels are the most tedious part! If you get the “werthers soft” they are soft enough to tear with your hands (they’ll be stringy but so good!).
Love this recipe! Aside from the tedious chopping it is very simple! No mixer needed, which is a PLUS! They turned out amazing!!
The end result makes all the chopping worth it! So glad that you enjoyed these cookies Rianna.
Thank you for taking the time to leave a review - I appreciate it!