
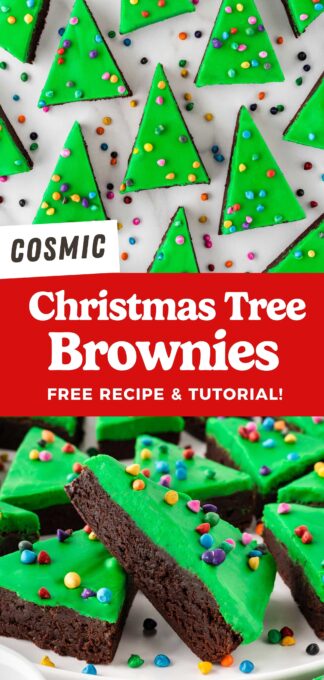
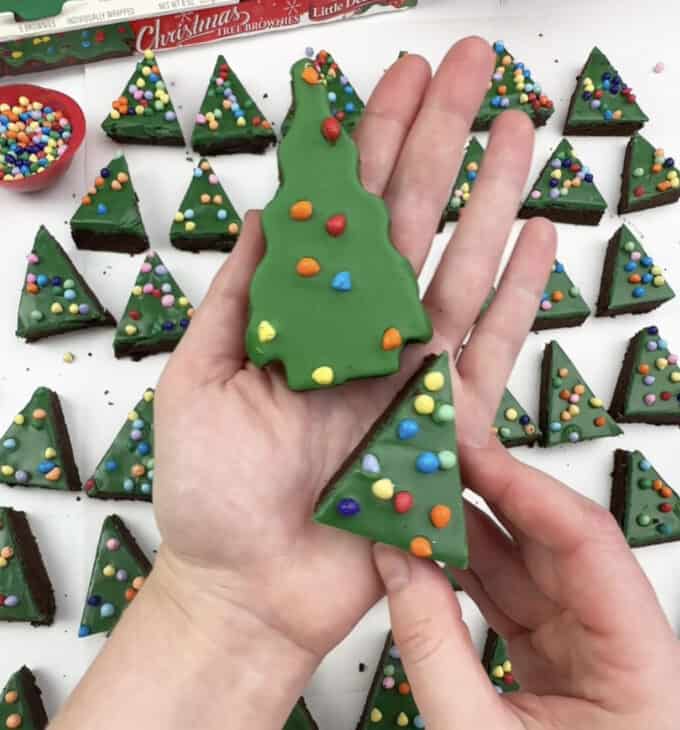
Turn my viral cosmic brownie recipe into these adorable & easy Christmas tree brownies, inspired by the Little Debbie version! Bake in a 9x13 pan and cut in triangles to make the perfect bite-sized brownies that are perfect for holiday dessert platters!
Why I Love These Tree Brownies
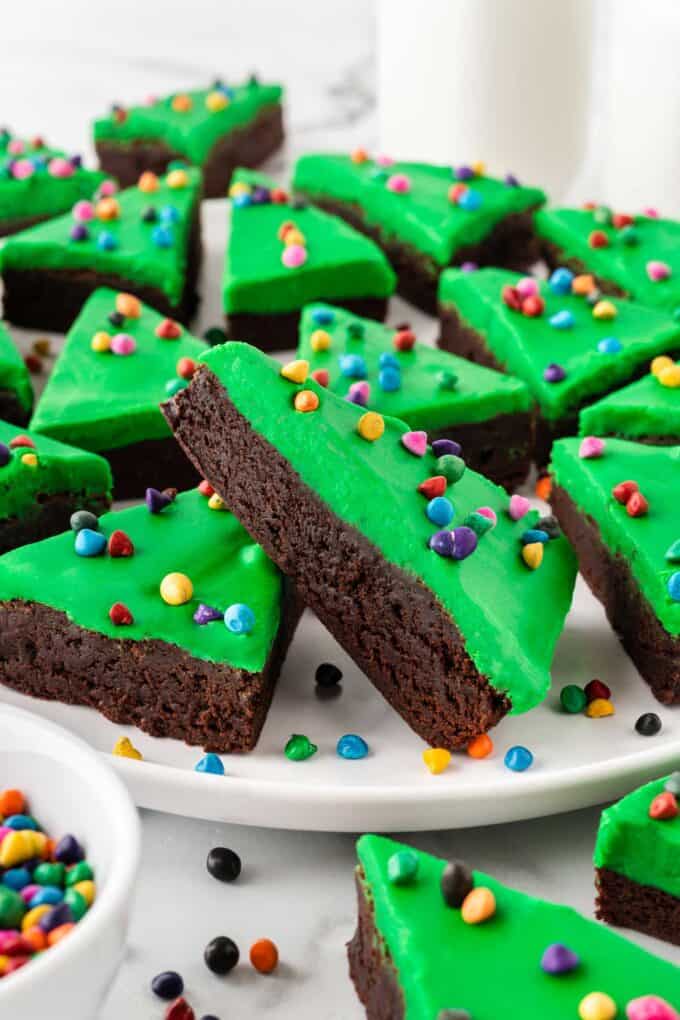
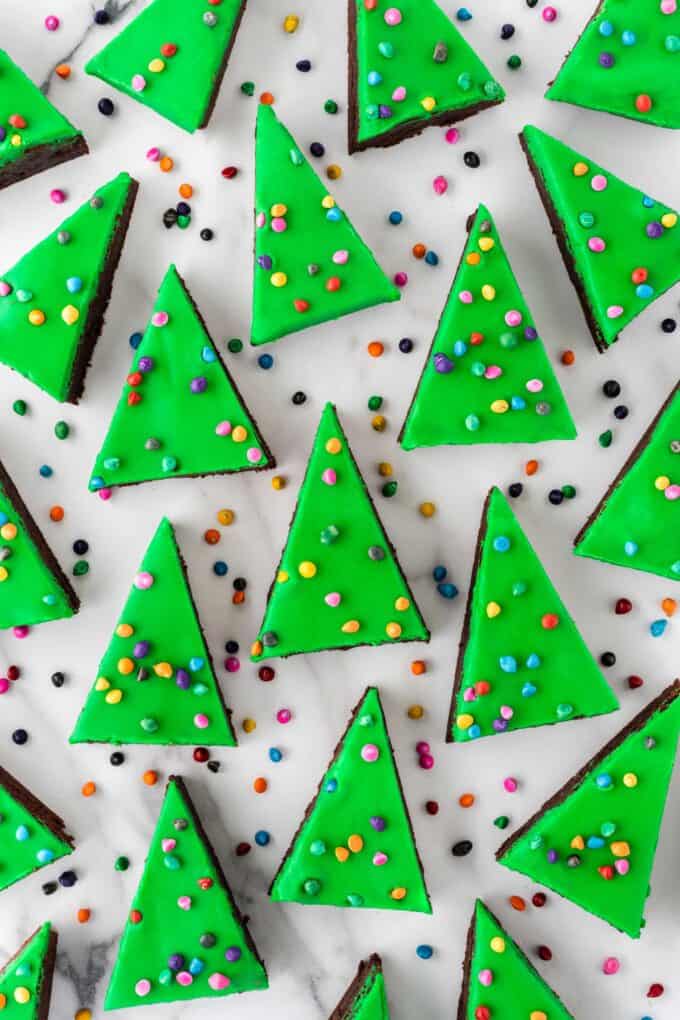
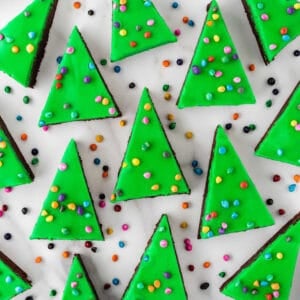
- Fudgy Brownie Base: This is my TikTok viral cosmic brownie recipe that has over 500 five-star reviews…but made to look like the Little Debbie Christmas tree brownies! It's a super rich, fudgy brownie topped with white chocolate ganache (with cute little rainbow chip sprinkles for ornaments!).
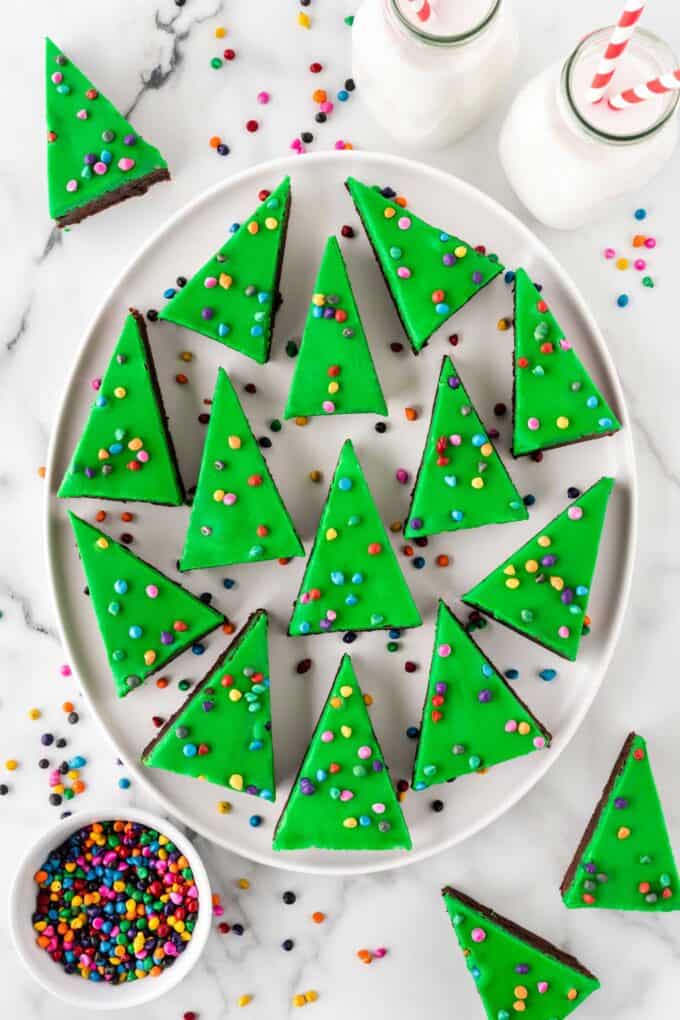
- Easy to cut: Use my photo references below to show you how you can cut a 9x13 pan into 24 brownies! No cookie cutters needed!
- Perfect for holiday platters: Add some variety to your holiday cookie platters with these bite-sized brownie trees!
Ingredient Notes & Tips
For more ingredient notes & tips, read through my original cosmic brownie recipe for a more extensive list!
- Homemade or boxed brownies: While you can use your favorite brownie recipe, my from-scratch recipe for copycat cosmic brownies is below!
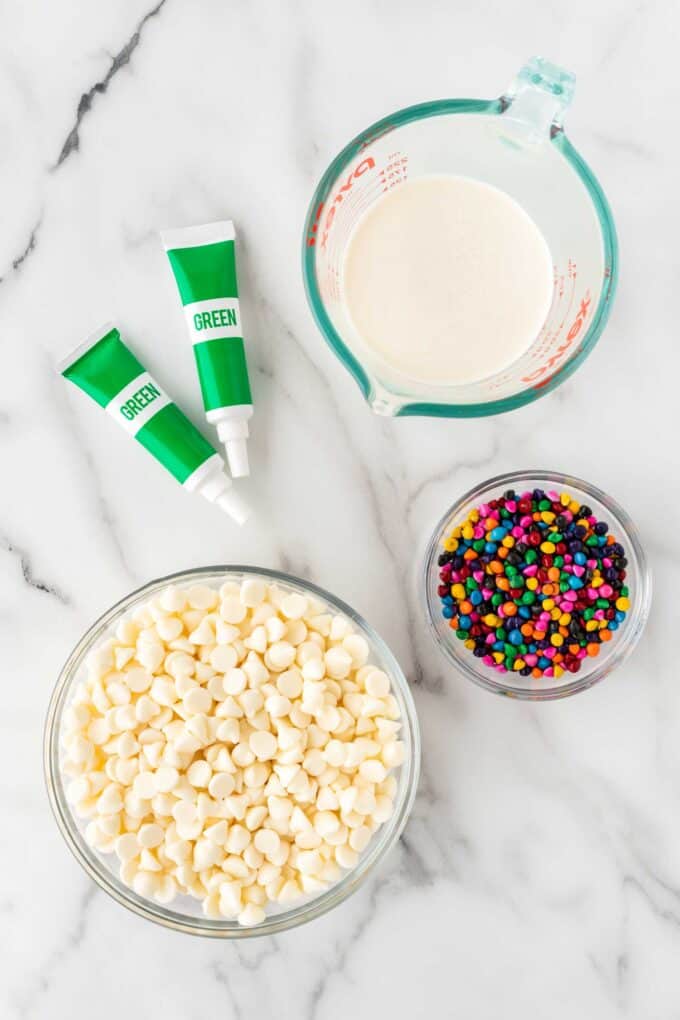
- White chocolate chips: To get the iconic green color, we're using white chocolate chips, heavy cream, and food coloring. Different brands of white chocolate chips can perform differently due to the type of fat content they have. I tested these with both Ghiradelli and Kroger "Private Selection" brands and both taste great and develop a firm ganache. Nestle brand works okay but doesn't firm up as well. If you're making boxed brownies, you can also warm a can of vanilla frosting, add food coloring, then pour it over the brownies.
- Green food coloring: I recommend gel-based food coloring so that you don't have to use a lot to get a dark green color (some liquid-based coloring can make the chocolate seize). You can typically find gel food coloring like Betty Crocker at grocery stores (I found it at Aldi) or Wilton gel coloring on Amazon or at craft stores.
- Rainbow chip sprinkles: I get these on Amazon but you can also typically find them at craft stores. Pillsbury also recently came out with a brownie mix that includes a packet of rainbow chip sprinkles (and is a good cheap option that you can find at most grocery stores!).
Make it gluten-free! Use your favorite gluten-free flour to make these gluten-free! My favorite brand is Bob's Red Mill Gluten Free 1-to-1 Baking Flour.
How to Make Cosmic Brownie Trees:
This is just an overview showing step-by-step photos, jump down to full recipe card with exact instructions.
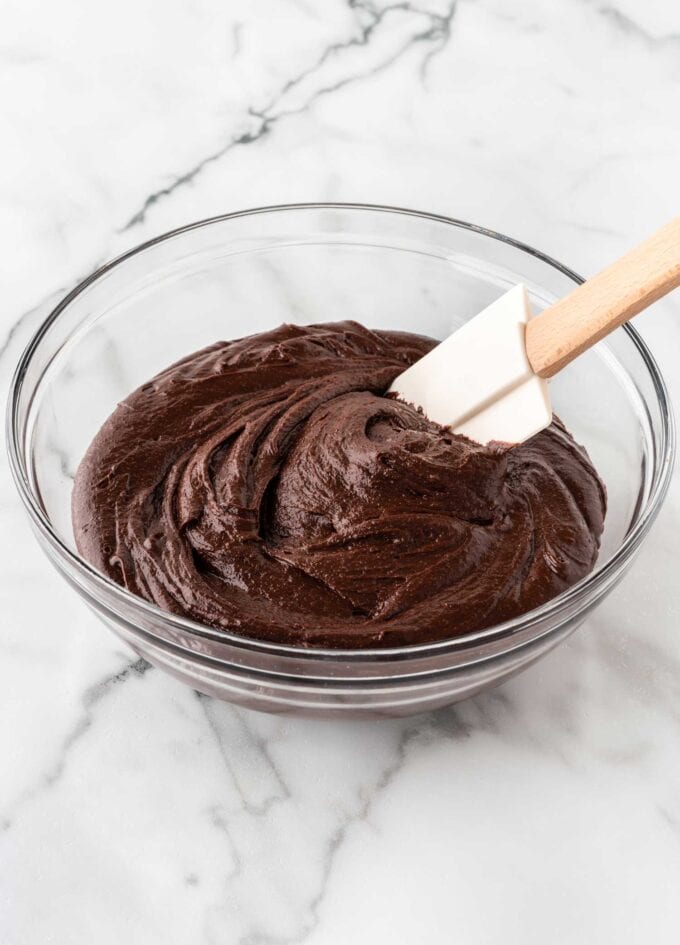
Step 1: Make Brownies
Use the recipe below or simply bake your favorite boxed brownies! I highly recommend both greasing and lining the pan with a parchment paper sling so that you can easily lift them out of the pan for cutting.

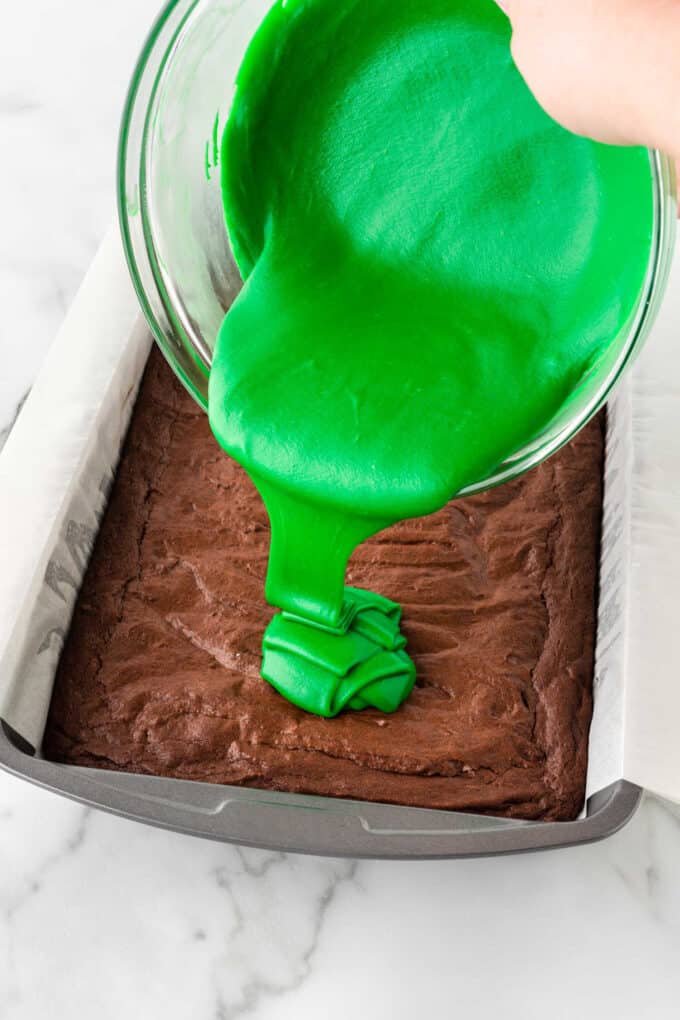
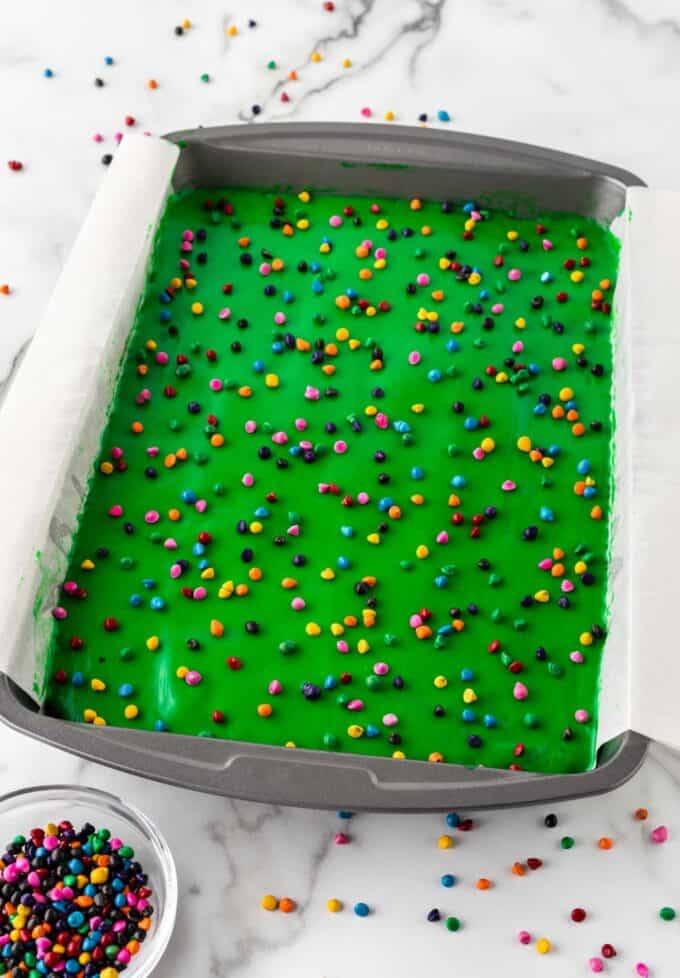
Step 2: Decorate & Refrigerate
Make the white chocolate ganache and use food coloring to dye it green. Pour on top of the brownies, use a spatula to spread, then top with rainbow chip sprinkles. Refrigerate for 1-2 hours or until the ganache is firm.
Want to make a dark green ganache?
The brighter green color shown throughout this blog post was achieved by standard green food coloring gel from the grocery store.
To achieve the iconic dark green color shown in this photo, we used 8 drops Wilton Blue, 7 drops Wilton Yellow, and 2 drops Wilton Black. You can buy the blue & yellow colors individually or all three come in the Wilton Color Right Set.
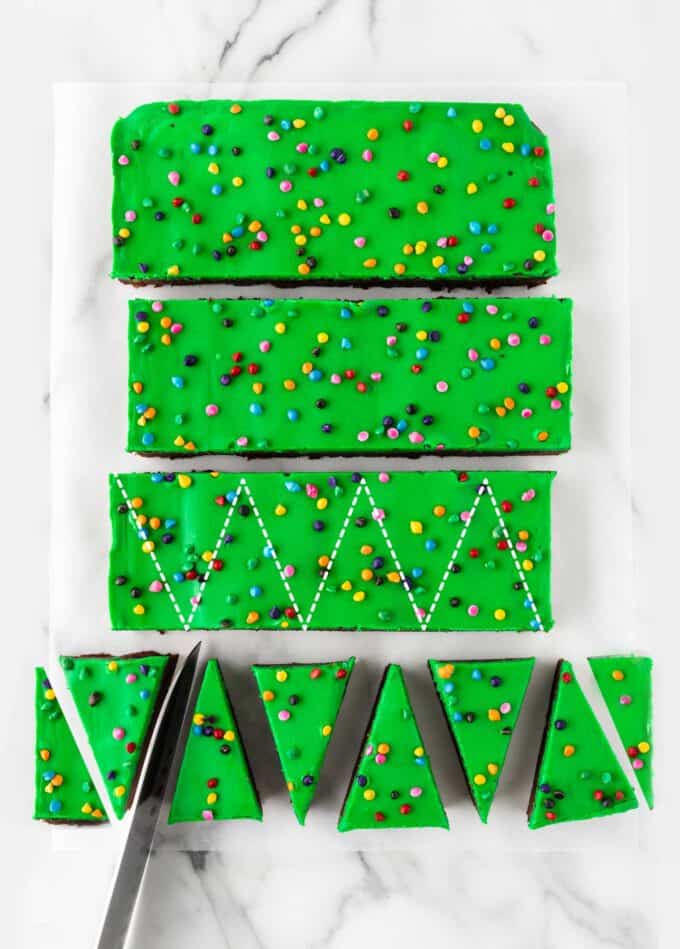
Step 3: Cut into Triangles
Run a knife along the edges of the brownies (that aren't covered with parchment), then carefully lift the brownie slab out of the pan. Use the instructions & photo references below to cut.
- Use a large, straight-edged knife to cut the brownies in half horizontally, then cut each half into half again.
- Starting on the bottom quadrant, use a sharp knife to cut into triangles. To keep clean edges, wipe the knife off on a warm, wet cloth in between each cut (or whenever the ganache is sticking to the knife).
- Continue until all brownies are cut (you should get 24 brownie trees). You can snack on the edge pieces.
Make them mini! I'm making these mini for our 2023 Christmas Series! To do so, cut into 6 sections (versus 4) and then cut as shown in my Instagram video.

Tips & Tricks
- Bake in a light-colored metal pan & be sure not to overbake! It's important not to overbake these brownies (which glass or dark metal pans can do!) to ensure they don't become dry and/or bitter. Check to make sure they are done by inserting a toothpick into the middle or gently shaking the pan to ensure the center is not jiggly. If the toothpick comes out clean, then they are finished baking. If you bake them too long, they won't have the irresistible fudgy texture you want.
- Refrigerate to set the ganache: I tested 11 batches of this ganache to get a perfect consistency (see my notes on brands below) as white chocolate ganache can be more difficult to set. After decorating, allow your brownies to chill in the fridge to help them firm up. Right after you remove it & let it sit out at room temperature, the ganache may seem a bit tacky but will firm up as it comes to room temperature.
- Don't skip the parchment! Lining the pan with a parchment sling will allow you to get these clean cuts; it will be very difficult to cut these in the pan itself.
Storing & Freezing
Storing: Ganache can stay at room temperature for 2 days but I recommend storing in the fridge to be safe. These cosmic brownies also get fudgier on Day 2 after being in the fridge, so I highly recommend keeping them chilled!
Freezing: If you want to freeze, wait to add the ganache until after freezing and thawing. I don't recommend freezing the frosted brownies, as condensation will form on the ganache and it will make the colors of the sprinkles bleed.
Frequently Asked Questions:
I get rainbow chip sprinkles on Amazon but you can also typically find them at craft stores. Pillsbury also recently came out with a "funfetti" brownie mix that includes a packet of rainbow chip sprinkles (and is a good cheap option that you can find at most grocery stores!).
Different brands of white chocolate chips can perform differently due to the type of fat content they have. I tested these with both Ghiradelli and Kroger "Private Selection" brands and both taste great and develop a firm ganache. Nestle brand works okay but doesn't firm up as well.
The tricks are to (a) make sure the ganache is chilled & firm, (b) make sure you use a parchment sling (see photo below) so that you can easily lift the brownies out of the pan for cutting, and (c) wipe your knife off between cuts. The parchment sling will allow you to lift the brownies out and use a large knife and cut across without the pan getting in the way. Wiping the knife off on a warm, wet cloth in between each cut (or whenever the ganache is sticking to the knife) will prevent smearing and crumbs.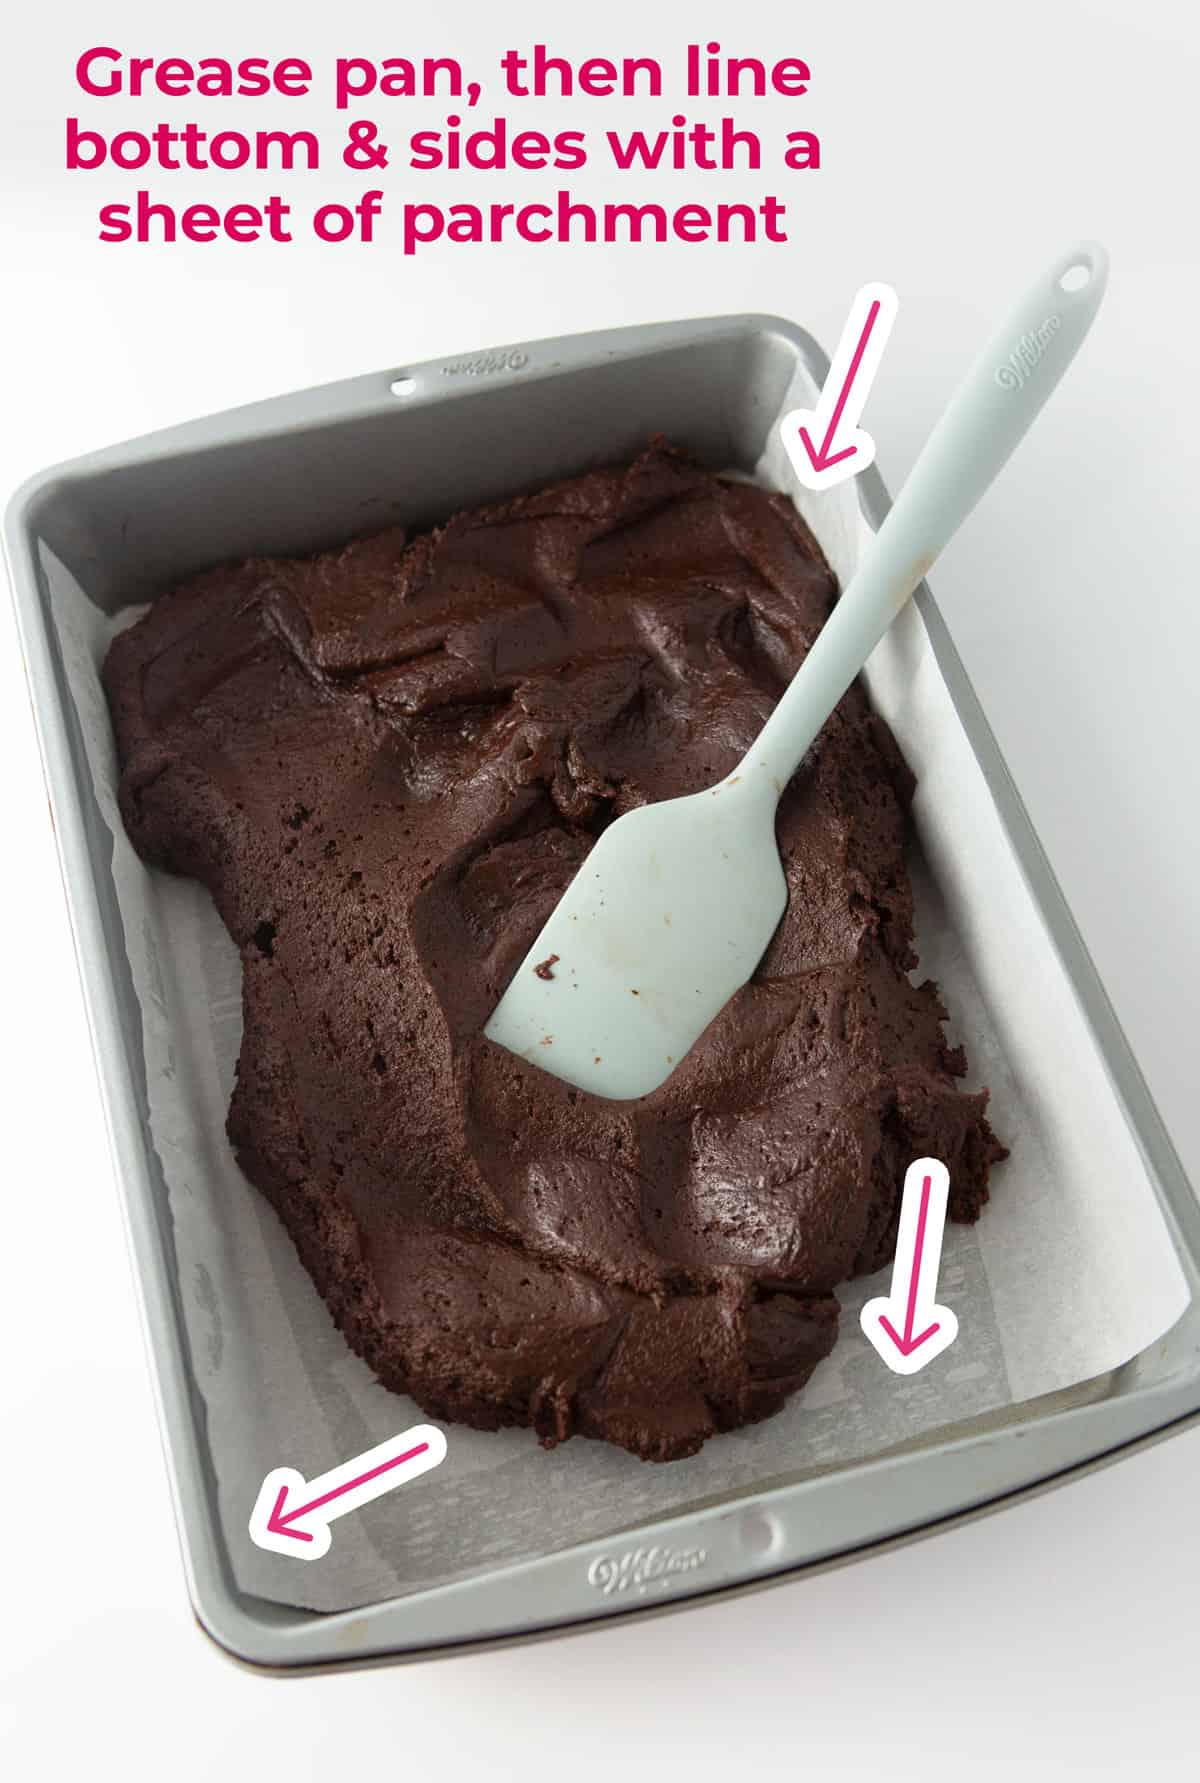
Start by adding white chocolate chips to a glass or heat-proof bowl. Microwave the heavy cream for 1.5 minutes (be sure to place it in a large glass measuring cup or heat-safe bowl so that it has room to expand upwards). Pour the hot cream over the white chocolate chips but don't stir. Allow to sit for about 1 minute, then use a fork to stir; it will be thick and will likely look like it's going to mix together but keep at it for at least 30 seconds. At this point, the mixture will likely be thick and look a little grainy. Microwave in 15-second increments on 50% power, stirring in between each until smooth and pourable (I did four rounds of this).
The brighter green color shown throughout this blog post was achieved by standard green food coloring gel from the grocery store. To achieve the iconic dark green color shown in this photo, we used 8 drops Wilton Blue, 7 drops Wilton Yellow, and 2 drops Wilton Black.
Did you make this recipe? If so, will you do me a huge favor and leave a review and rating letting me know how you liked this recipe? This helps my small business thrive so I can continue providing free recipes and high-quality content for you.
Cosmic Christmas Tree Brownies
Ingredients
⭐️ Before you begin! If you make this, will you do me a huge favor afterwards and leave a review and rating letting me know how you liked this recipe? This helps my small business thrive so I can continue providing free recipes and high-quality content for you.
Instructions
- Before you start, be sure to read through the tips & tricks in the post above for ingredient notes, step-by-step photos, and FAQ's!
- Preheat oven to 350° F.
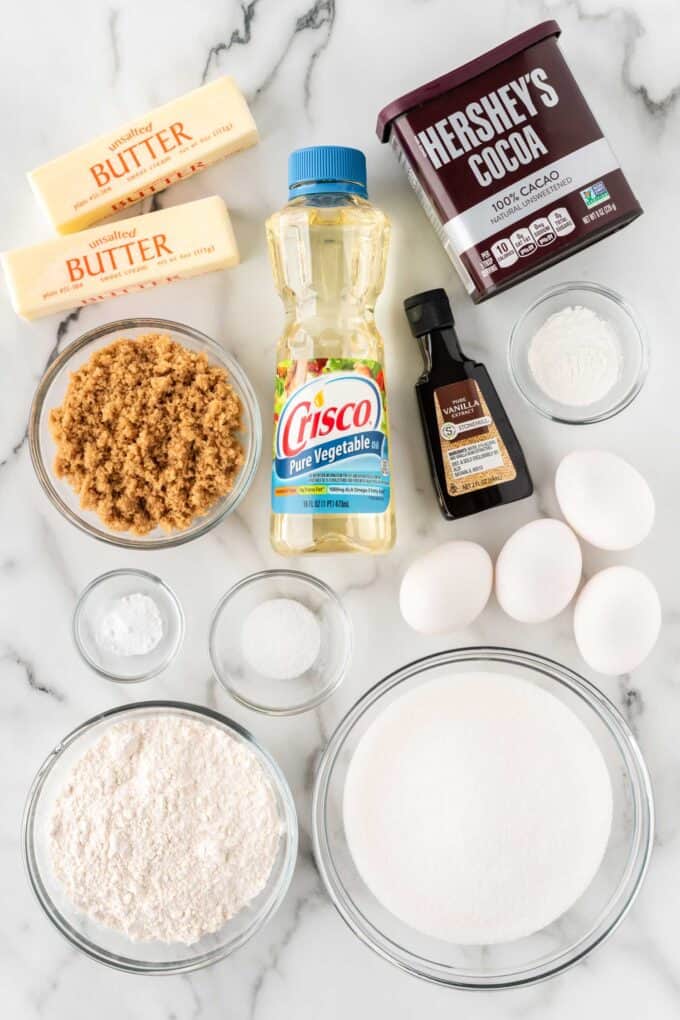
- In a large microwave-safe bowl, add ¾ cup unsalted butter, i.e. 1 ½ sticks), 1 ½ cups granulated sugar, and ½ cup light brown sugar. Microwave for 2 minutes, stir, then micowave for 30 more seconds. Carefully remove bowl from microwave and stir until smooth. Let cool for 2-3 minutes.
- To the butter and sugar mixture, stir in the 3 large eggs + 1 egg yolk, 1 tablespoon vanilla extract, 1 teaspoon salt, ¼ teaspoon baking soda, and 2 tablespoons cornstarch. Once combined, mix in 1 ½ cups Hershey's cocoa powder (100% cacao natural unsweetened) and 1 cup all-purpose flour until just combined (I recommend mixing by hand to prevent overmixing). Stir in ¼ cup vegetable oil.
- Spray a light metal 9x13 pan with nonstick cooking spray, then press on a piece of parchment paper to cover the bottom and long sides to create a parchment sling (photo in faq section above!). This will help you lift the brownies out of the pan so that you can cut them nicely. Spread brownie batter into the prepared pan until smooth.Note: baking these in glass or dark metal pans may cause them to overbake and become bitter. If that's the only pan you have, lining with parchment on all sides becomes more crucial. You will also likely need to bake them for less time to prevent overbaking.
- Bake at 350° F for 24-26 minutes or until center looks set and no longer jiggles when you gently shake the pan (do not overbake). Let cool completely in pan (once the pan is no longer hot to the touch, you can speed up cooling by placing pan in refrigerator.
- In a medium-sized, heat-safe bowl, place 2 cups white chocolate chips (i.e 11 or 12 oz. bag).
- In a separate medium-sized bowl or large liquid measuring cup, heat ⅓ cup + 2 tablespoons heavy cream in the microwave for 1 ½ minutes, or until it begins to bubble (it's important that your measuring cup or bowl is at least 4x taller than the milk line, as it will expand when it's heating and can easily overflow). You can also heat this on the stove; remove it once it begins to steam.
- Use a hot pad to carefully remove milk from the microwave and pour over the white chocolate chips (do not stir yet!). Use a fork to press down the chips so that they're fully covered with the cream.Allow to sit for about 1 minute, then use a fork to stir; it will be thick and will likely look like it's going to mix together but keep at it for at least 30 seconds. At this point, the mixture will likely be thick and look a little grainy. Microwave in 15-second increments on 50% power, stirring in between each until smooth and pourable (I did four rounds of this). Stir in green food coloring, then pour over cooled brownies and spread until smooth. Tap the pan on the counter to help smooth out any bumps.
- Immediately top with rainbow chip sprinkles (or any other sprinkles you have!). Place in refrigerator for 1-2 hours to help the ganache harden (you can speed this up by putting in the freezer!).Use a large knife to slice bars into trees, as shown in the photo instructions in the blog post above. I highly recommend that your bars are chilled before slicing to ensure a clean cut.
- Storage: I recommend refrigerate the frosted bars, as they get even better & fudgier on Day 2! You can also keep them at room temperature for up to 2 days, if desired.
Notes from Melissa

Did you make this?
I'd LOVE to hear your thoughts! Leave a review & photo of your creation and be sure to mention @DesignEatRepeat or tag #DesignEatRepeat on Instagram!More fun ideas...
How do you doctor up a brownie mix for Christmas??
If you don't want to make this cosmic brownie version, here are a few other Christmas brownie ideas!
- Boxed Mixed: Use a boxed mix and then pour on warm canned frosting (dyed green) to make an easy version of these! I love Ghiradelli Triple Chocolate boxed mix and then I use 2 boxes for a nice & thick 9x13 pan.
- Sprinkles: Add some Christmas jimmies on top of the brownie batter so that they are baked into the top (and you don't need to add any frosting!). This is a super easy way to make holiday brownies! You can also decorate like I did above but use rainbow nonpareil sprinkles as the ornaments!
- Bake in a round pan: If you don't have a 9x13 pan, you could bake two 8x8" round pans and then cut them into slices (they'll be bigger triangles that look like brownie trees!). Just bake for a little less time since the brownies will be thinner.
I made these for a work holiday treat exchange - everyone loved them!
So glad to hear everyone loved this recipe! Thank you so much for leaving a review, Brianna! I really appreciate it!
Super easy to follow, with super yummy results!!! I’m not a professional baker by any means but these turned out wonderful! My best friend has to eat GF so I just substituted the AP flour for GF AP flour, and the texture and taste was still spot on!!! Will definitely be making these again!
I'm so glad to hear these turned out even with the GF flour! Thank you so much for leaving a review, Emilie! I really appreciate it!
SO GOOD!!! I picked these as the December challenge bc my sister loved the brownies so much!! Only downfall is that I made the ganache too runny!! But still delicious! 😋
Thank you so much for leaving a review, Camille! I'm so glad you enjoyed this recipe!
These brownies were so good! I normally don't like Little Debbie's treats, but these were genuinely so delicious :) I made these as part of the baking challenge and thanks to the instructions, they actually turned out so pretty! (Unlike most of what I make lol)
These were wonderful! I actually don't even like Little Debbie's treats, but these are genuinely so delicious :) I made these as part of the baking challenge, and they turned out so pretty (unlike most things I make) thanks to the instructions!
These were wonderful! I actually don't even like Little Debbie's treats, but these are genuinely so delicious :) I made these as part of the baking challenge, and they turned out so pretty (unlike most things I make) thanks to the instructions!
Yay, I'm so glad you decided to try this recipe out and you enjoyed them! Thank you so much for leaving a review and for participating in the monthly baking challenge, Nico!
I made them tonight and WO they are amazing! I didn’t get the green right, but there’s always next time!
I am so glad to hear you loved the recipe, Melanie! Thank you so much for leaving a review!
Amazed at how perfect the brownie texture is!! It truly is just like cosmic brownies!!
I'm so happy you loved this recipe, Tori! Thank you so much for leaving a review!
I made these as part of the Baking Challenge and not only are they delicious, but they are the cutest addition to my cookie trays! I like to add something colorful and new each year and these are perfect! I added a pretzel stick to make a tree truck as well!
I am so glad you loved this recipe, Adrienne! Thank you so much for leaving a review and for participating in the monthly baking challenge!
Curious since I bake a lot during the holidays, how far can I make these in advance if I refridgerate them?
These stay moist pretty long, I’d say you could make them up to 4 days ahead!
These are adorable and pretty simple! I’d likely stick to the Ghirardelli mix I usually use for brownies. Not much compares! I used almond bark instead of white chocolate for the ganache (because it’s what I had) and it worked no problem!
I would leave 19 starts if I could. These are dangerously delicious!
Make sure you read the recipe and directions all the way through!
Ahh, I'm so glad you loved this recipe, Steph! Thank you so much for taking the time to leave a review!
My mom been looking everywhere for the Little Debbie Trees cause they're her favorite to have round this time of year. Idk what's going on, but we haven't found them so I made these as a surprise. I hope she like them.
OMG these are awesome!!! So rich and chocolatey. It was also my first time making ganache successfully following your easy and thorough directions. I can’t wait to eat more of these at my holiday party tomorrow! Thank you for an awesome recipe.
I really appreciate you trying out my recipes and leaving so many reviews, Elizabeth! It means a lot! :)
So cute and tasty! I made these for a christmas brunch and everyone loved these! This is such a great idea and recipe, so happy I found this! :)
That's awesome to hear everyone enjoyed this recipe! Thank you so much for taking the time to leave a review, Sabrina!
I made these yesterday and the recipe was so easy to follow and they turned out perfect! So cute for the holiday. Thank you!!
I'm so happy to hear you enjoyed this recipe, Chloe! Thank you so much for taking the time to leave a review!