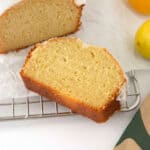
Copycat Starbucks Lemon Loaf
The BEST moist, tender, buttery, lemon bread made in one bowl, no mixer required! After months of testing, I finally mastered the Starbucks lemon loaf recipe!
Servings 8 thick slices
Calories 308kcal
Ingredients
- ½ cup unsalted butter (1 stick) softened
- 1 cup granulated sugar
- 1 tablespoon lemon extract, to taste tablespoon, not teaspoon! See notes below.
- ½ tablespoon lemon zest (about 1 large lemon) optional but recommended for a more citrusy flavor.
- 2 teaspoons vanilla extract
- 2 large eggs
- ½ teaspoon salt
- 1 teaspoon baking powder not baking soda!
- 1 ¼ cups all-purpose flour
- 2 tablespoons cornstarch
- ¼ cup milk whole milk is best but 1-2% will work
- ¼ cup vegetable oil
Lemon Glaze
- 1 tablespoon unsalted butter softened
- 1 cup powdered sugar
- 1 tablespoon fresh lemon juice
- 1 tablespoon milk or heavy cream
- ⅛ teaspoon salt
Instructions
- For best success, be sure to read the tips & tricks in the blog post above! I recommend mixing this by hand with a spatula, not an electric mixer.
- In a medium-sized mixing bowl, mix together softened unsalted butter (½ cup, i.e. 1 stick), granulated sugar (1 cup), lemon extract (1 tablespoon), and fresh lemon zest (½ tablespoon, optional) until smooth and no more butter chunks remain. This will infuse the butter and sugar with the lemon flavor.If your butter isn't incorporating easily, it's too cold. You can pop the bowl in the microwave in 5-second increments until it's easy to stir.
- Add vanilla extract (2 teaspoons), eggs (2 large), baking powder (1 teaspoon), and salt (½ teaspoon), then mix until incorporated.
- Add all-purpose flour (1 ¼ cups) and cornstarch (2 tablespoons), then mix until just combined. Lastly, add milk (¼ cup) and vegetable oil (¼ cup) and stir until combined.
- Grease an 8×4″ light-metal loaf pan and line with parchment paper. Pour batter into pan, then gently tap against the counter to release any air bubbles.
- Read these baking instructions carefully! Bake at 350°F for 60 minutes total, but when there are 15 minutes left, tent a piece of foil on top to prevent the top from overbrowning. This will allow the inside to finish baking without overbaking the top.* Because ovens bake differently, use a toothpick or skewer to check for doneness around 45 minutes. If you're using a dark metal pan, you will want to check for brownness earlier around the 30 minute mark. You will also likely not need to bake for the full 60 minutes.
- Allow the loaf to FULLY cool before adding glaze.
Glaze:
- In a small bowl, mix together softened unsalted butter (1 tablespoon), powdered sugar (1 cup), salt (⅛ teaspoon), fresh lemon juice (1 tablespoon), and milk or heavy cream (1 tablespoon). If your glaze is too thick to pour, add a bit more milk.
- Stir until smooth, then pour over the cooled loaf. To prevent it from pooling on the sides, I sometimes like to pour half on at once, allow it to set, then add the second half.
- After allowing the glaze to fully set, cut into thick slices and enjoy!
Notes
Lemon extract: Depending on how strong of lemon flavor you like, you can use 1-2 tablespoons of lemon extract. Some brands of lemon extract taste stronger and more like alcohol than others, therefore you may want to use 1 tablespoon the first time you make this and then decide if it's strong enough for your liking.
I tested this recipe using Kroger brand and thought the flavor matched the Starbucks lemon loaf well. However, I also tested this with the more expensive Nielsen Massey lemon extract and 2 tablespoons was too strong with that brand (partly because that brand is more potent and has more of an alcohol/Pine Sol lemon flavor, in my opinion).
All that said, flavor this to taste based on your experience with the brand of extract you're using and how strong of lemon flavor you like. I know 1-2 tablespoons sounds like a lot but a lot of the flavor will bake out in the oven. With 1 tablespoon of Kroger brand, the bread itself (without the glaze) has a very subtle flavor but the glaze will add a good lemon punch.
If you omit the lemon extract entirely, use 2 tablespoons fresh lemon zest. The flavor will be more subtle but it will work.
Lemon zest: The lemon zest is optional (but encouraged!), as I know not everyone has a zester at home. If you don't have one, you can use this DIY method using a vegetable peeler.
Nutrition
Calories: 308kcal | Carbohydrates: 43g | Protein: 2g | Fat: 15g | Saturated Fat: 9g | Polyunsaturated Fat: 1g | Monounsaturated Fat: 4g | Trans Fat: 1g | Cholesterol: 96mg | Sodium: 205mg | Potassium: 91mg | Fiber: 1g | Sugar: 40g | Vitamin A: 500IU | Vitamin C: 1mg | Calcium: 47mg | Iron: 1mg