• Skip to primary navigation
  • Skip to header navigation
  • Skip to main content
  • Skip to primary sidebar
  • Skip to footer
  • My Craft Room
  • FAQ
  • Work with Me
  • Contact
  • Homemade Cookie Cakes

Design Eat Repeat

Food Crafting, Free Printables, Recipes, Paper Crafting, Graphic Design and more!

Display Search Bar
  • Printables
  • Recipes
  • Food Crafts
  • Party Themes
  • Holiday Ideas
  • About
  • Blog View

Frosted Animal Cookie Wafers

Share
Comments 29
Last Updated:September 8, 2021Published:January 9, 2015
This Post May Contain Affiliate Links
Jump to RecipeRate this Recipe

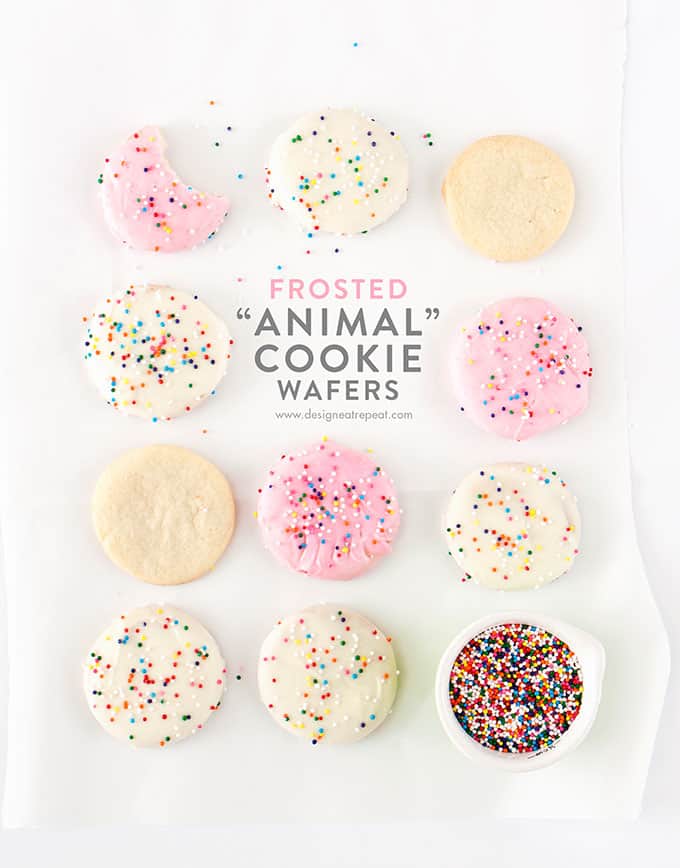
Recreate a childhood favorite with these Homemade Frosted Animal Cookie Wafers! These adorable treats use a sugar cookie base & almond bark for dipping!

Homemade Frosted Animal Cookie Wafers!

The amount of time I spent thinking about the title of this post is ridiculous. Do I call them frosted animal cookies even though they aren’t technically animal shaped or do I leave it out and risk the nostalgic connection between these sweet treats getting lost? Oh the struggles that come along with blogging. But after much debate, I decided that it doesn’t really matter what shape they’re in…pink & white cookies with sprinkles will forever be called animal cookies in my sprinkle-lovin’ mind.

Recreate a childhood favorite with these Frosted Animal Cookie Wafers!

These cookies use a sugar cookie base recipe similar to my favorite one, but are rolled thinner than I typically make them to allow them to have more of a crunch. You can use a 1.5″ cookie cutter (or lid of a spice jar to cut them out) so they are sized about 1.5 inches round. The other trick to making them have a crunch is to bake them longer than you might otherwise do.

What You Need to Make Frosted Animal Cookie Wafers

Sugar cookie dough (recipe below), white almond bark, food coloring, sprinkles, wax paper, and a rolling pin.

Recreate a childhood favorite with these Frosted Animal Cookie Wafers! Uses a sugar cookie base & almond bark for dipping!

How to Make Frosted Animal Cookie Wafers

Step 1: Make & Roll Sugar Cookie Dough

Use the recipe below to make a soft sugar cookie dough. On a floured surface, use a rolling pin to roll the dough out to 1/4 inch thickness. The thinner you go, the faster they will bake & the crispier they will be.

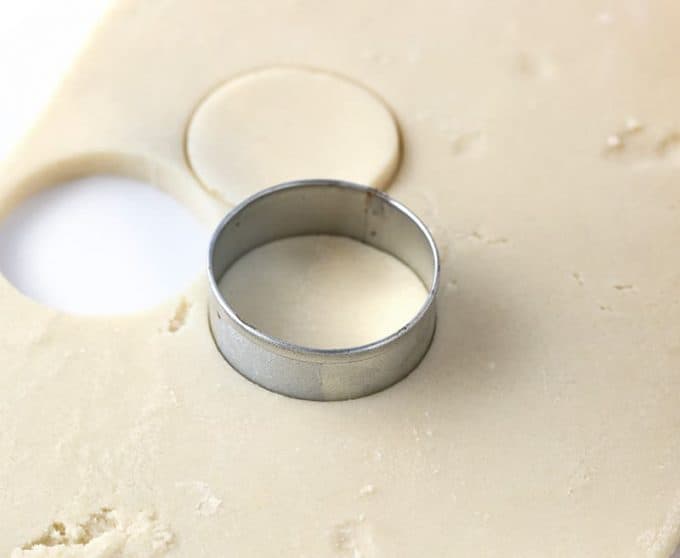
Step 2: Cut into circles

Cut 1.5-2 inch circles out with cookie cutter, lid of spice jar, or shot glass and place the cookies on a parchment-covered cookie sheet.

Step 3: Bake

Bake at 375 degrees for 7-10 minutes or until the edges are lightly browned. After about 6 minutes, check the cookies each minute to check the brownness and take out as soon as the edges are lightly browned. They will continue to bake on the hot cookie sheet after it comes out of the oven, so I take them out right when they are starting to brown. Cool cookies completely before dipping.

Tip: While I typically take sugar cookies out immediately after seeing the edges start to lightly brown, but with these, I left them in an extra minute or two until the brown edges were more prominent. If you want them to be soft, you can take them out before the edges turn brown – but just know that you may have more trouble dipping them if they’re on the softer side.

Frosted Animal Cookie Wafers!

Step 4: Cover in Almond Bark

To dip, follow the instructions on the package to melt almond bark in a glass bowl. Once melted, add in food coloring (check out my tip for achieving the perfect pink shade!) and mix until color is smooth. I like to add a few tiny drops of vegetable oil or a teaspoon of coconut oil to the melted almond bark to prevent it from hardening so quickly.

Using a fork, carefully dip each cookie into the bark and tap excess bark off the cookie before setting it on the parchment paper. After set on the parchment, top with sprinkles and allow to full harden before enjoying!

Tip: If you are doing this by yourself, I recommend melting one bowl at a time (i.e. do all the pinks, then do all the whites). Otherwise, if you melt both the pink & white bowls at the same time – you may find that one will start to harden before you are finished dipping the other one.

Recreate a childhood favorite with these Frosted Animal Cookie Wafers by Design Eat Repeat!

Step 5: Gift

For a fun cookie gift idea, pop these in a plastic bag and top with a printable cookie tag!

Frosted Animal Cookie Wafers

Recreate a childhood favorite with these Homemade Frosted Animal Cookie Wafers! Uses a sugar cookie base & almond bark for dipping!

Author: Melissa Rose
Prep Time: 10 minutes
Cook Time: 10 minutes
Total Time: 20 minutes
Course: Dessert
Category: Cookies
Servings: 48 cookies
Print this Recipe
5 from 1 vote
Did you make this recipe?
Leave us a review

Ingredients

  • 1 cup butter
  • 1/4 cup sugar
  • 1 1/4 cup powdered sugar
  • 1 egg yolk
  • 1 1/2 teaspoon vanilla extract
  • 1/2 teaspoon almond extract
  • 1/8 teaspoon salt
  • 2 cups all-purpose flour
  • 1 package white almond bark
  • Food Coloring
  • Sprinkles

Before you begin! If you make this, will you do me a huge favor and leave a review and rating letting me know how you liked this recipe? This helps my small business thrive so I can continue providing free recipes and high-quality content for you.

Instructions

  1. Cream the butter, sugar, and powdered sugar together with an electric mixer. Once mixed, add the egg yolk, vanilla, almond extract, and salt and continue to stir on medium speed. Once incorporated, turn the mixer down to low speed and add the flour in one cup portions. When the flour disappears, turn off the mixer and transfer the dough onto a floured surface. Knead the dough until it forms a solid ball. If dough is sticky, add additional flour while kneading (do not be afraid to add 1/4-1/2 cup more flour while kneading if sticky).
  2. Next, on a floured surface, use a rolling pin to roll the dough out to 1/4 inch thickness. The thinner you go, the faster they will bake & the crispier they will be. Cut 1.5-2 inch circles out with cookie cutter or shot glass and place the cookies on a parchment-covered cookie sheet.
  3. Bake at 375 degrees for 7-10 minutes or until the edges are lightly browned. After about 6 minutes, check the cookies each minute to check the brownness and take out as soon as the edges are lightly browned. They will continue to bake on the hot cookie sheet after it comes out of the oven, so I take them out right when they are starting to brown. Cool cookies completely before dipping.
  4. To dip, follow the instructions on the package to melt almond bark in a glass bowl. Once melted, add in food coloring and mix until color is smooth. (Like I mentioned above, I also like to add a few tiny drops of vegetable oil to the melted almond bark to prevent it from hardening so quickly.) Using a fork, carefully dip each cookie into the bark and tap excess bark off the cookie before setting it on the parchment paper. After set on the parchment, top with sprinkles and allow to full harden before enjoying!

Last Step! Please leave a review and rating letting me know how you liked this recipe! This helps my small business thrive so I can continue providing free recipes and high-quality content for you.

Nutrition

Calories: 138kcal
Fat: 7g
Saturated fat: 5g
Cholesterol: 14mg
Sodium: 43mg
Potassium: 6mg
Carbohydrates: 16g
Sugar: 12g
Vitamin A: 125%
Calcium: 2%
Iron: 0.3%
Did you make this?
Tag me on Instagram @designeatrepeat or leave a comment below to let me know how it turned out! I love seeing what you’ve made.
  • Chocolate Cosmic Cookies
  • Candy Button Cookie Sticks
  • Chilled Pink Sugar Cookies
Previous Post
Turn Ice Cream Bars into Easy Valentine’s Day Treats!
Next Post
How to Make A Mini Popsicle Cheese Tray

Reader Interactions

29 Comments

  1. Julie says

    02/03/2017 at 2:07 pm

    These are adorable!

    Reply
  2. Jolena @ TheRubyKitchen says

    02/10/2016 at 7:13 pm

    I love frosted animal cookies and adore the simplicity of these!

    Reply
  3. Kate says

    01/14/2016 at 12:53 pm

    I love your food styling! Your photos are so fun!

    Reply
    • Melissa says

      01/17/2016 at 9:19 pm

      Thank you so much, Kate!

      Reply
  4. Erkka R.e says

    01/31/2015 at 7:07 am

    I love this recipe! I homeschool three of my four kids, and will use this as a lesson in baking. They love the store-bought version, but I prefer anything homemade hands down (I hate feeding them chemicals in processed foods!). The only suggestion I have is rolling out the dough sandwiched between two layers of parchment paper before using cookie cutters on the dough. I usually make the call on adding flour on the parchment paper wether the dough seems extra sticky or not. Sometimes just to be safe I still add flour! Clean-up is suer easy, just fold up the used parchement paper and toss in the trash! Thank you for this recipe, it sounds awesome!

    Reply
    • Melissa says

      01/31/2015 at 11:35 am

      Hi Errka! The parchment sounds like a great tip, thanks for sharing! Be sure to report back how you & your kiddos like these!

      Reply
    • CatieBaker says

      02/02/2015 at 6:01 pm

      Errke,

      I always did the same thing! (Great minds and all that :) )

      I’m not sure how you solved the problem of the bottom parchment moving around. But I found that moistening the bottom wasn’t my best answer, but I did find that using some painting tape, or
      design tape, I would tape down the four sides and it never moved after putting the the cookie dough or pastry dough on it. With one particularly troublesome dough, I loosely taped a larger top sheet, and it worked like a charm. I just rolled up the parchment, as tape comes off so easily and taped the parchment closed, so no flour or any crumbs fell out.

      Isn’t it amazing what we humble Baker’s can come up with when facing problems in the kitchen?

      Hate to be the single vote for plain animal cookies, but my favorites were the Barnum circus car box cookies shaped like little animals.
      It’s all good! And delicious.

      Melissa, it was a delightful surprise to accidentally find your blog page. It’s hard work I know, as a designer myself, and this is just awesome, thanks for sharing all of this with all of us! :)

      Reply
      • Melissa says

        02/02/2015 at 10:47 pm

        Thanks so much for sharing your tips, Catie! I love the idea of using painting tape to keep the parchment down. I always wondered what kind of tape would work (without melting or setting the whole place on fire), so I’m glad to hear painters tape works. I’m totally trying that next time! Thanks so much for stopping by and for your sweet words. I look forward to keeping in touch!

        Reply
« Older Comments

Leave a Comment Cancel reply

Recipe Rating


Primary Sidebar

Welcome

I’m Melissa - a Graphic Designer & Paper Crafter creating easy-to-assemble printables, party DIY's, and food crafts for family fun.
Read More...

Freebies Delivered

Free Baking e-club

Trending Now

Fudgy Cosmic Brownie Cookies

Fudgy Cosmic Brownie Cookies

Cosmic Christmas Tree Brownies

Cosmic Christmas Tree Brownies

Copycat Starbucks Lemon Loaf

Copycat Starbucks Lemon Loaf

12 EASY Circle Christmas Cookies

12 EASY Circle Christmas Cookies

Christmas Cookie Frosting

Christmas Cookie Frosting

The Ultimate Moist Banana Bread

The Ultimate Moist Banana Bread

Favorites

Chewy M&M Cookie Cake

Chewy M&M Cookie Cake

The Ultimate Moist Banana Bread

The Ultimate Moist Banana Bread

Quick 1 Hour Cinnamon Rolls

Quick 1 Hour Cinnamon Rolls

Homemade Cookie Cake Recipe

Homemade Cookie Cake Recipe

Copycat Panera Chocolate Chip Cookies

Copycat Panera Chocolate Chip Cookies

The Best White Wedding Cupcakes

The Best White Wedding Cupcakes

Trending Recipes

The Ultimate Moist Banana Bread

The Ultimate Moist Banana Bread

Quick 1 Hour Cinnamon Rolls

Quick 1 Hour Cinnamon Rolls

Homemade Cookie Cake Recipe

Homemade Cookie Cake Recipe

Homemade Cheese Crackers

Homemade Cheese Crackers

Free Monthly Baking Challenge
Join Now!
Back to Top

Footer

Melissa is a graphic designer & craft stylist living in the Midwest, specializing in easy food and paper crafts for holidays, parties, and everyday.
Read More
  • Contact
  • Image Usage Policy
  • Privacy Policy
  • Disclaimer
  • Terms
  • Contact
  • About
  • Free Printables
  • Work with Me
Copyright © 2023 Design Eat Repeat Site Credits Designed by Me Developed by Once Coupled